
Baking recipes
Scroll through our posts below to try all sorts of delicious baking recipes from our instagram baking videos. New baking videos are posted the first week of each month on Instagram and Facebook.
To easily find one of our recipes type below:
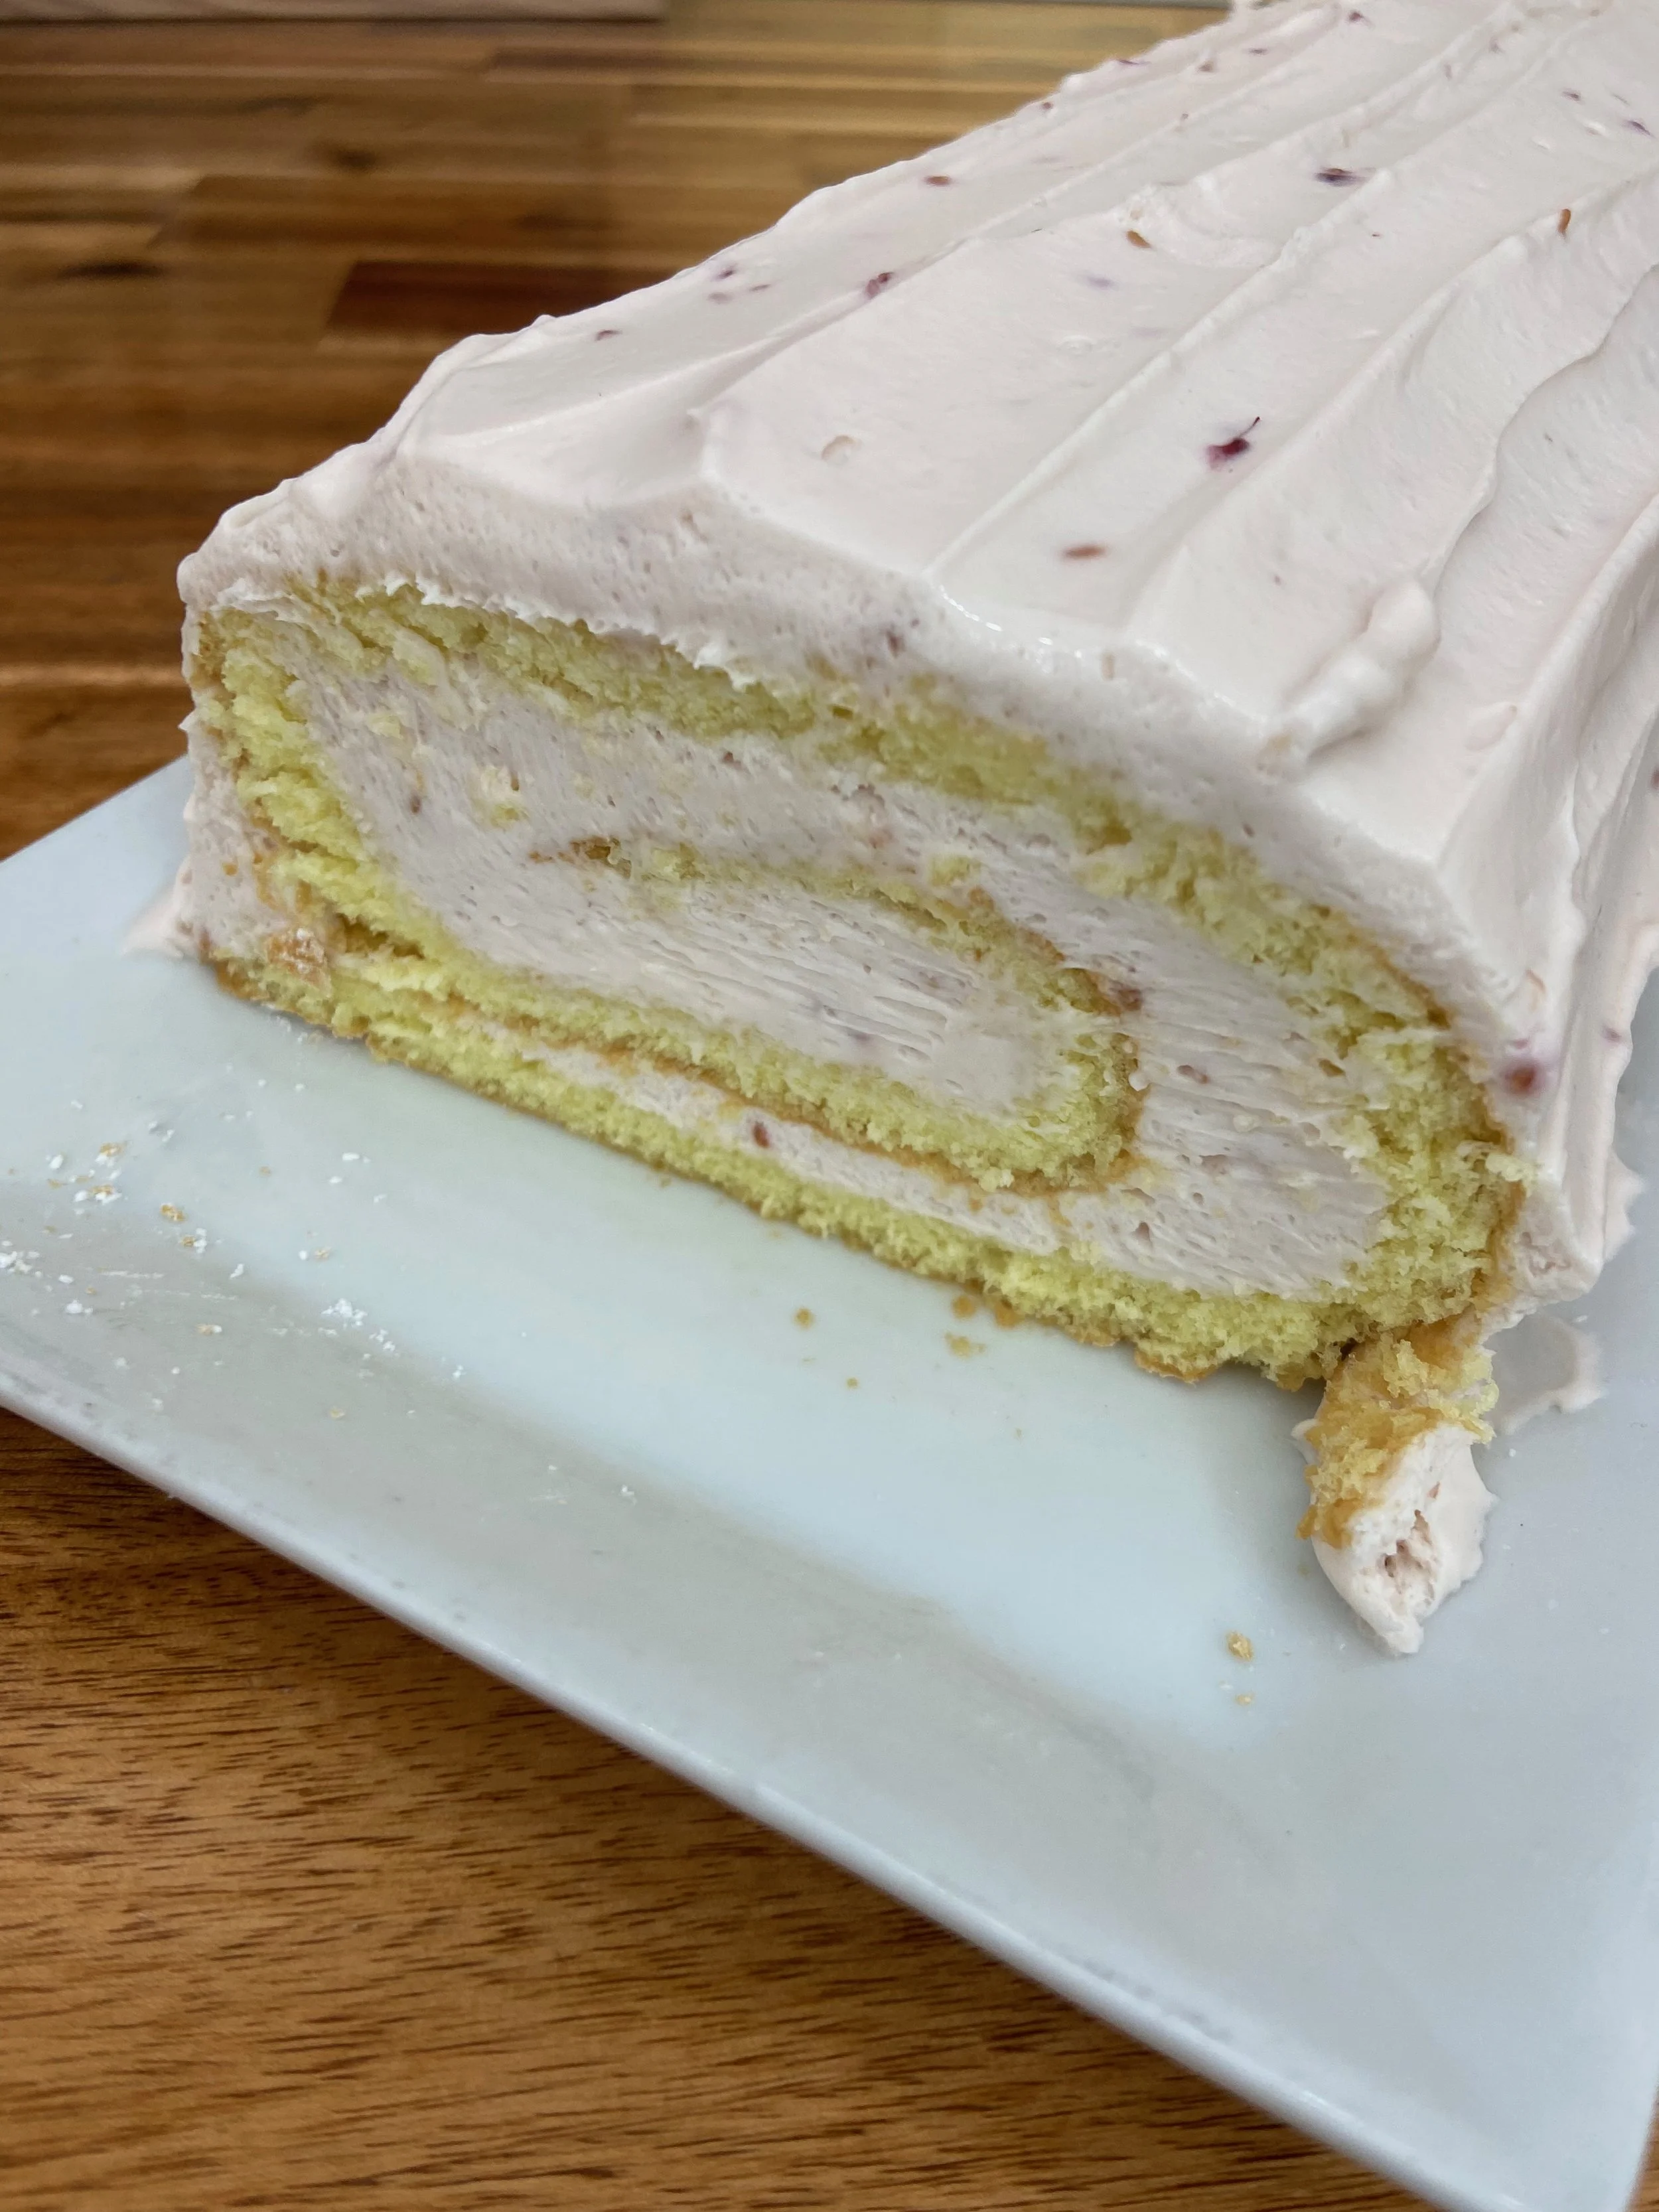
Lemon Raspberry Roll Cake!
YeeHAW! Stampede is back and so are my cooking demos at the kitchen theatre! This year we made a lemon raspberry roll cake with a light lemon sponge and smooth raspberry cream cheese filling. It’s delightful!
Ingredients:
Cake:
5 egg yolks
2 Tablespoons Oil
3 Tablespoons Milk
1 teaspoon vanilla extract
1 teaspoon lemon extract, or zest of 1 lemon
2 drops yellow dye (optional)
1 cup of sugar (divide into 2 parts)
4 egg whites
3/4 cup flour
2 Tablespoons Cornstarch
1 teaspoon Baking Powder
1/4 teaspoon salt
Filling:
454g Cream cheese (2 x 8oz logs)
1 cup sugar
pinch salt
3 Tablespoons Raspberry Jam
1 1/2 cups Whipping Cream
Cake:
Preheat oven to 350*F and grease and line a half sheet pan with parchment. Grease parchment as well.
With electric mixer, whisk yolks, oil, milk, vanilla, lemon extract, yellow dye and half of the sugar. Whip until light and fluffy.
In a separate bowl, whisk egg whites and remaining sugar until stiff peaks form.
Combine remaining dry ingredients in a bowl.
Sift dry ingredients into yolk mixture and gently fold in.
Fold approximately 1/3 of egg whites into the yolk mixture.
Fold in remaining egg whites gently.
Spread into the greased half sheet pan and bake for 15-20 minutes until golden brown and firm feeling.
When cake comes out of the oven, run a knife around the edges to loosen, and flip onto a clean tea towel that is sprinkled heavily with icing sugar.
Peel off parchment paper carefully.
Using tea towel roll the cake up into a log and let cool.
Filling
With a whisk on your mixer, mix together softened cream cheese, sugar, salt and raspberry jam.
Scrape down bowl and continue mixing until smooth.
Slowly pour in cream and combine.
Turn up speed and whip until thick and fluffy.
Unroll cake and spread a tick layer of the filling over the entire cake, leaving about 1” on the far end free of any filling.
Using the tea towel to help, roll the cake back up into a log.
Place onto your serving dish and then spread remaining filling all over the entire cake.
Place in the fridge to chill for at least 30 minutes and serve cold.
Hey! Nice (Cinnamon) Buns!
Cinnamon buns…can you think of a GREATER bun?! The answer is no! Sweet, soft and oh so gooey! They are the perfect breakfast, lunch or dinner! This recipe has a delicious layer of “goo” aka caramel on top (some might call it a sticky bun!), but if you are more of a cinnamon bun with icing type of person, omit the goo and top with your favourite icing instead.

Yield: 12 buns (or you can make 8 ginormous buns)
Ideally use a 9”x13” pan but you can probably use 2 pie pans if you don’t have one
Dough:
3 cups All purpose flour
1/4 cup milk powder
1 1/2 teaspoons salt
2 teaspoons or 1 packet Instant Yeast
2 Tablespoons Sugar
1 1/4 cup milk, warm to the touch but not boiling
1 egg
1/4 cup butter, melted
In the bowl of an electric mixer, place the milk, egg and melted butter.
In another bowl toss together the flour, milk powder, salt, yeast and sugar just to combine.
Pour the dry ingredients on top of the liquid ingredients in the mixer bowl and then mix using the dough hook attachment for 5-10 minutes, or until the dough forms a smooth ball. The dough will still be a little sticky.
Place the dough into a greased bowl and cover. Let rest at room temperature for about 1 hour or until doubled.
Goo:
1/3 cup butter
1/2 cup Brown Sugar
1/2 cup Corn syrup, honey OR maple syrup
1/4 cup heavy cream (if you don’t have cream, omit this and increase your butter to 1/2 cup)
pinch of salt
Combine all the ingredients: butter, brown sugar, syrup, cream and salt in a small pot.
Bring to a boil while stirring, basically we are melting the butter and sugar together, so you don’t need to cook it very much. You can also do this in the microwave if you prefer.
Pour the goo into a greased 9”x13” pan and set it to the side until your dough is ready.
Filling/Assembly:
1/3 cup - 1/2 cup Butter, very soft basically you want it to be the texture of mayonnaise, so almost melted
3/4 cup - 1 cup Brown sugar
1-2 Tablespoons Cinnamon
1/2 cup Add-in (optional): toasted pecans, toasted walnuts, raisins, chocolate chips, OR dried fruits
Once your dough has doubled in size place it onto a lightly floured surface and shape it into a rough rectangle shape. Then roll out into a large rectangle using a rolling pin or wine bottle, whatever you’ve got on hand! Since we are making 12 buns, make sure your rectangle is at least 12” wide, but if it gets a bit longer that is no problem. Mine probably was about 15”x9” in the end.
Smear your super soft butter all over your rectangle but leave a strip about 1” wide across the top edge without any butter. This strip is going to be the end edge of our roll which we will use to stick the dough to itself and seal the log.
On top of the butter sprinkle a nice even layer of brown sugar all over, depending on the size of your rectangle you might need a little more sugar, or a little less, but as long as it’s nicely covered you are set, the measurements for the filling are more by feel, so if you have leftover don’t worry!
Next, sprinkle the cinnamon all over the sugar to your liking. If you are putting any add-ins into your cinnamon buns, you can sprinkle them all over the cinnamon sugar layer now as well.
Now time to roll! Starting at the edge closest to you, move from one side to the other, rolling the dough on top of itself, tucking in the dough into the layer of cinnamon sugar, until you reach the top edge that doesn’t have any butter on it. Your dough should look like a big wormie and be lying on top of the un-buttered strip of dough.
For ease, I like to roll my wormie over so the edge of the dough is on top, then you want to seal the dough together by pinching it all the way from one side to the other so it won’t unravel when we cut it.
Now using your sharpest knife cut the wormie into 12 even-ish pieces. The easiest way for me to do this is to cut the wormie in half, then you will have 2 pieces. Now, take each of those pieces and cut them in half, so now you should have 4 even-ish pieces. Then cut each of those 4 pieces into thirds. Viola! 12 even-ish pieces!
Now grab your pan that has the goo at the bottom (or if you don’t want goo, just make sure your pan is very well greased, or lined with greased parchment). Place your buns cut side down in the goo into the pan, in a 4 across and 3 down pattern.
Cover the pan and let sit at room temperature until doubled and starting to reach the top edge of the pan, about 1 hour. If you want to serve these for breakfast, make your buns the day before, then cover them and place into the fridge overnight. In the morning, take your buns out about 2 hours before baking so they can come up to room temperature and then continue to proof so they are doubled and reaching the top edge of the pan.
While your buns are rising, pre-heat your oven to 350*F.
When your buns have doubled, pop the pan onto a cookie tray (this is purely to catch caramel drips from falling into your oven which would be the worst to clean…speaking from personal experience) and then place the pan with cookie tray into the middle of the oven and bake for 20-30 minutes or until golden brown and sounding hollow when you tap on the dough.
Let the pan sit for about 5 minutes at room temperature so it’s not boiling and then using oven mitts and being EXTREMELY careful, place a baking tray or a large platter (something that is larger than your cinnamon bun pan so it can catch the caramel) on top of the cinnamon buns, and flip them over and remove the baking pan. All your buns and delicious caramel should pour out onto the baking tray/platter, but if there are a few stragglers, just grab a spatula and scrape them out.
Now time to devour these delicious babies! Best served warm!
Peanut Butter and Jelly Panna Cotta!
YeeHAW! It’s stampede time, which means I get to don the Britney Spear’s microphone headset and hit the stage at the “Calgary Stampede”. This year I made a peanut butter panna cotta which is a peanut custard topped with strawberry compote and peanut brittle! Fancy!

Yield: 8-10 ramekins
Ingredients:
Peanut Panna Cotta
Gelatin 7g
Water 60mL
Whipping Cream 750mL
Sugar 170g
Salt pinch
Peanut butter 50g
Milk 180mL
Strawberry Compote:
Fresh strawberries, chopped 1 cup
Sugar 2 Tbsp or to taste
Peanut Brittle:
Sugar 200g
Water 85g
Corn Syrup 140g
Peanuts 230g
Salt 1/4 tsp
Butter 15g
Vanilla 1 tsp
Baking Soda 1/2 tsp
Panna Cotta:
Bloom your gelatin in the water, set to the side
In a pot combine your cream, sugar, salt and peanut butter and cook until the sugar is dissolved and the peanut butter is combined, it will only need to simmer, not boiling necessary.
Melt your bloomed gelatin and then stir into the hot cream mixture and stir to combine.
Add your milk and stir until combined.
Pour into ramekins or whatever molds you are using and pop in the fridge overnight.
Strawberry Compote:
Combine chopped strawberries and sugar until you reach a sweetness you like, then set to the side. If you are making ahead of time, store in the fridge.
Peanut Brittle:
In a pot heat the sugar, water and corn syrup until it reaches 115*C on a candy thermometer.
Add your peanuts and cook while stirring constantly until the mixture reaches 155*C
Remove from heat and add butter, salt and vanilla, stir to combine.
Add baking soda and stir, this is going to start foaming, so be cautious!
Pour immediately onto a greased and parchment lined baking tray, or onto a silicone mat.
Let cool completely, then store in an airtight container.
Serving:
Your panna cotta can be served in it’s mold or unmolded. To unmold, dip your ramekin into a bowl of hot water to warm up the container, this is going to melt the edges of your panna cotta, then place your serving plate on top of the ramekin and flip it over. It should pop out of the ramekin and be ready to serve!
Spoon some of your strawberry compote onto your panna cotta.
Break up some of your peanut brittle and you are ready to serve!
Tres Leches Cake!
This delicious vanilla cake gets soaked in three types of milk and then topped with whipped cream! The milk soak softens the cake so it’s a bit like a pudding and it’s SO delicious!
Tres Leches Cake
Yield: 9”x13” pan
Preheat your oven to 350*F
1/2 cup Butter, soft
1 cup Sugar
1 teaspoon Vanilla
1/4 teaspoon Cinnamon
1/2 teaspoon Salt
1 teaspoon Baking Powder
5 Eggs, separated
1 1/2 cups Flour
1 1/2 cups Milk
1 can Sweetened Condensed Milk
1 can Evaporated Milk
1 1/2 cups Whipping Cream
2 Tablespoons Sugar
1 teaspoon Rum (optional)
In the bowl of your mixer whip together your butter, sugar, salt, cinnamon, vanilla, baking power until light and fluffy.
Separate your eggs and add the egg yolks to the butter mixture and continue whipping until light and fluffy.
Add your flour and stir until combined.
In a separate bowl whip up your egg whites until medium firm peaks.
Fold the egg whites into the butter mixture in 2 additions. Folding gently so they don’t deflate too much!
Pour your batter into a greased 9”x13” pan, you don’t need to worry about lining the pan with parchment paper just a little baking spray is great!
Bake your cake in a preheated 350*F oven for about 25 minutes or until lightly golden and a toothpick comes out clean when poked into the middle.
While your cake is baking stir together your milk, sweetened condensed milk, and evaporated milk .
When your cake comes out of the oven, pos it ALL over with a fork so the milk has somewhere to soak into.
While the cake is still hot, pour ALL of the milk mixture on top of your cake as evenly as possible. It’s going to look like too much, but it’s going to soak in.
Let the cake cool at room temperature for about 30-60 minutes, then place into the fridge for at least an hour or ideally overnight.
Whip up your cream to soft peaks with the sugar and rum (if using).
Spread your cream on top of the cake and eat!
Cheese-y Mushroom "Danishes"
These danishes are made with puff pastry instead of the traditional yeast raised Danish dough. For this recipe I used half of the batch from the puff pastry dough I made for Sausage Rolls, you can check out that recipe if you would like to make your own puff pastry or you can just use the puff pastry from the freezer section of your grocery store! These little danishes are buttery and full of flavour! You can fill your danish with anything (sweet or savoury!) and they make an awesome and impressive appetizer! I am filling mine with some caramelized onions, mushrooms, ham and swiss cheese!
Cheese-y Mushroom “Danishes”
Yield: 9 large sized danishes
Preheat your oven to 400*F
1 sheet of puff pastry (if buying premade) or 1/2 batch of my puff pastry dough (see Sausage Rolls recipe)
~1 Tablespoon Dijon Mustard
~1 cup grated Swiss Cheese (or your favourite cheese!)
2 slices of Ham Deli Slices (or your favourite thinly sliced meat), cut into quarters
Egg Wash - 1 egg whisked up with a pink of salt and sugar
Mushroom Filling:
1 Tablespoon Butter
1/2 an Onion, diced
1-1 1/2 cups of Mushrooms, chopped
1/2 teaspoon Dried Thyme
1/2 teaspoon Dried Rosemary
1/4 teaspoon Salt
1/4 teaspoon Pepper
1-2 Tablespoons Wine (white or red), or both or water - anything you have on hand!
1/2 teaspoon Worcestershire Sauce (optional)
In a frying pan melt your butter, then add your onions, thyme, rosemary, salt and pepper. Cook over medium heat until onions start to brown and caramelize.
Add your mushrooms and continue cooking until the mushrooms start to brown and release their juices.
Deglaze your pan by pouring a tablespoon or two of wine into the pan and scraping the bottom to release any of those bits that have stuck on. Add your Worcestershire sauce.
Cook for a minute or so while stirring until most of the liquid has bee absorbed. Pour into a bowl to cool and Taste and season to your liking!
Roll out your puff pastry into a large square about 1/8” thick.
Using a pizza cutter or knife, trim the edges and then cut into 9 portions, I did 3 rows horizontally and 3 rows vertically.
Going diagonally from on corner to the other, smear a thin layer of dijon mustard down the middle.
I sliced my deli ham into quarters, then placed one quarter on top of the dijon mustard.
On top of the ham but keeping to the centre area of your square, scoop about 1 tablespoon of the mushroom mixture.
Then place a large pinch of shredded cheese on top of the mushrooms.
Now you can bake the danish just like this, or make it into a shape!
To shape, grab the corner with the least toppings and fold it over so it’s reaching across the cheese and filling. Lightly egg wash, then grab the opposite corner and fold it on top of the first one, so they are “hugging” your filling. Egg wash the other side.
Sprinkle the tops of your danishes with coarse salt or pepper (optional)
Bake in a preheated 400*F oven for about 25 minutes or until golden brown!
Eat!
Cream Puffs with a Lemon Cheesecake Filling!
Cream puffs are made with ‘Choux Paste” which is a dough that is used for ALL sorts of things - eclairs, churros, cruellers, profiteroles, gorgieres and more! It’s a dough you cook on the stove, then add eggs to before piping and baking. I filled my cream puffs with a lemon cheesecake filling, but you can fill them with lightly sweetened whipped cream or a scoop of ice cream for a simple and delicious dessert!
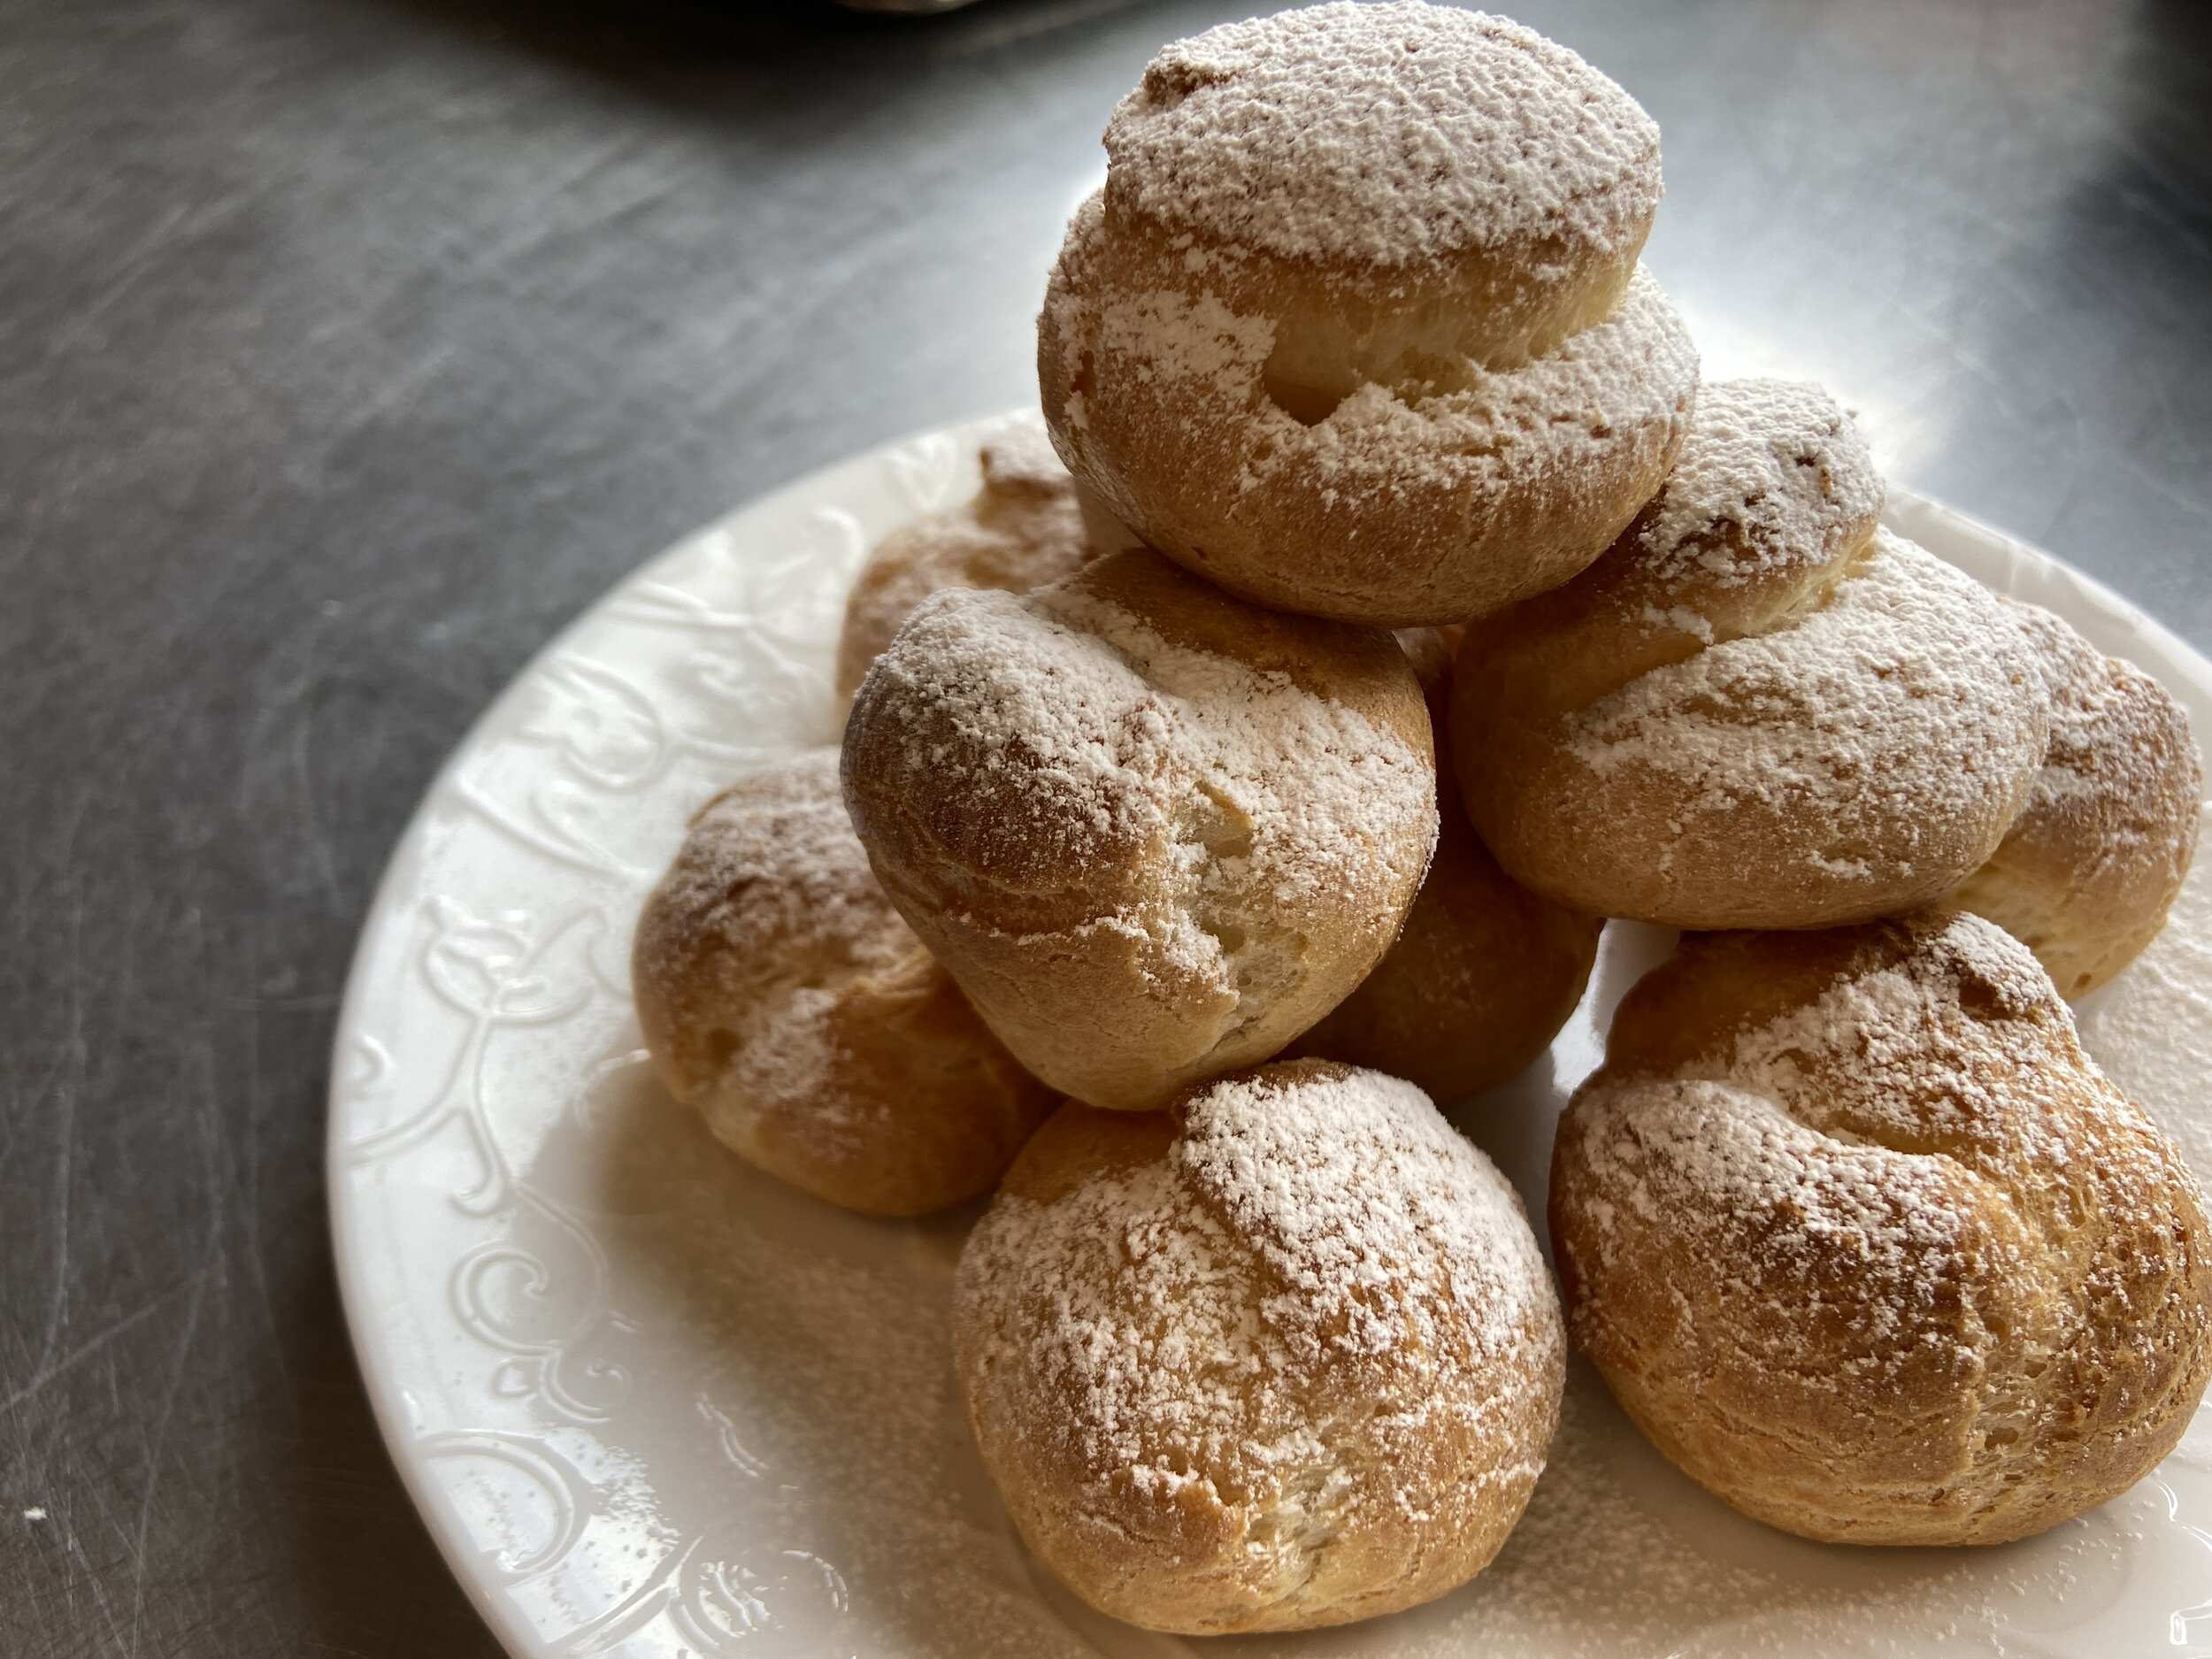
A mountain of Cream Puffs!
Cream Puffs with Lemon Cheesecake Filling
Yield: 24-30 cream puffs
Preheat your oven to 400*F
Choux Paste aka Cream Puff Dough:
1/2 cup Milk
1/4 cup Water
1/3 cup Butter
1/4 teaspoon Salt
1/2 teaspoon Sugar
3/4 cup Flour
~3 Eggs
icing sugar for dusting on top
Lemon Cheesecake Filling:
1 cup (8oz.) Cream Cheese, softened
1/4 cup Icing Sugar
1/4 teaspoon Salt
zest of 1 lemon
In a small pot, bring your milk, water, butter, salt and sugar to a boil.
Once the milk mixture is boiling, add your flour and stir over a medium heat until the mixture become a dough ball and leaves a film on the base of your pot. Transfer to a bowl and cool for a minute or two.
Add your eggs one at a time, stirring to combine after each egg. Depending on how much moisture is in your dough, and how large your eggs are, you might not need all three. You want your finished dough to be soft and when you run your finger though it, it should slowly fill in the gap, but still leave a visible line where your finger had been.
Place your dough into a piping bag and pipe about 1.5” diameter rounds onto a parchment lined baking tray.
If there are little “kisses” poking up from where you stopped piping, wet your finger and lightly press them down so the tops of your cream puffs are flat.
Bake in a preheated 400*F oven for 20-30 minutes, or until golden brown. Try not to open the oven at all (no peeking!) for the first 20 minutes, the cream puffs are creating steam that will help them bake, and we don’t want that to escape!
To make the lemon cheesecake filling, whip together the cream cheese, icing sugar, salt and lemon zest until light and fluffy. If you plan on piping it into your cream puffs, you can place it into a piping bag or a ziplock bag with the corner cut off.
Once your cream puffs are baked, let them cool and fill with your choice of filling! You can use a knife to poke a hole in the base of your cream puff, large enough to fit the tip of a piping bag full of filling, then squeeze it into your cream puff, or you can cut the top of your cream puff off with a serrated knife, scoop some filling into it and then place the top back on once filled, both look cute!
Sprinkle the tops with icing sugar and devour!
Perfect Peanut Butter Cookies!
An oldie but a goodie! Peanut butter cookies are the perfect combination of sweet and salty! They combine that delicious nuttiness of peanut butter with the chewiness of a cookie and it’s pretty much perfection! These cookies are crispy with a soft, chewy centre, but if you like the crispier bake them for a minute or two longer, and if you like them chewier, pull them out a minute or two earlier.

soft and perfect!
Peanut Butter Cookies
Yield: 8-12 depending on how large you scoop them
Preheat your oven to 350*F
1/4 cup Butter, soft
1/4 cup Peanut Butter
1/2 cup Brown Sugar
1/4 teaspoon Salt
1/2 teaspoon Baking Soda
1 teaspoon Vanilla (optional)
1 Egg
3/4 cup Flour
Granulated Sugar for sprinkling on top (optional)
In the bowl of your mixer, whip together the butter, peanut butter, brown sugar, vanilla, baking soda and salt until fluffy, about 3-5 minutes.
Add in your one egg, and continue whipping for about 1 minute, or until combined and fluffy.
Add your flour into the mixture and mix until combined, being sure to scrape down the sides of the mixing bowl to get any chunks of butter combined.
Scoop onto a parchment lined baking tray (or if you don’t have a liner, just spray with baking spray oil. I used a ice cream scoop but you can just use a spoon. Leave at least 2” between cookies so they don’t bake into each other.
Sprinkle the tops of your cookies with granulated sugar for a little extra crunch and sparkle!
Bake in a preheated 350*F oven for about 10-12 minutes, or until lightly golden.
Let cool and eat!
Roasted Tomato Sourdough Bread!
Sourdough bread is SUPER popular right now! Instead of adding yeast to your dough, you use a sourdough starter which absorbs natural yeast from your environment to give rise to your dough, along with LOTS of tangy flavour! This bread is made with roasted tomatoes, but you can also take that out and just use water if you want a plain flavoured loaf. The process of this bread takes about 1 day, but there isn’t any kneading or mixers involved, just a little tending every few hours. The long wait is what helps build lots of delicious flavour into your loaf.

Crispy Crust full of Tomato Flavour!
Roasted Tomato Sourdough Bread
Yield: 1 loaf
Preheat oven to 375*F to bake tomatoes
Preheat oven to 450*F WITH a cast iron pot with it’s lid inside to heat up as well for baking bread
Tomato puree (you can skip this step and use 2 Tablespoons of tomato Paste if you like!)
1-1 1/2 cups Tomatoes cut into a few large chunks - I just used up any random chunks of tomato or wrinkly tomatoes that were in my fridge
3 cloves of Garlic
1 teaspoon Olive oil
Salt and Pepper
Bread:
1 1/3 cup room temperature water mixed with Tomato puree from above
1/2 cup Sourdough Starter (about 100 grams) - should be nice a bubbly and when you place it in a glass of water, it should float to the top, that means it’s ready to go!
1 teaspoon Dried Basil
2 1/3 cup Flour
1 1/2 teaspoons Salt
For the tomato puree, toss together all the ingredients - tomatoes, garlic, olive oil and salt and pepper in an oven safe pan, and bake for about 30 minutes or until the tomatoes start to roast and break down.
Let tomatoes cool, then puree in a food processor or blender until smooth.
To make dough, place your tomato puree into your measuring cup, then add your water until you get 1 1/3 cup liquid total. We need 1 1/3 cup liquid total, so it doesn’t matter how much tomato puree you end up with as long as the total of tomatoes and water equals 1 1/3 cup.
In a large bowl with a lid, combine your tomato/water liquid, the sourdough starter, dried basil and flour. Stir until there are no bits of dry flour peaking out.
Cover the bowl with a lid and let sit at room temperature for 1 hour.
At this point sprinkle your salt on top and lightly press it into the dough but poking your fingers into the dough all over the top.
Now we are going to do 4 folds.Grab one side of the dough, lift and fold it on top of itself, then turn the bowl 90 degrees and repeat until you get back to where you started and have done 4 folds.
Cover the bowl and let sit at room temperature for 30 minutes.
Repeat step 7 and 8 until you have done the 4 fold FIVE TIMES! This will take 2.5 hours. I put a sticky note on top of my bowl and mark each time I do the folds so I don’t loose track.
Once all your folds are finished, put the lid on and let your dough sit at room temperature for about 1 hour, then place into the fridge overnight or about 12 hours.
After the dough has rested, take it out of the fridge and let it sit for about 2 hours at room temperature.
Plop your dough out onto a floured surface and lightly press it into a rough rectangle shape.
Fold the dough into thirds, like you are folding a letter (Take the base third and fold it over, then fold that over on top of itself).
Now turn the log of dough and take the narrowest end and roll it up into a chubby little bundle.
Now pinch together all the seams so they can’t come apart.
Grab a bowl or basket (or if you have one, a banneton) and line it with a super well floured clean tea towel.
Place your dough ball seam side UP into the tea towel lined bowl, then flip any overhanging towel edges on top of the loaf to cover it.
Place your loaf into the fridge to chill for 3-4 hours (this will help build a little extra flavour), or 1 hour at room temperature.
Heat up your oven to 450*F with a cast iron pot with a lid inside of it, so your pot gets really hot as well. Grab a piece of parchment paper that will fit into the bottom of your pot.
Once your bread is ready to go, flip the bread out of the bowl onto your piece of parchment that fits into the pot and peel off the tea towel. Sprinkle the top of the bread with a little extra flour (this will help your scoring design POP!)
Using a sharp knife or clean exacto blade make a long slice across the top of your bread, just cutting through the top “crust” of the bread, not going too deep into the loaf, this is called scoring and it’s going to allow your bread to expand without cracking. You can also score pretty patterns onto your dough, google has lots of inspiration, leaf shapes, wheat designs, so many ideas! Bakeries score different designs on each bread so they can tell what flavour each loaf is!
Grab your super hot pot out of the oven and place your dough into the pot by lifting it up with the parchment paper.
Toss 1 ice cube into the pot under the parchment paper and quickly place the lid on top, this is going to give it a little extra steam and help make a nice crust!
Immediately place your pot back into the hot oven and bake for 45 minutes.
Remove the lid of your pot and continue baking for about 10 more minutes, or until golden brown and sounds hollow when you tap it.
Remove from pot and place on a wire rack to cool!
Eat!
Honey Oat Sandwich Bread!
Sandwiches are delicious! It’s a meal you can eat anywhere! What makes the best sandwiches? Home made bread! This is a jazzed up version of your typical white bread, it’s got a touch of honey and oats to make things extra delicious!

Soft, fluffy and ready for sandwiches!
Honey Oat Sandwich Bread
Yield: 1 loaf (9”x5” pan)
Preheat your oven to 350*F
1 1/2 cups Milk, warm
2 Tablespoons Butter, warm
2 Tablespoons Honey
2 3/4 cup Flour
1/2 cup Oats
1 1/2 teaspoons Salt
2 teaspoons Instant Yeast
In the bowl of your mixer combine the dry ingredients - flour, oats, salt and yeast. Toss to combine.
In a separate container stir together your honey, warm milk and butter. Then pour into the dry ingredients and knead with the dough hook in your mixer for 6-10 minutes, or until it forms a firm ball around the hook and isn’t sticking to the sides of the bowl.
Place dough into a greased bowl and cover. Let sit at room temperature until doubled, about 1 hour.
Place your dough ball onto a lightly floured surface and using your hands flatten into a rough rectangle shape that is about 8” wide.
Roll the dough up into a log, then pinch the seams together.
Place the dough log into a greased 9”x5” loaf pan, with the seam side going into the bottom of the pan.
Cover with saran wrap and let sit at room temperature for about 1 hour, or until the dough is starting to rise over top of the pan edge.
Bake in a preheated 350*F oven for 30-45 minutes or until golden brown and sounds hollow when you tap it.
Let cool and eat!
Zucchini Muffins!
For when life gives you a GINORMOUS zucchini! These delicious muffins are similar to a carrot cake, but instead of carrots, we use grated zucchini! The flavour is cinnamon sugar, which is always delicious, but feel free to add in other things like dried cranberries or chocolate chips! Yum!

mmmmmmmmuffins!
Zucchini Muffins
Yield: 12 muffins or 1 loaf
Preheat your oven to 350*F
2 cups of grated Zucchini
2 Eggs
1/3 cup Sour Cream
1/2 cup Butter, melted
1/2 cup Sugar
1/2 cup Brown Sugar
1 teaspoon Vanilla (optional)
1 2/3 cup Flour
1 teaspoon Baking Soda
1/4 teaspoon Baking Powder
1/2 teaspoon Salt
1 teaspoon Cinnamon
Cinnamon Sugar for topping (about 1/4 cup sugar mixed with 1/2 teaspoon Cinnamon)
In a large bowl stir together your wet ingredients - zucchini, eggs, sour cream, butter, sugar, brown sugar and vanilla. Stir to combine.
Add your dry ingredients - flour, baking soda, baking powder, salt and cinnamon. Stir until just combined.
In a greased and lined muffin tin, evenly scoop your batter.
Top the muffins with a sprinkle of cinnamon sugar.
Bake in a preheated 350*F oven for about 25 minutes, or until lightly golden and the toothpick comes out clean when you stab it into the centre.
Time for eating!
Fruit and Nut Crisps! The PERFECT cracker for cheese!
Nothing is more perfectly paired than cheese and crackers, but sometimes you want to feel fancy so you get those delicious fruit crisp crackers from the store, but they are super expensive in terms of crackers pricing, so if you’re me, you only buy them when you are feeling fancy and having guests over. Instead of buying them, we can make them! These crisp crackers aren’t too tricky to make, but they do take a few hours because you need to let things cool and do a second bake. Feel free to switch up the flavours, you can use any nuts, dried fruit and spices you have on hand. You can even switch up the flour if you have some fun flours like whole wheat or rye flour, feel free to substitute 50% of the flour with that. Lots of fun flavours you can make!

Snazzy Crackers!
Fruit and Nut Crisps
Yield: about 50 crackers depending on how you slice them
Preheat oven to 350*F for the first bake, 250*F for the second bake
1 cup of Flour
1/4 cup Brown Sugar
1 teaspoon Baking Soda
1/2 cup Oats
1/2 teaspoon Salt
1/2 teaspoon Pepper
2-3 teaspoons herbs and spices, I did 1/2 teaspoon each: cinnamon, dried rosemary, dried thyme, and paprika but do whatever your heart desires!
1/2 cup seeds/nuts (I used 1/2 cup sliced almonds)
1/2 dried fruit (I used 1/2 cup dried cranberries)
1 cup Milk
1/4 cup Sour Cream (you can also use yogurt, buttermilk, or even unsweetened apple sauce or pumpkin puree)
In a large bowl stir together your dry ingredients, flour, brown sugar, baking soda, oats, salt, pepper, and herbs/spices. Toss to combine.
Stir in your dried fruit and nuts.
Pour in your milk and sour cream, stir to combine.
Pour into a greased and lined loaf pan, I used an 8”x4” pan.
Bake in a preheated 350*F oven for about 35-45 minutes or until a toothpick stabbed into it comes out clean.
Let cool at room temperature, then freeze for 1-2 hours.
Once lightly frozen, slice your loaf as thinly as possible using a serrated knife.
Lay each slice in a single layer on lined baking trays.
Bake in a preheated 250*F oven for 35-50 minutes or until thoroughly dried out. We are not baking at this point so much as we are drying out the crackers.
Let cool and eat! These babies can be stored in a sealed container at room temperature.
Bread Pudding with the EASIEST Caramel Sauce!
I never had bread pudding growing up, but once I went to pastry school I was like “omg what have I been missing!” Bread pudding is basically like french toast, but instead of slices of bread, you cube up all your old dry bread and soak it in the custard, then place it into a baking pan and bake until custardy! Delicious! To top it off I make the easiest caramel sauce, just pop everything in a pan and bring to a boil. Easy and impressive dessert, what more could you want!
For the type of bread, you can use anything, I had some leftover sourdough bread, but I’ve used white bread, banana bread, even croissants! They are all yummy!
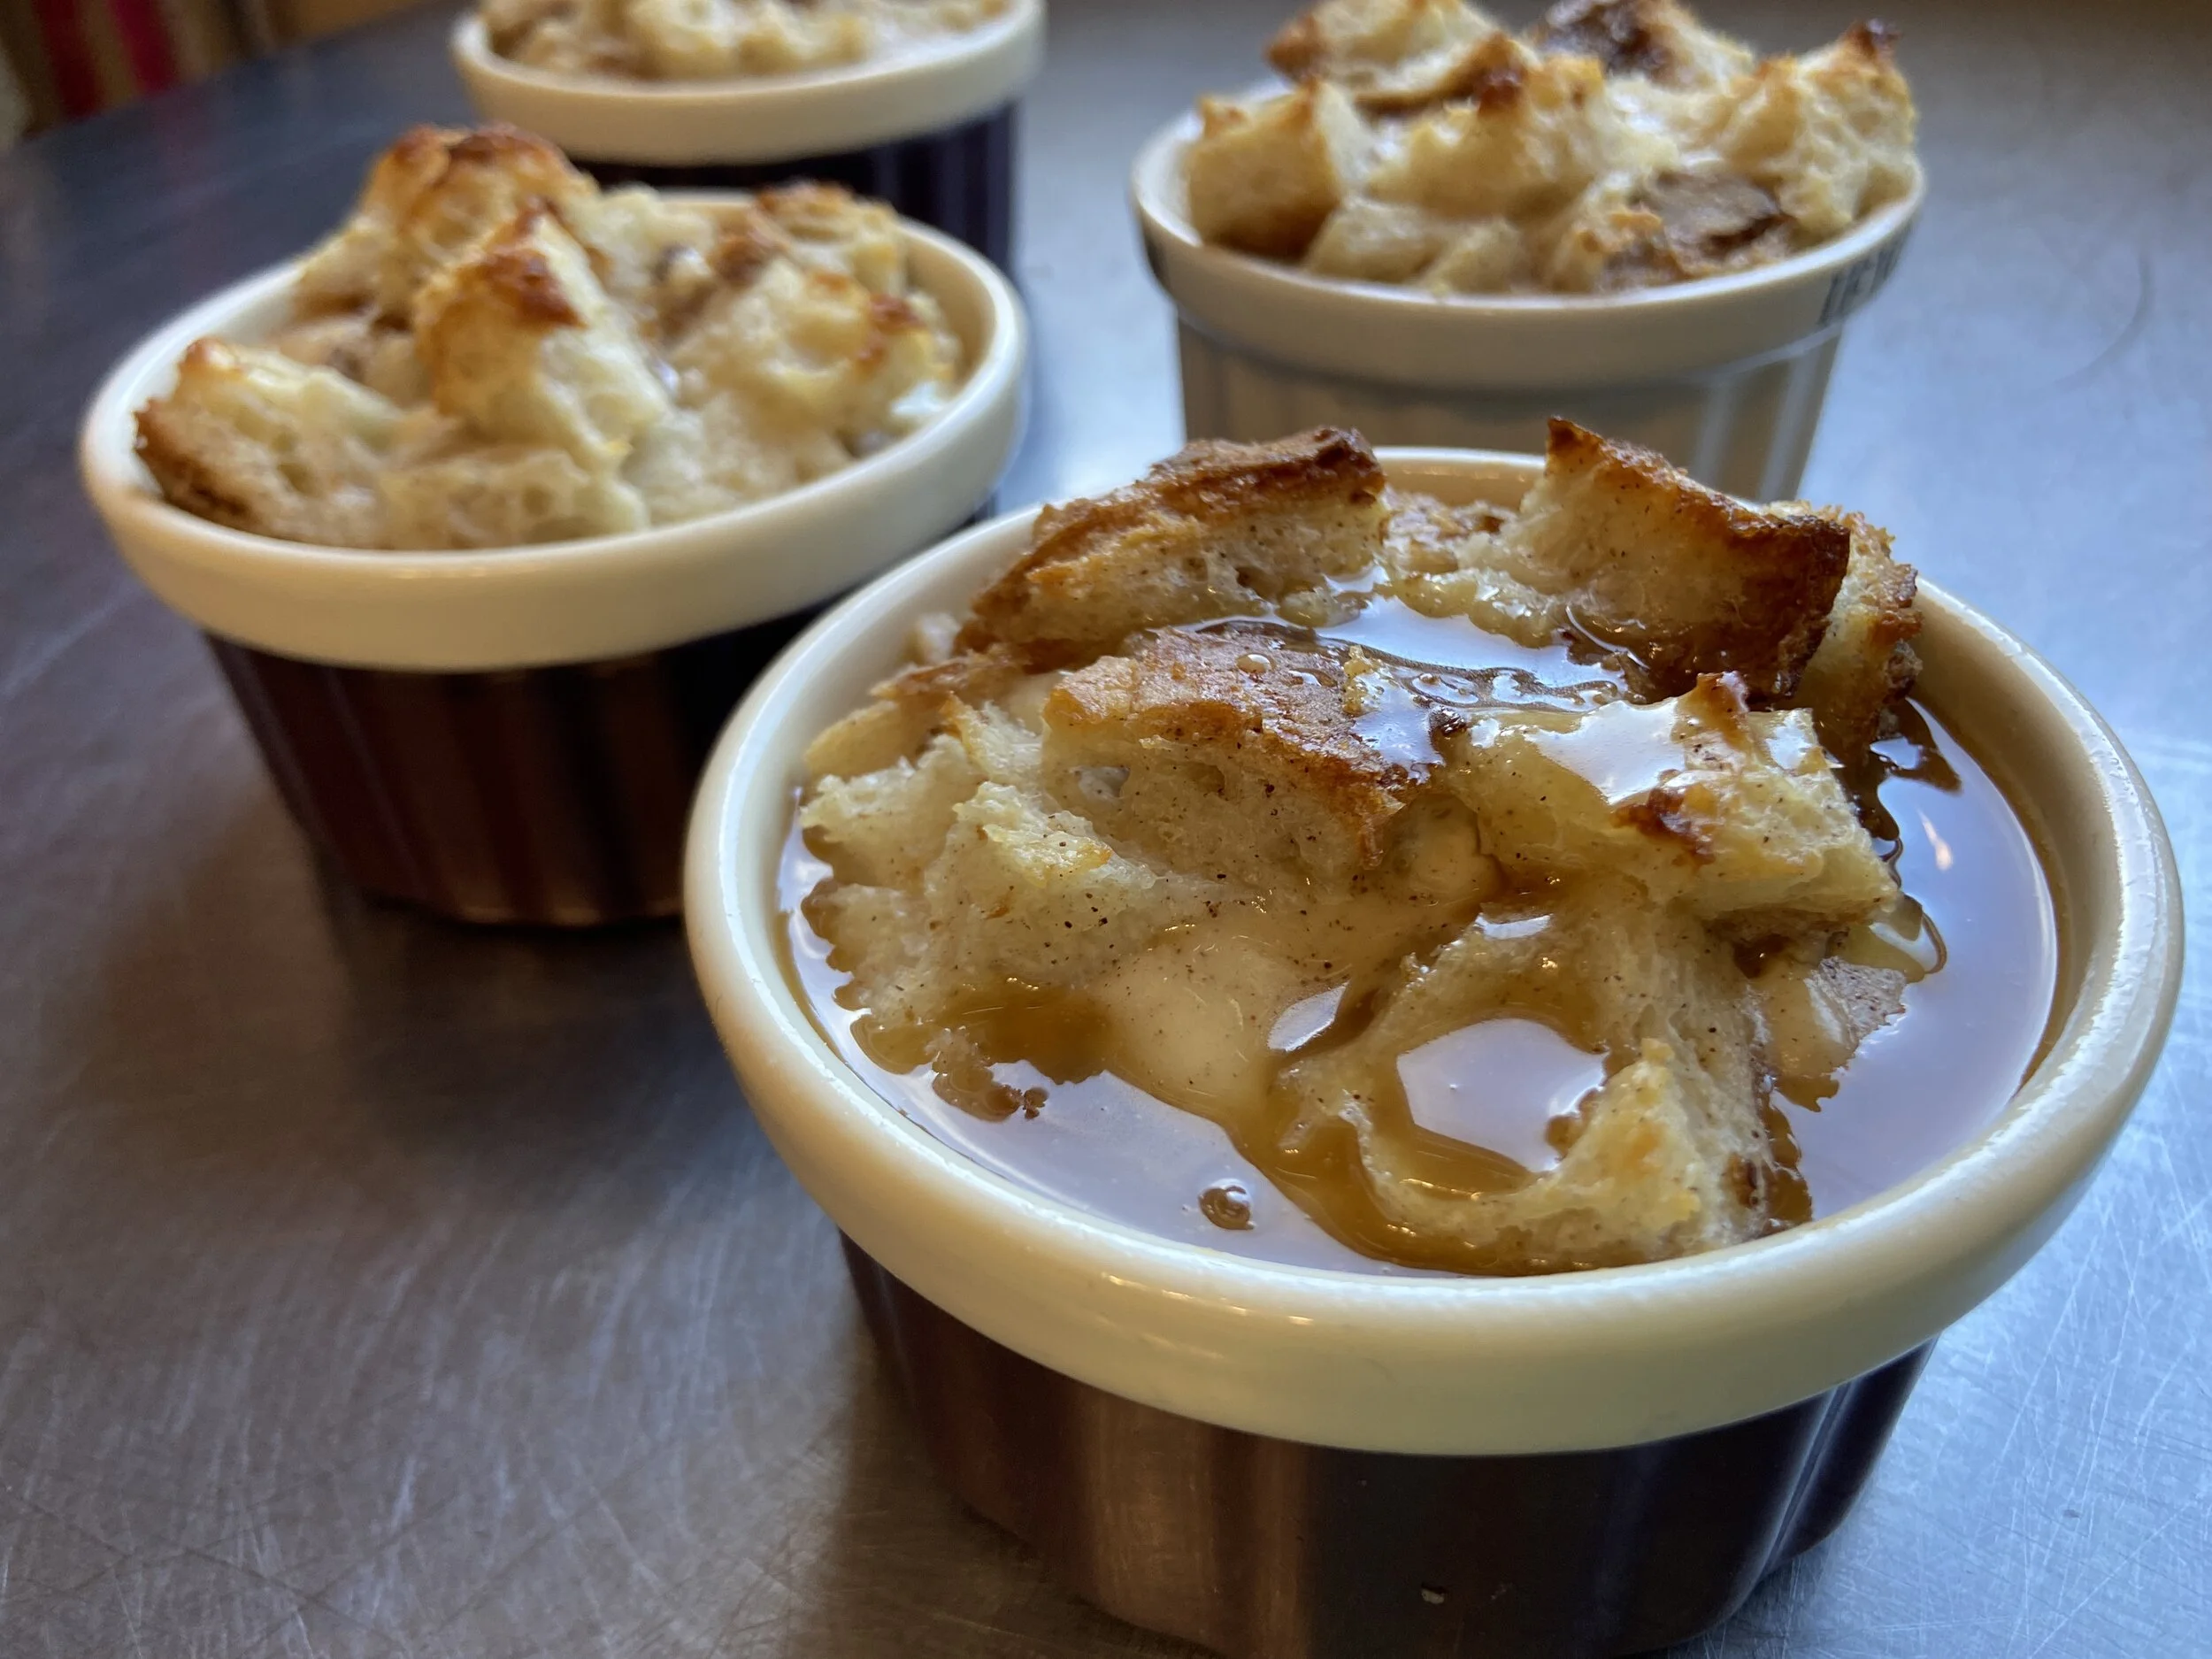
ALL the caramel sauce on my bread pudding!
Bread Pudding with Caramel Sauce
Yield: 4 Ramekins
Preheat your oven to 350*F
Bread Pudding:
3 Eggs
1/3 cup Sugar
pinch of Salt
1 teaspoon Vanilla (optional)
1/2 teaspoon Cinnamon
1 cup Milk
1/2 cup Cream (or milk if you don’t have cream)
4-5 cups of cubed dry bread (if it’s not stale, pop it in the oven for a few minutes to dry them out for maximum custard absorption!)
Caramel sauce:
2/3 cup Brown Sugar
1/2 cup Whipping Cream
1/4 cup Butter
1 teaspoon liqueur like dark rum or whiskey (optional)
In a bowl combine your eggs, sugar, salt, vanilla, cinnamon, milk and cream. Whisk until combined.
Toss in your cubed bread and stir until coated. Let sit at least 20 minutes to absorb the custard.
Scoop your bread mixture into 4 greased ramekins (or whatever baking vessel you are using). Pour over any excess custard left in the bowl to fill up the ramekins.
Place the ramekins into a larger pan where they can sit flat without touching (I used a 9”x13” cake pan).
Place the pan with ramekins into the preheated 350*F oven and then fill the pan with hot water until it reaches about halfway up the side of the ramekins. This is called a water bath.
Bake for about 35-45 minutes, or until lightly golden and the custard is set in the middle. If you push down on the middle of a ramekin it shouldn’t look super liquidy.
Remove from water bath and let cool or eat straight away!
To make caramel sauce, place your brown sugar, cream and butter in a pot and bring to a boil.
Remove from heat and stir in the liqueur if you are using it.
Pour over your delicious baked bread puddings and eat warm.
Butter Tarts! Classic Canadian!
What’s the most Canadian dessert? I would say it’s a tie between butter tarts and Nanaimo bars, but butter tarts are definitely MY favourite! These little tarts are basically a buttery vanilla sugar pie, I love butter, I love sugar, what more do you need…RAISINS! Ok some people hate raisins in their butter tarts, I believe they are crucial, but do what you love, that’s the fun of baking, you can make them exactly how you want! The way I make my butter tarts is by adding the raisins before the filling, instead of mixing them together, so you can even make some with raisins and some without and then judge how you prefer them. So many options!

Look at those gooey edges!
Butter Tarts
Yield: 12 tarts (made in a muffin tin)
Preheat your oven to 375*F
Pie Dough:
Alternatively, you can skip the pie dough step and buy the frozen tart shells from your grocery store, just fill and bake them straight from the freezer, no thawing required!
2 cups Flour
1/2 cup COLD butter, cut into small pieces
1/4 cup shortening (you can replace this with butter if you prefer, I just like the texture it brings)
1/2 teaspoon Salt
1 teaspoon Sugar
1/4-1/2 cup COLD water
Filling:
1/2 cup Raisins (optional)
1 teaspoon Dark Rum (optional)
1/2 cup Brown Sugar
1/2 cup Corn Syrup
1/4 cup Butter, melted
1 Egg
1 teaspoon Vanilla Extract
1/4 teaspoon Salt
In a large bowl combine your flour, salt and sugar for the dough.
Toss in your cold butter and shortening and using your fingers pinch and rub the butter into the flour until it looks crumbly like sand, but still has some large pea sized chunks of butter - this is going to make things flaky!
Add your cold water, start with about 1/4 cup, and see how it feels, depending on your flour and how the butter has been incorporated, you might not need the full amount, You want the dough to stay together when pressed in your hand, I used about 1/3 cup in my dough.
Your bowl should still have some drier bits at the bottom, that is perfect, then dump the bowl of pastry out onto your counter and give it a few kneads until it comes into a nice ball, then press into a flat disk or rectangle and wrap in saran wrap. Chill in the fridge for at least 30 minutes.
Once your dough is chilled, roll it out on a flat surface to about 1/8-1/4” thickness and cut into about 4” diameter circles, you want a circle that will fit into the cavity of a muffin tin, so see what fits best in yours. Or maybe you have actual tart tins, you can definitely use those too!
If you run out of dough, just lightly press the scraps together and continue cutting out the rounds.
Take each circle and press it into each cavity of your muffin tin, making sure to press in the corners so they are filled with dough.
Once all your muffin cavities are lined with dough, poke the bases a few times with a fork, this is called “docking” and helps any trapped air release during baking.
Pop your muffin tin into the freezer to firm up, at least 20 minutes.
Now for the filling, you can skip this step but it makes things more decadent, take your raisins and cover them with boiling water to soak. Just enough water to cover them, the amount doesn’t matter as we will be draining it all off. Soak 10+ minutes.
Once your raisins have soaked, drain them off, and squeeze out any excess moisture. Then toss with the 1 teaspoon of Rum! Set to the side.
In a large bowl combine all the rest of the ingredients for the filling - brown sugar, corn syrup, melted butter, egg, salt and vanilla. Stir to combine.
Now to put everything together! In your chilled tart shells, evenly distribute the raisins into the bottom of each tart (or however many you want raisins in!)
Scoop your filling mixture on top of the raisins in each tart shell, then pop into a preheated 375*F oven for about 15-25 minutes until gold and bubbly! The longer you bake them, the thicker your filling, if you like them gooier, bake them a little less.
Let cool and devour!
Pitas! The envelope of the bread world!
Pitas are a delicious flatbread that puffs up when it bakes, creating a lovely little pocket inside that you can stuff full of yummy things like falafel, meats, salad, really whatever you like! You can also just rip apart the pita and use it as a receptacle for large scoops of dip! Yum! These are little tricker of a bread to make, but even if they don’t turn out perfectly, they will still be super delicious!

Pitas are perfect for dipping!
Pitas
Yield: 8-10 pitas, depending on the size you want
2 1/2 cups Flour
1 Tablespoon Sugar
1 teaspoon Salt
1 1/2 teaspoons Instant Yeast
2 Tablespoons Olive Oil
1 cup Water, warm
In the bowl of a mixer, stir together your flour, sugar, salt and yeast.
Add the olive oil and water and knead with the dough hook for about 6 minutes, until the dough forms a nice smooth ball that isn’t sticking to the sides of the bowl.
Place dough ball into a greased bowl with a lid and let sit at room temperature until doubled (about 1 hour).
Remove dough from bowl and using a knife, divide into 8 (or 10) even pieces.
Cup each dough ball in your hand and roll it in a circle on the counter until the dough forms a nice little ball. Place on a lined or floured baking tray and cover with a tea towel, then repeat with the remaining dough balls until they are all nice and round. Let rest at room temperature at least 20 minutes to relax the dough.
Grab one dough ball at a time and roll into a thin flat circle about 6-7” in diameter and about 1/8” thick. If your dough is just not rolling out thinly, roll it as much as you can, then place back onto a parchment lined baking tray with a tea towel on top, and let it rest for about 10 minutes (I just waited until I had rolled out all the dough balls), then come back to it and roll it out a little more until it is the thickness you want. By this time the dough will have relaxed a bit and it will allow you to roll it thinner.
Cover all your rolled out pitas with a tea towel and layer in between pieces of parchment paper so they aren’t overlapping.
You can bake these in a 450*F preheated oven for about 4-8 minutes until puffed and lightly golden, or you can bake them on the stove in a pan which I did.
To bake on the stove in a pan, heat your pan to medium-high heat, I found my stove worked best at medium heat, but see what works best for you. Make sure your pan is nice and hot before you add a pita.
Place one pita down flat into the hot pan, as soon as it starts to bubble (about 15 seconds), flip it over, then once it starts expanding flip it again, then your pita might be fully expanded, or your might need to flip it again, depends on the pita. If you are like me, my pitas weren’t all the exact same thickness, so some of them needed an extra flip or two, but use your judgement, if it’s starting to burn, flip it. They only take a minute or two to bake.
Don’t worry if you burn some, they are still delicious, and baking them off is definitely a learning curve! Regardless these pitas are WAY more delicious than anything you will buy in the store.
Enjoy the labour of love and remember, practice makes perfect!
Chocolate Marshmallow Puff Cookies!
I’m not going to name names, but there is a boxed cookie that I loved as a child. It’s a graham cracker with jam and marshmallow that is covered in chocolate! It was pretty much the fanciest boxed cookie I had, and you know how to make a boxed cookie even better? Make your own version from scratch! It’s quarantine so you shouldn’t really be in the grocery store anyways, plus there is SO many hours in the day to use up, and what better way than making cookies! This recipe starts with one batch of the graham crackers we made yesterday (scroll down for that recipe). Then we are going to make some homemade marshmallows! Marshmallows are great on their own, you can definitely just make the marshmallow recipe then press it into a grease and lined, and greased AGAIN 8”x8” baking pan. Then cut it into squares with a greased knife and toss in icing sugar, so delicious!

SOOOOOOO FUN!
Chocolate Marshmallow Puff Cookies
Yield: 12-18 (depending on how many graham crackers you have)
Bases:
1 batch of home made graham crackers cut into circles and baked (I had 18) - You could also use packaged graham crackers, it’s just going to be a bit tricker since they are square
about 1/2 cup of jam (raspberry and strawberry are really good with the chocolate)
Marshmallows:
2 packages Gelatine
1/3 cup Cold water
1 cup Sugar
1/3 cup water
1/3 cup Honey
1/3 cup Corn Syrup
pinch of Salt
1 teaspoon Vanilla (optional)
Topping:
2 cups Chocolate
1 Tablespoon Oil
sprinkles! (optional)
Place your graham crackers onto a parchment lined baking tray in a single layer. Scoop about 1 teaspoon of jam into the centre of each graham cracker, then set the tray to the side.
in the bowl of your mixer, pour 1/3 cup of cold water, then mix in your gelatine, set this to the side to rest, it is going to absorb the water and firm up.
In a small pot, place your sugar, 1/3 cup water, honey, corn syrup and salt. Heat over high heat until it reaches 240*F. Then remove from heat.
Place your bowl with the gelatine onto the mixer with the whisk attachment.
Turn the mixer onto the lowest speed, and while it’s mixing, slowly pour in the hot syrup until the whole pot is mixed in and the gelatine is all melted.BE CAREFUL THIS IS SUPER HOT!
Turn up the speed to high, and whisk for 8-10 minutes or until the marshmallow looks super white and fluffy and the bowl does not feel hot to the touch.
Add your vanilla extract and mix for another minute or until combined.
Scoop your marshmallow into a piping bag, or a ziplock bag with the end chopped off, and pipe the marshmallow in a circle around the jam on your cookie, then continue piping over top of the jam until you have a nice mound of marshmallow and you can’t see any jam peeking through. It will look similar to the swirl on a cupcake or soft serve ice cream cone. Do this for all of your graham crackers.
Once all the marshmallow is piped, let your cookies sit at room temperature for about 2 hours until they firm up.
In a microwave or double boiler, melt your chocolate and oil until smooth and melted.
Dunk each of your marshmallow cookies into the chocolate, toss until covered and then shake them off a little so there isn’t too much excess chocolate on them, then place back onto the parchment lined tray. You can add sprinkles now if you love sprinkles as much as me, or just leave them off.
Place your tray into the fridge for about 20 minutes to set the chocolate up and then enjoy!
Graham Crackers...well imitation "Graham" Crackers!
Graham crackers… they’re really more of a cookie, but if we can call it a cracker and eat it at any time of the day without judgement I’m down for it! True graham crackers are made with graham flour, which is a whole wheat variety of flour. It’s quarantine, which means I am not leaving the house, and also finding graham flour can be a bit tricky, but if you have whole wheat flour feel free to substitute that in for the oats in this recipe. To add to the “whole wheat” flavour of this cookie…I mean cracker! I added in some quick oats, but if you don’t have those, just use straight up regular flour, they will still be delicious! These crackers are great for making the best SMORES or using as a base in other desserts, which we are going to be doing tomorrow!

“Graham” crackers…ok these are basically a very thin oatmeal cookie but shhhhhh! I’m not telling!
“Graham” Crackers
Yield: 15-20 - 2” cookies
1/4 cup Quick Oats (use whole wheat flour if you have it!)
3/4 cup Flour
1/2 cup Brown Sugar
1 teaspoon Cinnamon
1/2 teaspoon Baking Soda
1/2 teaspoon Salt
1/4 cup Butter, soft
2 Tablespoons Milk
2 Tablespoons Honey (can substitute with corn syrup)
1 teaspoon Vanilla Extract
In a bowl combine all your dry ingredients - flour, oats, brown sugar, cinnamon, salt and baking soda. Toss to combine.
Using your hands, rub the butter into the dry ingredients until its fully combined and there aren’t any large butter chunks. It should look like sand.
Add your milk, honey and vanilla, and stir until fully combined.
Place your dough onto a baking tray sized piece of parchment paper, then top with another piece of parchment paper the same size and roll it until it is about 1/8-1/4” thick. If you plan on making square shapes try to roll it into a rectangle shape for easier cutting. Chill your dough with the 2 pieces of parchment until firm, at least 30 minutes.
Take your dough out of the cooler and peel off the top layer of parchment, if it is not coming off cleanly, your dough isn’t cold enough, just put back in the cooler until hard.
Cut out your desired shapes from the dough, you can use a pizza cutter to make squares easily, I made rounds using the edge of a water glass.
Peel the shapes off of the parchment paper and place on a lined baking tray about 2” apart.
Dock each cookie with a fork so they don’t get too many air bubbles.
Bake in a preheated 350*F for 5-12 minutes, until golden brown and delicious smelling!
Eat or save in a sealed container.
Honeycomb Toffee!
Buzz! Buzz! It’s honeycomb time! This candy is a delicious honey flavoured, honeycomb looking treat! Some people call is “sponge toffee” or “sea foam” because it’s light and airy! This treat is perfect for eating on it’s own, but it’s also great covered in chocolate, crushed up on ice cream, put into cake layers, in my world it’s the perfect accent to any dessert!

It’s the bee’s knees!
Honeycomb Toffee
Yield: about a 12”x10” rectangle
1 1/4 cup Sugar
1/4 cup Corn Syrup
1/4 cup Honey
1/4 cup Water
1 Tablespoon Baking Soda
In a 2-3 qt. pot place your sugar, corn syrup, honey and water. Stir to combine and make sure all your sugar gets wet, then scrape down the sides so there aren’t any clumps of sugar sticking to them.
Line a baking tray with a silicon pad or a piece of parchment and grease with baking spray or oil/butter. Place next to your stove.
On a high heat, cook your sugar mixture until it reaches 300*F with a thermometer, this is called the “hard crack” stage, remove from the heat.
Quickly whisk in your baking soda and it is going to start GROWING! Be careful this is still SUPER HOT! Quickly pour your honeycomb onto the greased and lined baking tray. Don’t smooth out, just let it go where it may, the more your smooth, the less bubbles you will have.
Let cool for about 2 hours, then crack into pieces and store in a sealed container.
Pizza Dough!
Pizza party time! Pizza dough is fairly easy to whip together and then you can have both a delicious meal, and a fin activity for your family. Each person can make their own pizza with whatever toppings they like, super fun!

It’s a pizza party!
Pizza Dough
Yield: 3 approximately 9-10” diameter pizzas
Preheat the oven to 450*F with your Cast Iron Pan or Pizza Stone inside so it gets hot hot hot!
2 2/3 cup Flour
1 teaspoon Instant Yeast
1.5 teaspoon Salt
1 teaspoon Sugar
1 cup Water, warm
1 Tablespoon Olive Oil
Toppings for your pizza like pizza sauce, cheese, pepperoni, vegetables, pineapple, anything!
In the bowl of your mixer, combine your dry ingredients - flour, yeast, salt and sugar, toss to combine then pour in your liquid ingredients - warm water and olive oil
Knead in the mixer for about 6 minutes, until you get a nice firm dough ball, and the dough is not sticking to the sides of your bowl, but wrapped up around the hook.
Place your dough ball into a greased bowl with a lid and let sit at room temperature for about an hour or until doubled.
Preheat your oven to 450*F with your cast iron pan inside of the oven (or pizza stone) so it gets nice and hot.
If you want to make this ahead of time, you can put your dough in the fridge now, otherwise divide the dough into 3 even portions and take each portion and roll out into a roundish shape 9-10” in diameter.
Add whatever toppings you like to your pizzas.
Once your pizzas are ready, pull your hot pan out of the oven and slide one pizza onto it and quickly place it back into the oven.
Bake for 5-10 minutes or until the cheese is melted and the bottom of your pizza is golden brown and crispy.
Once your pizza is ready pop it out of the pan and immediately place the next pizza on it and pop it back into the oven, and continue until they are all baked!
Now it’s pizza eating time!
Lemon Lime Citrus Pie...and by Pie I mean Mason Jar!
What’s better than a pie, a cute little individual mason jar full of pie just for you! This is similar to a key lime pie, but I don’t have key limes, and unfortunately I am not in Florida so walking out into my backyard citrus farm just isn’t an option. These little beauties are perfect for making yourself feel fancy and like you are at a restaurant serving the most delicious desserts!

Perfect size for snacking!
Lemon Lime Citrus Pie Mason Jars
Yield: 6 x 1/2 cup mason jars (a Ramekin would also be great for this!)
Preheat your oven to 350*F
Base:
1/3 cup Graham Cracker Crumbs
1 Tablespoon Sugar
1/4 teaspoon Cinnamon
1.5 Tablespoon Butter, melted
Filling:
1 can Sweetened Condensed Milk
1/2 cup Citrus Juice - I used 1/2 lemon and 1/2 lime
Zest of 1 lemon or lime or whatever you got!
3 Egg Yolks
pinch of Salt
Topping:
1/2 cup Whipped Cream
1-2 Tablespoons Sugar
In a bowl combine all your base ingredients - graham cracker crumbs, sugar, cinnamon and melted butter. Mix to combine, then evenly portion into the 6 mason jars.
Using your fingers press the graham crackers down to compact them into a firm base and set to the side.
In a new bowl mix together all of your filling ingredients - condensed milk, citrus juice, zest, yolks and salt. Once combined evenly pour into your mason jars.
Place filled mason jars onto a clean baking tray and bake in a preheated 350*F oven for 8-10 minutes or until they have a firm jiggle.
Remove from the oven and let cool at room temperature for about 30 minutes, then transfer to the fridge and chill for at least 2 hours or overnight.
While your mason jars are chilling, whip up your whipping cream and sugar until firm peaks.
Dollop a nice pile of whipped cream on top of your chilled mason jar pie and devour!
Cheese Crackers!
Who doesn’t love cheese crackers, a favourite since the days of eating handfuls of goldfish crackers on the playground! These delicious cheesy crackers can be modified to incorporate whatever grate-able cheese you have in the fridge, which results in SO many fun flavours! I went with cheddar and parmesan because that’s what I had on hand, and as we know, it’s quarantine so I am avoiding the store.

Little cheese bites!
Cheese Crackers
Yield: depends on how you cut them, lets say about 100 small crackers!
Preheat your oven to 350*F
1/2 cup Flour
1 teaspoon Sugar
1/2 teaspoon Salt
1/4 teaspoon Baking Powder
1/4 teaspoon Smoked Paprika (you can leave this out or replace it with other spices, things like onion or garlic powder, italian seasoning, cajun seasoning, even rosemary or thyme would be good!)
2 Tablespoons Cold Butter, cubed
about 115g Cheddar Cheese, grated on the smallest sized grater you have (you can replace this with another cheese such as swiss, mozzarella, havarti, whatever you got!)
2 Tablespoons grated parmesan (optional)
1-2 Tablespoons of cold milk or water
Coarse salt for the tops
In a bowl combine all your dry ingredients - flour, sugar, salt, baking powder and smoked paprika (or other spices)
Toss in your cold butter and cheese and combine together by pinching and rubbing the dough with your hands until it looks like coarse sand. We ideally want there to be no large butter chunks left but it still looks crumbly.
Now add your milk (or water) a little bit at a time, I used about 1.5 Tablespoons, but it will vary depending on how dry your cheese is, something like an old cheddar or a parmesan is going to need a little more moisture, while something like a havarti is not as dry and will need a little less. So just add a little bit at a time, stirring them together until you can grab a ball in your hand and when squeezed it will stay in a ball.
Press the dough together into a disk and wrap with saran wrap and chill for at least 30 minutes.
Roll out your dough onto a lightly floured surface and cut into small squares using a pizza cutter, or whatever shape you like!
Bake in a preheated 350*F oven for about 10-15 minutes or until lightly golden on the bottom and cheese-y smelling!
Let cool and eat! Store any extras in an airtight container or baggie.