
Baking recipes
Scroll through our posts below to try all sorts of delicious baking recipes from our instagram baking videos. New baking videos are posted the first week of each month on Instagram and Facebook.
To easily find one of our recipes type below:
Herb and Garlic Pull Apart Bread!
This loaf of bread is made up of many squares of dough layered with herb and garlic butter! The layering results in a flaky loaf you can just pull apart with your fingers! So tasty and easy to eat!

Layers of buttery goodness!
Herb and Garlic Pull Apart Bread
Yield: 1 loaf sized 9”x5”
Dough:
1.5 cups Milk, warm
1/4 cup Butter, melted
3 cups Flour
1.5 teaspoons Salt
1.5 teaspoons Instant Yeast
3 Tablespoons Sugar
1/2 teaspoon Pepper
Herb and Garlic Butter:
1/3 cup Butter, soft
2 cloves Garlic, chopped
1/2 cup chopped herbs - I used green onion, cilantro and parsley, but use what you got!
pinch of Salt
pinch of pepper
In the bowl of your mixer combine all the dry ingredients for your dough - flour, salt, instant yeast, sugar and pepper. Toss to combine, then add your warm milk and melted butter.
Mix with the dough hook about 10 minutes or until the dough is no longer sticking to the sides of your bowl and is in a nice firm ball around the dough hook.
Place the dough into a grease bowl with a lid and let sit at room temperature for about 1 hour or until doubled.
While the dough is resting, stir together the herb butter- soft butter, garlic, herbs, salt and pepper.
Once your dough is ready, roll it into a large rectangle about 12'“x16” on a lightly floured surface.
Now spread your garlic butter on top of the dough covering the entire thing.
Using a pizza cutter, cut the dough into 12 pieces 3 columns x 4 rows, don’t worry if some aren’t exactly square.
Now grab one of the 12 squares and fold it in half so the butter layer is in the inside like a herb butter taco, you will do this with each square of dough.
Place all the folded pieces of dough into a greased loaf pan, placing the folded edge on the bottom of the pan so you can see the buttery centre from the top of your loaf. I find it easiest to place my loaf pan on it’s side so I can stack all the pieces of dough on top of each other without them falling over, then I can place the pan back on it’s bottom and rearrange the pieces if needed.
Once all your dough is in the pan, cover with a piece of saran wrap and let sit at room temperature until it has expanded and filled the pan, about 1 hour.
Bake in a preheated 350*F oven for about 30-45 minutes, or until golden brown and hollow sounding when tapped.
Cool and eat!
Crepes Suzette! It's FLAMBE time!
This dessert was popular in the days of white gloved waiters, but no white gloves necessary! First you make crepes which are already delicious, then you make an orange caramel sauce which you FLAMBE! So fun and exciting! Both the crepes and orange caramel sauce are delicious for other uses, like crepes filled with nutella and bananas, or ice cream with orange caramel sauce on top! Yum!

These crepes are saucy!
Crepes Suzette
Yield: 6-8 large crepes (I used a 10” skillet)
Crepes:
1/2 cup Milk
2 Eggs
1 Tablespoon Butter, melted
2 teaspoon Sugar
1/4 teaspoon Salt
1/2 cup Flour
Orange Caramel Sauce:
1/2 cup Sugar
1/4 cup Butter
Juice of 1 Orange (about 1/4-1/2 cup)
2 ounces (1/4 cup) Grand Marnier (optional)
To make crepes, whisk together all the crepe ingredients until smooth and combined. If it is lumpy just pour it through a strainer. Let this sit in the fridge at least 30 minutes or overnight.
To cook the crepes, heat a non-stick skillet to medium high heat (or a crepe pan if you have one of those!). Grease the pan with a little butter or oil then pour a few tablespoons of batter into the pan and swirl the pan around to coat the base. You don’t want your crepes to be thick, so depending on the size of your pan probably 2-4 tablespoons.
Continue heating the crepe until it looks matte on top and not liquidy, then it’s all cooked! Peel it off the pan and place onto a clean baking tray. Then continue until all your batter is used up, placing each crepe onto the baking tray, the crepes can overlap a bit and they shouldn’t stick together.
Now for the sauce! Make sure you have ALL the sauce ingredients ready to go, you can’t walk away from this once you start.
Heat up a large pan over medium-high heat. Place a few teaspoons of sugar onto it and stir until it is melted, then add a few more teaspoons of sugar and continue stirring until it’s melted, then continue until all your sugar is used. This is called a dry caramel. Once all your sugar is melted, continue cooking until it is a nice golden brown colour.
Turn off the heat and carefully add your butter, stirring it gently until it is all melted and combined. Watch out this is going to be super hot and bubbly!
Now slowly pour in your orange juice, and stir to combine. Even though this is off the heat it is still going to bubble up and steam so be careful! If the sugar clumps up don’t worry!
Now put your caramel sauce onto a medium-low heat and cook until all the sugar clumps have melted and the sauce looks nice and smooth.
Now turn off the heat and pour in your grand mariner (if using), DO NOT POUR FROM THE BOTTLE! This can carry a flame back into your bottle and explode which would not be good! Just use a measuring cup or small container. Carefully using a BBQ lighter ignite your sauce, it might take a second and then it will be on fire! Carefully shake your pan until the fire burns itself out. If you get scared or the fire gets out of control, keep a lid nearby to cover the pan, this will put out the fire if you need. IF YOU HAVE A GAS STOVE your burner will ignite the pan, you might have to tilt it towards the flame, but it will catch on fire that way. If you are not comfortable with this, turn off your gas stove, move your sauce off the heat and ignite with the BBQ lighter as I had. Now your delicious sauce is all ready to go!
To serve, fold each crepe in half and then fold that in half, so it looks like a triangle shape. Then you can place the crepes directly into the sauce, or you can place the crepes onto a plate and pour the sauce on top! Yum!
Blueberry Cake aka Blueberry Buckle!
This cake is family favourite! We would make it every summer whenever we had some fresh blueberries! It’s a soft buttery cake layered with blueberries and cinnamon streusel! the blueberries burst into the cake while it bakes making a delicious layer of blueberries and cinnamon in the middle! So good!

ALL the blueberries!
Blueberry Cake
Recipe courtesy of my mama Patty Lotecki
Yield: one 9”x13” pan
Preheat your oven to 350*F
Streusel:
1/4 cup Butter
1 cup Brown Sugar
1 Tablespoon Cinnamon
Blueberry Layer:
2 cups Blueberries
1/2 cup Sugar
Cake:
3/4 cup soft Butter
3/4 cup Sugar
1/4 teaspoon Salt
1 teaspoon Baking Soda
1 teaspoon Baking Powder
1 teaspoon Vanilla Extract
2 Eggs
1 cup buttermilk (or sour cream, or yogurt, or 1 cup milk plus 1 teaspoon vinegar)
2 cups Flour
In a bowl combine your streusel ingredients (butter, brown sugar and cinnamon) by rubbing them together with your hands until combined. Set aside.
In a bowl combine your blueberry layer ingredients - blueberries and sugar. Toss to combine. Set aside.
In the bowl of a mixer place your butter, sugar, salt, baking soda, baking powder and vanilla. Whip until light and fluffy.
Add eggs one at a time, mixing between each egg until they are combined. Then give your bowl a scrape down and whip for a few more minutes or until light and fluffy.
Slowly add about 1/3 of your flour to the butter mixture, once it’s almost fully combined add half of the buttermilk, then continue alternating the buttermilk and flour until it’s all used up. I usually do 3 portions of flour and two of buttermilk. Then scrape your bowl down and mix for about 20 seconds until the batter is nice and combined.
In a greased 9”x13” pan put about 2/3 of your cake batter and smear so it covers the entire base of the pan.
Next, layer all of your blueberry mixture, spreading it evenly on top of the cake batter.
Then layer all of your streusel topping on top of the blueberry layer as evenly as possible.
Now dollop spoonfuls of the remaining batter randomly on top of the streusel layer so you can still see the streusel peeking through.
Bake in a preheated 350*F oven until golden brown and comes out clean when stabbed with a toothpick.
Let it cool then devour!
Pavlova!
Pavlova is the fluffiest of cakes! It’s a GIANT meringue with a marshmallowy centre that you fill with whipped cream and top with fresh fruit! It’s our favourite dessert for any bakery staff party! Named after a ballerina’s fluffy tutu this cake is as light as air!

it’s a mountain of deliciousness!
Pavlova
Yield: 1 approximately 8” round pavlova
Preheat oven to 300F, then reduce to 250*F when you place the pavlova into the oven.
Pavlova:
5 Egg Whites, room temperature
pinch Salt
1 teaspoon Vanilla extract (optional)
1 cup Sugar
1 teaspoon Vinegar
1 Tablespoon Cornstarch
Filling:
1/2 cup Whipped cream
1-2 Tablespoons Sugar
1 cup Fresh Fruit
1 Tablespoon Sugar
In the bowl of your mixer place your egg whites and the pinch of salt.
Using the whisk attachment, whip the egg whites until they start to turn white and foamy.
While the machine is running on a low speed, slowly pour in the sugar until it is fully incorporated, then increase the mixer speed to medium high speed and whip until super thick and fluffy, at least 10 minutes. The meringue should not feel grainy when you rub it between your fingers.
Add the vinegar and cornstarch to the mixer and mix on a medium speed for 20-30 seconds until combined.
Using a bowl or plate, trace an approximately 8” diameter circle onto a piece of parchment paper, then flip oven the parchment so the outline is on the bottom of the paper, and place the parchment onto your baking tray. You can use a little baking spray on the pan to stick down your parchment so it won’t slide.
Load your meringue mixture onto your drawn circle on the parchment. Then gently spread it into the circle shape. You can use the back of a spoon or a spatula to create decorative lines on the side of your pavlova, or just leave it with a rustic look.
Place pavlova into a preheated 300F oven, then as soon as the pavlova is in, REDUCE the heat to 250*F and bake for 1.25-1.5 hours. The pavlova should be crispy feeling on the outside.
Turn off the oven, but leave your pavlova in the oven to cool - about 2 hours (or just leave overnight.)
Once your pavlova has cooled, whip your cream to soft peak and sweeten to taste with sugar (1-2 Tablespoons if usually good for me), place the whipped cream on top of the pavlova.
Chop up your fresh fruits and toss with a little sugar to taste - if your fruit is sweet enough don’t worry about adding any sugar. Place fruit on top of the whipped cream.
Serve right away! So delicious!
Lavash Crackers
What’s better than cheese and crackers…cheese and HOMEMADE crackers! Lavash crackers are a super thin flatbread that you can top with any type of spices and seeds to customize to your liking. They look beautiful on a cheese board as you can break them into large pieces that you can place in a glass for added height.

Crunchy Crackers!
Lavash Crackers
Yield: about a 15”x10” rectangle
Preheat oven to 400*F when you are shaping the dough.
Dough:
3/4 cup Flour
1/4 teaspoon instant Yeast
1/3 cup water, warm
1 teaspoon Honey
1/2 teaspoon Salt
Topping:
Olive oil and seasoning of your choice - I used a pre made spice blend normally used for steak, but whatever you like is great! Or you can just use coarse salt.
In the bowl of your mixer combine all the ingredients for the dough.
Mix with the dough hook on your mixer for about 10 minutes, or until a non-sticky dough ball forms.
Place your dough ball into a grease bowl with a lid for about 1-2 hours at room temperature.
Once your dough has rested roll it out as thin as you can with a rolling pin, then place on the BOTTOM side of a baking tray that you have greased and use your hands and rolling pin to stretch and pull the dough as thin as you can.
Drizzle your dough with a little olive oil and smear it over the dough so it is fully covered.
Sprinkle the dough with your seasonings.
Bake in the preheated 400*F oven for 5-10 minutes, keep an eye on these as they can go from unbaked to burnt very quickly, I check the crackers every minute or two. My crackers took 9.5 minutes. The dough will be crispy and golden, thinner pieces will be a bit darker but that is fine.
Let your crackers cool for at least 10 minutes before cracking into pieces and eating!
Cheese-y Garlic Knots!
It’s like garlic bread and dinner rolls were KNOT together in perfect harmony! These tender buns get the addition of delicious cheese, because cheese makes everything more delicious! No pizza parlour required!

Knots of deliciousness!
Cheese-y Garlic Knots
Yield: 8 buns
2 cups Flour
1 teaspoon Salt
1 teaspoon Instant yeast
2 Tablespoons Sugar
1/2 teaspoon Garlic Powder (or one chopped garlic clove)
1 cup Milk, warm
3 Tablespoons Butter, melted
1/2 cup Shredded Cheddar Cheese
1 Tablespoon Parmesean
Glaze:
2 Tablespoons Butter, melted
1 Clove of Garlic, chopped (optional)
pinch of Pepper (optional)
pinch fo dried parsley (optional)
In the bowl of your mixer combine the dry ingredients - flour, salt, yeast, sugar, and garlic powder. Stir to combine.
Add the warm milk and melted butter, then mix with a dough hook on your mixer for about 8 minutes or until the dough ball isn’t sticking to the sides of the mixer.
Add your cheese to the dough and knead for one more minute, until fully combined.
Let your dough rest at room temperature for about an hour until doubled.
Place your dough onto a lightly floured surface and cut into 8 equal pieces.
Roll each piece of dough into a wormie about 6-8” long, then tie them together by criss crossing both ends, once crossed, then pinch the ends together and place them onto a lined baking tray.
Once all your dough is knotted, cover your baking tray with a clean dish towel and let rise at room temperature for 30 minutes to an hour, or until doubled in size.
Combine your glaze, mix the melted butter with the garlic, pepper and parsley.
Glaze each bun with the garlic butter glaze, then bake in a preheated 350*F oven for about 20 minutes, or until golden brown and when tapped on the bottom, they sound hollow.
Enjoy!
Peanut Butter Balls aka Peanut Butter Truffles if you want to be fancy!
Who doesn’t love a peanut butter cup? Probably some people. but not me! I love peanut butter cups! These peanut butter balls are a confection/cookie that taste like a peanut butter cup, but like the most LOADED peanut butter cup you’ve ever made! These treats are great to store in the freezer, and not that I am looking forward to Christmas time just yet (when will the snow go away!), but they do make a great addition to any holiday baking platter!

Peanut Buttery goodness!
Peanut Butter Balls
Yield: 20-25 balls
3/4 cup Peanut Butter (smooth or chunky, whatever you got!)
1/4 cup Butter, melted
1/2 teaspoon Salt
1 3/4 cup Icing Sugar
1 teaspoon Vanilla Extract (optional)
Dipping chocolate:
2 cup chocolate
1 Tbsp Oil or butter
in a bowl combine the peanut butter, melted butter, salt, and vanilla. Stir to combine.
Add icing sugar and stir in, it’s going to be fairly dry, so you will have to mix with your hands once you get most of the icing sugar mixed in (or a mixer will work too!). The mixture will look fairly dry and crumbly, but you should be able to press it together into a ball and it will hold its shape. If it is too dry to do that, add a tablespoon or two more melted butter until the mixture can be pressed into a ball.
Press the dough into balls using your hands and place them onto a parchment lined baking tray.
Place your chocolate and oil into a bowl and melt together in the microwave or on a double boiler until smooth.
Dunk each ball into the chocolate and pull out using a fork, scraping any excess chocolate from the bottom of your peanut butter ball by dragging the base of your fork along the edge of your chocolate bowl.
Place the coated balls onto your parchment lined tray. Add sprinkles if you like!
Chill in the fridge for at least 30 minutes, or until chocolate have firmed up.
Eat!
Homemade DOUGHNUTS!
Doughnuts are AMAZING! I love doughnuts! That is my birthday treat of choice. Home made doughnuts are truly the ultimate version of doughnuts because you can’t beat a warm doughnut straight out of the fryer! It’s sooooo yummy! The dough isn’t too tricky, but you do need to deep fry them, because lets be honest, a baked doughnut should just be called a bun and we don’t want none, if you’re just a bun! Ok I would still eat a bun, but fried is the WAY TO GO! I don’t have a deep fryer, you just need a sturdy pot and ideally a thermometer.

Freshly baked doughnuts are the love of my life!
Doughnuts
Yield: 6-8 regular sized hole-y doughnuts
Dough:
2/3 cup milk, warm
1/4 cup butter, melted
1 egg
1 teaspoon Vanilla Extract (optional)
3/4 teaspoon Salt
2 Tablespoons Sugar
1 1/2 teaspoons Instant yeast
2 cups Flour
In the bowl of your mixer combine the dry ingredients - flour, salt, sugar, yeast. Toss together to combine.
Pour in your liquid ingredients - milk, melted butter, egg and vanilla.
Knead the dough in your mixer until it creates a ball around your dough hook, and isn’t sticking to the sides of your bowl, about 10 minutes.
Place your dough ball into a grease bowl, cover and let rise at room temperature for about 1 hour, or until doubled.
Once double, press down your dough and take it out of the bowl. Wrap in saran wrap and place in the fridge until chilled, at least 30 minutes. You can even leave these overnight if you want to fry them off for breakfast in the morning!
Next, roll out your dough to about 1/2” thick and cut out your doughnuts, ideally use a 3-4” round cutter with a 1” cutter for the middle, but use what you got! Wine glasses work great!
Place your doughnuts onto a lined and lightly floured baking tray, then cover with a clean tea towel and let rise at room temperature for 30 minutes-1 hour, or until almost doubled.
Get your glaze and/or cinnamon sugar ready at this point, so they are ready to go once your doughnuts are fried!
While your doughnuts are rising, heat up a deep fryer or a large pot with at least 1” of canola oil or shortening at the bottom, you want an oil with a high smoke point. We want our oil at 350F-365F. Ideally use a thermometer to keep an eye on your oil, otherwise you can toss scraps of dough in to see how the sizzle and gauge the temperature that way.
Once your dough is ready place a 2-3 doughnuts in at a time and fry for 1-2 minutes flipping halfway. Mine took about 1.5 minutes for the larger doughnuts.
Once your doughnut is golden, remove it from the oil and place onto a wire rack that is sitting on top of a baking tray to catch anything that drips.
If you want cinnamon sugar doughnuts, roll them in the cinnamon sugar while they are hot out of the fryer. If you would like to glaze them, finish frying all your doughnuts and then toss them into your glaze and place back on to the wire rack to dry for a minute before serving.
Now eat them while warm, it is the GREATEST!
Cinnamon Sugar:
3/4 cup sugar
1 teaspoon cinnamon
Toss together!
Vanilla Glaze:
1 cup Icing Sugar
2 Tablespoons Milk
1 teaspoon Vanilla Extract
Stir ingredients together until smooth, if you want it thicker, add more icing sugar to get the consistency you like.
Giant Lemon Cheesecake Mousse Cream Egg!
Easter is almost here and that means Cream Eggs! So lets make a GIANT cream egg!!! You can definitely make this mousse in a glass or serving dish, but I am making it in a giant egg so I can crack it open! Yay! dessert and a show!

pre-smashing!
Lemon Curd
Yield: about 2 cups
1/2 cup Lemon Juice
1/2 cup Sugar
3 Eggs
1/2 cup Butter, cubed
In a pot bring your lemon juice to a boil on the stove.
which together your eggs and sugar in a bowl, set to the side.
Slowly pour the hot lemon juice into the eggs while constantly whisking until about 75% of your lemon juice has been whisked in.
Pour the egg mixture back into the pot and over a low-med heat on the stove, constantly stirring until the mixture begins to thicken.
Take off heat and then stir in the butter until melted.
Pour your lemon curd into a bowl and let chill in the fridge.
Lemon Cheesecake Mousse
Yield: about 4-5 cups
1 cup Lemon Curd
8 oz. Cream Cheese (1 cup), softened
1/4 teaspoon Salt
1 cup Whipped Cream
2/3 cup Icing Sugar
Whip your cream to medium peaks, set aside in the fridge.
in a mixer whip up your cream cheese and salt until soft.
Add your lemon curd to the cream cheese and using a whisk in the mixer, whip up until fluffy.
Add your icing sugar to the cream cheese mix, and whip until fluffy.
Using a spatula, fold your whipped cream into the cream cheese mix in 2-3 additions, folding as gently as possible to not deflate your mousse.
Pour into moulds or glasses!
Giant Egg Method
Yield: 1 giant egg!
You will need a giant easter egg that opens up to use as a mould
1 package of Candy Melts (I used white, but you can use any colour
Lemon Curd (just the leftovers from your mousse is perfect)
Lemon Cheesecake Mousse
Sprinkles and candies to decorate your egg
Line your easter egg with saran wrap on the inside of the egg, pressed as smoothly as possible against the sides and letting the excess go over the edge so you have something to grab onto when you want to pop out the egg shell from the mould.
Melt your candy melts in the microwave doing just 10 second intervals so you don’t burn the candy, you can also do this on a double boiler.
Once you candy melts are completely melted, using a small spatula or a spoon, brush the candy melts onto the saran wrap, it’s easiest to do a few layers, so brush your layer on, pop it in the fridge or freezer, once it’s hardened add another layer until your “shell” is thick enough that you can pop it out of the mould and it will stand on it’s own. I did 2 thick layers.
Fill your egg shells with the lemon cheesecake mousse, smoothing out the top so it is not higher than the edges.
In the centre of the mousse, scoop out an egg sized hole on both sides of the egg, as a yolk would be on a real egg.
Fill the hole with lemon curd.
Freeze your eggs until firm, I let them freeze overnight.
Once frozen, pop your eggs out of the moulds and remove the saran wrap.
Using a sharp knife, trim the edges until they are flat and the two halves will fit together.
Heat up your remaining candy melts and place them into a piping bag if you have one.
Pipe the candy melts around the edges and glue the two halves together, then smooth any candy melts that squished out with your finger.
Now using your candy melts as glue, decorate your egg using sprinkles and candies.
Your beautiful egg is not ready to go! Let it sit in the fridge for at least 4 hours so the mousse thaws and isn’t frozen!
Happy Easter!
Mud ball Cookies aka Easter Nests!
Mud ball cookies, sounds like your eating mud, but they’re actually a delicious chocolate coconut oatmeal cookie! This recipe is from my mom! We made them ALL the time growing up, and they are still a favourite today. They are a great cookie because they are quick to make and don’t involve any baking! Today we shaped them into nests with little mini eggs in the centre, but you can just scoop them and eat them without any chocolate eggs on top. These are also egg free and wheat free, which is great for anyone with allergies!

The most delicious bird’s nest you will ever eat!
Mud Ball Cookies
Recipe courtesy of Patty Lotecki - mama extraordinare
Yield: about 12 nests, or 24 smaller cookies
No oven required for these cookies!
1/4 cup Butter
1/4 cup Milk
3/4 cup Sugar
1 1/2 cups Oats (quick or rolled, both work great)
1/4 cup Cocoa Powder
1/2 cup Coconut (sweetened or unsweetened)
pinch Salt
1 teaspoon Vanilla extract (optional)
Mini Eggs for garnish (optional)
In a pot heat bring your butter, milk and sugar to a boil, then boil for 1 minute while stirring.
In a bowl combine all your dry ingredients - oats, cocoa, coconut, and salt. Stir to combine, breaking up any cocoa balls.
Once your butter mixture has boiled, pour it into the dry ingredients and add your vanilla extract. Stir until everything is well combined.
Grab a baking tray lined with parchment, and scoop your batter into little mounds on the tray. I used an ice cream scoop, but two spoons work great too! Then press the centre of each mound down slightly so it looks more like a nest shape.
Place a few mini eggs in the centre of each mound like eggs would be placed in a nest.
Let them cool at room temperature for about 2-4 hours, or until set and you can remove them from the parchment paper.
Eat! You can also store these in a sealed container…if you don’t eat them all!
Hot Cross Buns! Hot Cross Buns! One a penny, two a penny, Hot Cross BUNS!
Hot cross buns! These festive Easter rolls are rolling with flavour! They are made of a lightly sweetened dough, studded with dried fruit, orange zest and a little dash of cinnamon! Apparently they were created as a sweet treat to end your fasting for lent, but don’t you worry, no fasting is required to indulge in these babies!

I forgot to take a picture before taking a bite…whoopsie!
Hot Cross Buns
Yield: 6 buns (I fit them into a 10”x6” loaf pan so they would bake into one another, but use whatever pan you like, or double the recipe and it will fit perfectly into a 9”x13” pan)
Once dough is shaped, preheat your oven to 350*F
Bun Dough:
2/3 cup Milk, warm but not boiling
1 teaspoon Instant Yeast
2 Tablespoons Butter, melted
2 Tablespoons Sugar
1 teaspoon Salt
1 Egg
1 1/2 cups Flour
1 teaspoon Cinnamon
zest of 1 Orange (or if your orange is giant like mine, I just tested 1/2 of it)
Dough Fruits:
1/2 cup Dried Fruit - I used raisins and dried cranberries
1 teaspoon Grand Marnier (optional)
Cross Dough:
2-3 Tablespoons Flour
enough juice of your orange (or water or milk) to get a nice consistency, about 1-2 Tablespoons
Egg Wash:
1 Egg
pinch Salt
pinch Sugar
Place your dried fruit into a small bowl, then cover with boiling water and set to the side.
In the bowl of your mixer, combine all the ingredients of your dough - milk, yeast, butter, sugar, salt, egg, flour, cinnamon and orange zest.
Using the dough hook on the mixer, knead the dough on medium-low speed for about 10-15 minutes or until the dough comes together into a sticky ball around the dough hook. This is a pretty sticky dough, but it should be VERY glutinous in you grab it and not be sticking to the sides of your bowl too much.
Drain your dried fruits and press out any excess moisture, then stir with the 1 teaspoon of Grand Mariner if you are using it.
Now pour your dried fruits into the dough and knead for 2-3 more minutes or until they are combined.
Place your dough into a greased bowl, cover, and let sit at room temperature until doubled, about 1 hour.
Once your dough has rested, place it onto a floured counter and lightly press into circle, then cut into 6 even pieces.
Roll each piece into a ball and place into a greased and lined baking pan.
Once all the dough is in the pan, cover it with some saran wrap, and let it sit at room temperature for about an hour, or until doubled.
While your dough is resting, mix together your cross dough - combine about 3 tablespoons of flour with enough orange juice to create a pipeable consistency (you can also use water or milk for this). Place this into a piping bag or a ziplock bag that you can cut the corner off of to pipe with.
For the egg wash, whisk together your egg with the pinch of salt and sugar.
Once your dough has rested carefully glaze the buns with your egg wash.
Now using the piping bag, pipe a cross on top of each bun.
Bake in a preheated 350*F oven for about 20 minutes, or until golden brown and delicious!
Time to eat before the Easter bunny gets to them!
Mini Egg Nanaimo Bars!!!!! Yes, you read that correctly!
Mini eggs - they’re my addiction! Normally I would be in the midst of making a zillion mini egg cakes and bunny shaped sugar cookies, but alas it’s quarantine! Now I have a ridiculous amount of mini eggs and all I want to do is eat them by the handful…which I do, but we should bake some too! Genius idea - MINI EGG NANAIMO BARS! It came to me as I was eating mini eggs out of a bowl like they were cereal and they are HEAVENLY!

Mini Egg Nanaimo Bars before slicing!
Mini Egg Nanaimo Bars
Yield: 8”x8” pan
Preheat your oven to 350*F
Base:
1 cup Graham Cracker Crumbs
3/4 cup Sweetened Coconut (or unsweetened)
1/2 cup Toasted Almonds, chopped up (can substitute another nut, or replace with graham cracker crumbs)
1/4 cup Cocoa Powder
1/4 cup Sugar
1/4 teaspoon Salt
1/3 cup Butter, melted
1 Egg
Icing Filling:
1/2 cup Butter, soft
2 Tablespoons Hot Chocolate Powder (or 1 Tablespoon Cocoa powder)
2 Tablespoons Milk
1 teaspoon Vanilla
2 cups Icing Sugar
1/4 cup Crushed Mini Eggs (I crushed them in a food processor)
Chocolate Topping:
3/4 cup Dark Chocolate (semi-sweet Chocolate chips will work great!)
1.5 Tablespoons Butter
2 Tablespoons Crushed Mini eggs
Roughly chopped mini eggs for top decor ~ 1/4 cup
In a bowl combine the base dry ingredients - graham cracker crumbs, coconut, almonds, cocoa, sugar, and salt. Stir to combine.
Add your melted butter and egg, and stir until combined.
Pour your base mixture into a parchment lined 8”x8” baking pan, and using your hands press it evenly over the base of the pan until its evenly covered and compacted.
Bake your base for about 10-15 minutes until it feels firm and you can’t see any liquid bits. Let cool.
Once your base is cool, in the bowl of a mixer combine your icing filling ingredients. Start with the milk and hot chocolate powder, stir them together to moisten the powder, then add all the other ingredients - butter, icing sugar, mini eggs, and vanilla extract. Mix on medium high speed until light and fluffy looking 4-6 minutes.
Smear the icing filling on top of your cooled base and evenly spread it out, trying to make the top as smooth as possible. Chill until firm, at least 30 minutes.
In a microwaveable bowl, or a double boiler (if you want to use a stove), melt together your chocolate and butter until fully melted.
Stir in the crushed mini eggs to the chocolate and quickly spread on top of the firm icing layer.
Sprinkle with more chopped mini eggs!
Chill until set, ideally 4 hours.
Cut and eat! These also freeze great!
Ciabatta - it takes a day...but it's worth it! I swear!
Ciabatta is my favourite bread! I have paid a ridiculous amount of money for a single loaf of ciabatta (and I would happily do it again!), but guess what, you can make it at home for pennies! Literally! My food costing comes in around $0.30 whaaaaaatttt! Amazing! It is a labour of love though because it takes about 24 hours to make, but what else are we doing, it’s quarantine! If I am going to have 24 hours to dedicate to a bread it’s now! Yay! This delicious bread starts the day before with a pre-ferment called a biga. A biga is basically a lump of firm dough, I think in theory it was a lump of the dough from your bread baking the day before, but obviously if I made dough it would all be eaten that day. That lump of dough then sits for ideally about 18 hours at room temperature so it can gain lots of flavour and grow some natural yeasts, giving it that sourdough tang without needing to worry about a sourdough starter, because that takes like a week and I can’t be bothered!

Ciabatta Bread before going into my belly!
Ciabatta
Yield: 1 loaf (approximately 10”x4” rectangle)
Biga:
2/3 cup Flour
1/4 cup Warm Water
pinch of Instant Yeast
Final Dough:
1 1/4 cup Flour
1/2 teaspoon Instant Yeast
2/3 cup Warm Water
1 teaspoon Salt
Biga that has sat for 12-18 hours at room temperature
In your mixer with a dough hook combine your Biga ingredients - 2/3 cup flour, 1/4 cup warm water and pinch of yeast. Mix for 3 minutes on a low speed.
You should have a little dough ball, this is your Biga! Place your biga in a greased bowl with a lid/saran wrap and leave at room temperature for 12-18 hours. It should become bubbly and rise.
Once your Biga is ready to go, place it into your mixer along with all of the other ingredients for the final dough. Mix with a dough hook for 4 minutes. This dough is going to look very sticky and goopy, that is perfect!
Place the dough into a greased bowl or pan that has a lid and let sit and proof at room temperature for about 1 hour or until doubled.
Once your dough it ready you will fold your dough ball in half 4 times, I like to use a rectangle pan instead of a bowl when I make ciabatta because it has 4 sides, and i can turn the pan for each fold so I make sure to do this 4 times. Grab the edge of the dough and fold it in half, then turn the pan or bowl 90 degrees and repeat, do this until you get back to where you started and your 4 folds will be complete! Now put the lid on and let sit at room temperature for 1 hour.
Now that your dough has sat, you will repeat the 4 folds like we did earlier. Then place a lid on and let it sit at room temperature for 30 minutes.
Our dough is now ready to shape. Grab a large baking tray and dust it fairly heavily with flour.
Place your dough gently onto the tray and gently stretch the dough into an approximate 10”x4” rectangle shape. Try not to squish the dough, we don’t want to collapse too much of the volume.
Now heavily dust the top of the ciabatta bread with flour, then drape a clean tea towel on top and let it sit at room temperature for 30 minutes.
While the dough is resting, heat your oven up to 450*F and place a clean metal tray on the bottom rack of your oven, this needs to be hot when we bake our bread.
Once your dough is ready to go, place it into the hot oven, on the rack above the one with the hot tray, then grab 1-1 1/2 cups of water and carefully pour it onto the metal pan that is on the bottom rack and its going to SIZZLE and create STEAM! Quickly close the oven to capture all the steam and bake your ciabatta for about 20 minutes. DON’T OPEN THE OVEN! If you take a peak into the oven it’s going to release the steam we just created and we want to keep that steam in there to allow our dough to grow and expand in the oven before it crusts up.
Your ciabatta will be done when it is golden brown and when you tap it with your finger it should sound hollow.
Place your cooked loaf onto a wire rack to cool (this helps steam from forming under your loaf and giving you a soggy bottom!)
Now eat your AMAZING ciabatta bread! I’m eating mine now! mmmm
Tiramisu! It's like we're at a fancy Italian Restaurant... when actually we can't leave the house!
Tiramisu! It just sounds delicious! This Italian dessert has layers of coffee soaked ladyfingers (which we made yesterday!), sandwiched with sweet fluffy mascarpone cheese filling, then topped with a sprinkle of cocoa powder! No Italian restaurant required!
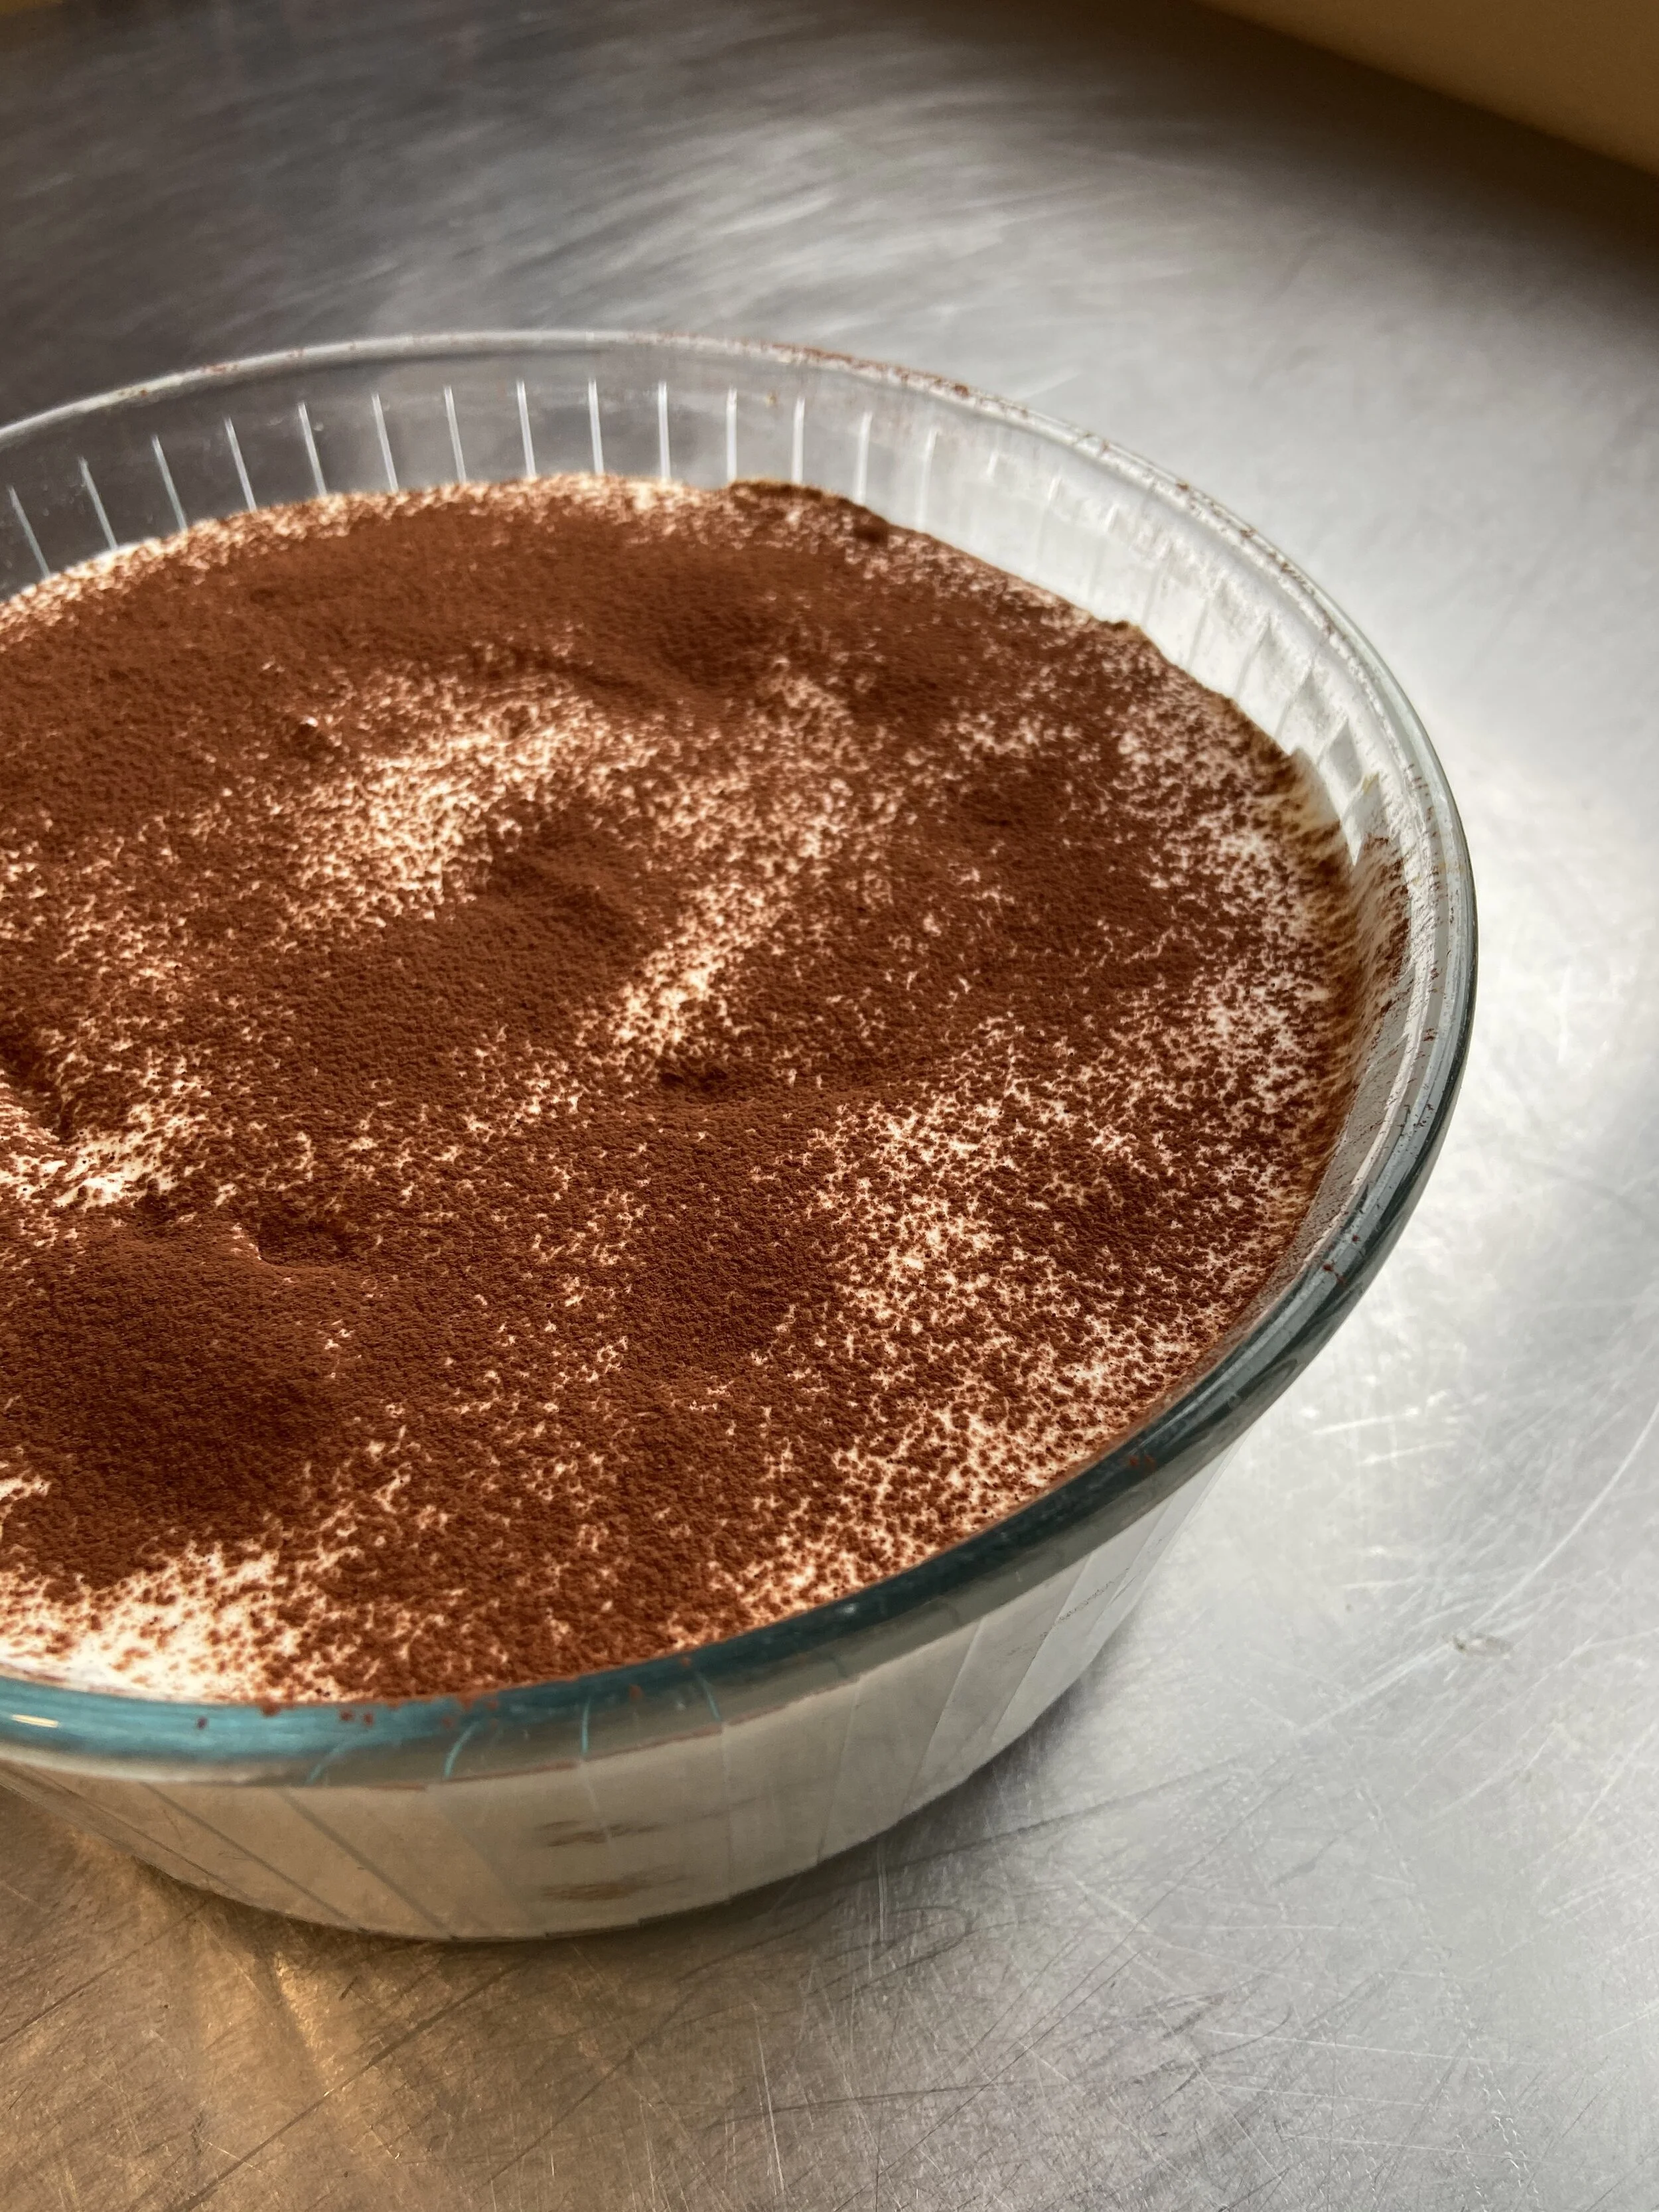
This photo does not capture the deliciousness of this Tiramisu!
Tiramisu
Yield: 1 large serving dish, I believe my glass dish is about 2 litres, but use whatever pan you’ve got, the taller the container, the more layers you will get. You could also make this in a 9”x13” pan
Mascarpone Filling:
1 1/4 cup Whipping cream
4 Egg Yolks
1/2 cup Sugar
2 Tablespoons Frangelico - Traditionally this is made with Marsala wine, but I don’t have any, so use whatever liqueur you got!
pinch of Salt
1 1/4 cup Mascarpone Cheese, softened at room temperature
Ladyfinger Soaking Syrup :
2 cups of coffee
1/4 cup sugar
2 Tablespoons Frangelico (optional)
Approximately 24 ladyfingers (or one batch of the recipe we made yesterday)
Cocoa Powder - for dusting
In a shallow baking dish stir together your ladyfinger soaking syrup ingredients - coffee, sugar, Frangelico. Set this to the side.
In the bowl of your mixer (or by hand) whip the cream to soft peaks. Then leave in fridge until we are ready for it.
Get a pot with water simmering on the stove, we are going to do a water bath! Just an inch or two of water in the bottom of a large pot will be perfect.
Grab a metal bowl the will fit on top of your pot of water and in it place the egg yolks, sugar, Frangelico, and salt. Then stir them together and place it on top of the simmering water pot on the stove. The bowl should not be touching the water, we are just trying to steam the bottom of our bowl and cook the eggs so they are safe to eat.
Constantly stir your egg mixture while it is sitting on the waterbath until the eggs feel warm/hot and when you rub it between your fingers you cannot feel any grains of sugar. Then pour this mixture into the bowl of your mixer and whip on high until cool - it should be super fluffy and marshmallowy looking.
In a large bowl place your softened mascarpone cheese.
With a spatula fold in all of your egg mixture, being as gentle as you can so you don’t knock out too much air.
Now fold in about 1/3 of your whipped cream, again, being gentle!
Then fold in the rest of your cream. Now your filling is complete!
To layer your tiramisu you will start with a layer of ladyfingers. Grab one ladyfinger, dunk it into your coffee syrup on both sides and then place it into the bottom of your serving dish. Continue until you have fully covered the bottom of the pan (mine fit 8 cookies).
Now pour a layer of your mascarpone filling - my container would fit 3 layers of ladyfinger cookies, so I planned to do 3 layers of mascarpone filling, so I poured about 1/3 of the filling on top. but count up your ladyfingers in the base layer and see how many cookies you have for your baking dish and divide the filling evenly.
Continue to layer the soaked ladyfinger cookies, then the mascarpone filling until you use them all up.
Then lightly dust the top of your tiramisu with cocoa powder!
This baby is all finished now, it just needs to sit in the fridge for about 8 hours or overnight to let everything soak into each other.
Yum!
Lady Fingers...Prelude to a Tiramisu!
What are lady fingers? Obviously they are these wonky digits on the end of my hands….but ALSO a delicious sponge cake-y cookie used in things like TIRAMISU! These cookies can be little tricky, the hardest part is folding everything together gently, so no taking your aggression out on these babies! Make them in a Zen state of mind!

Last fingers…but the cookie kind!
Ladyfinger Cookies
Yield: about 24-30 3” long cookies
Preheat your oven to 400*F
3 Egg Yolks
3 Egg Whites
1/3 cup Sugar
Flour, sifted
pinch of Salt
Icing sugar for sprinkling on top ~3 Tablespoons
In the bowl of your mixer whip your 3 egg yolks with approximately 60% of the 1/3 cup of sugar (save the rest of the sugar to whip up with your egg whites). Whip until super light and fluffy 5-10 minutes. Then place into a large bowl.
In a super clean bowl with a super clean whisk, whip up your egg whites and pinch of salt. When they start to turn white and foamy, sprinkle in the remaining sugar, then whip until medium stiff peaks form.
In 3 parts, fold the egg whites into the egg yolks, start with one third, gently fold that in until it’s almost incorporated, then add the next third and repeat the folding, and then the final third, until all the egg whites have been incorporated.
Now sprinkle all your flour on top of the eggs and continue to gently fold until the flour has been incorporated. Don’t worry if you have any little flour lumps, that is ok! Try not to over mix your batter or else it will get super runny and make piping a bit torturous!
With a piping bag pipe log shaped cookies onto parchment lined baking trays. Each log should be about 3” long and 1” wide.
Sprinkle the cookies heavily with icing sugar, a sifter works great for this.
Pop into the oven and bake for about 15 minutes or until golden brown.
These can now be eaten or made into delicious tiramisu! Which is what I shall be making tomorrow!
Puff Pastry with a side of Sausage Rolls!
Puff pastry is a super delicious flaky pastry dough with hundreds of buttery layers! Perfect for making sausage rolls! The puff pastry we are making is the SLIGHTLY faster “quick puff” or “rough puff” which is a little easier! Yay!
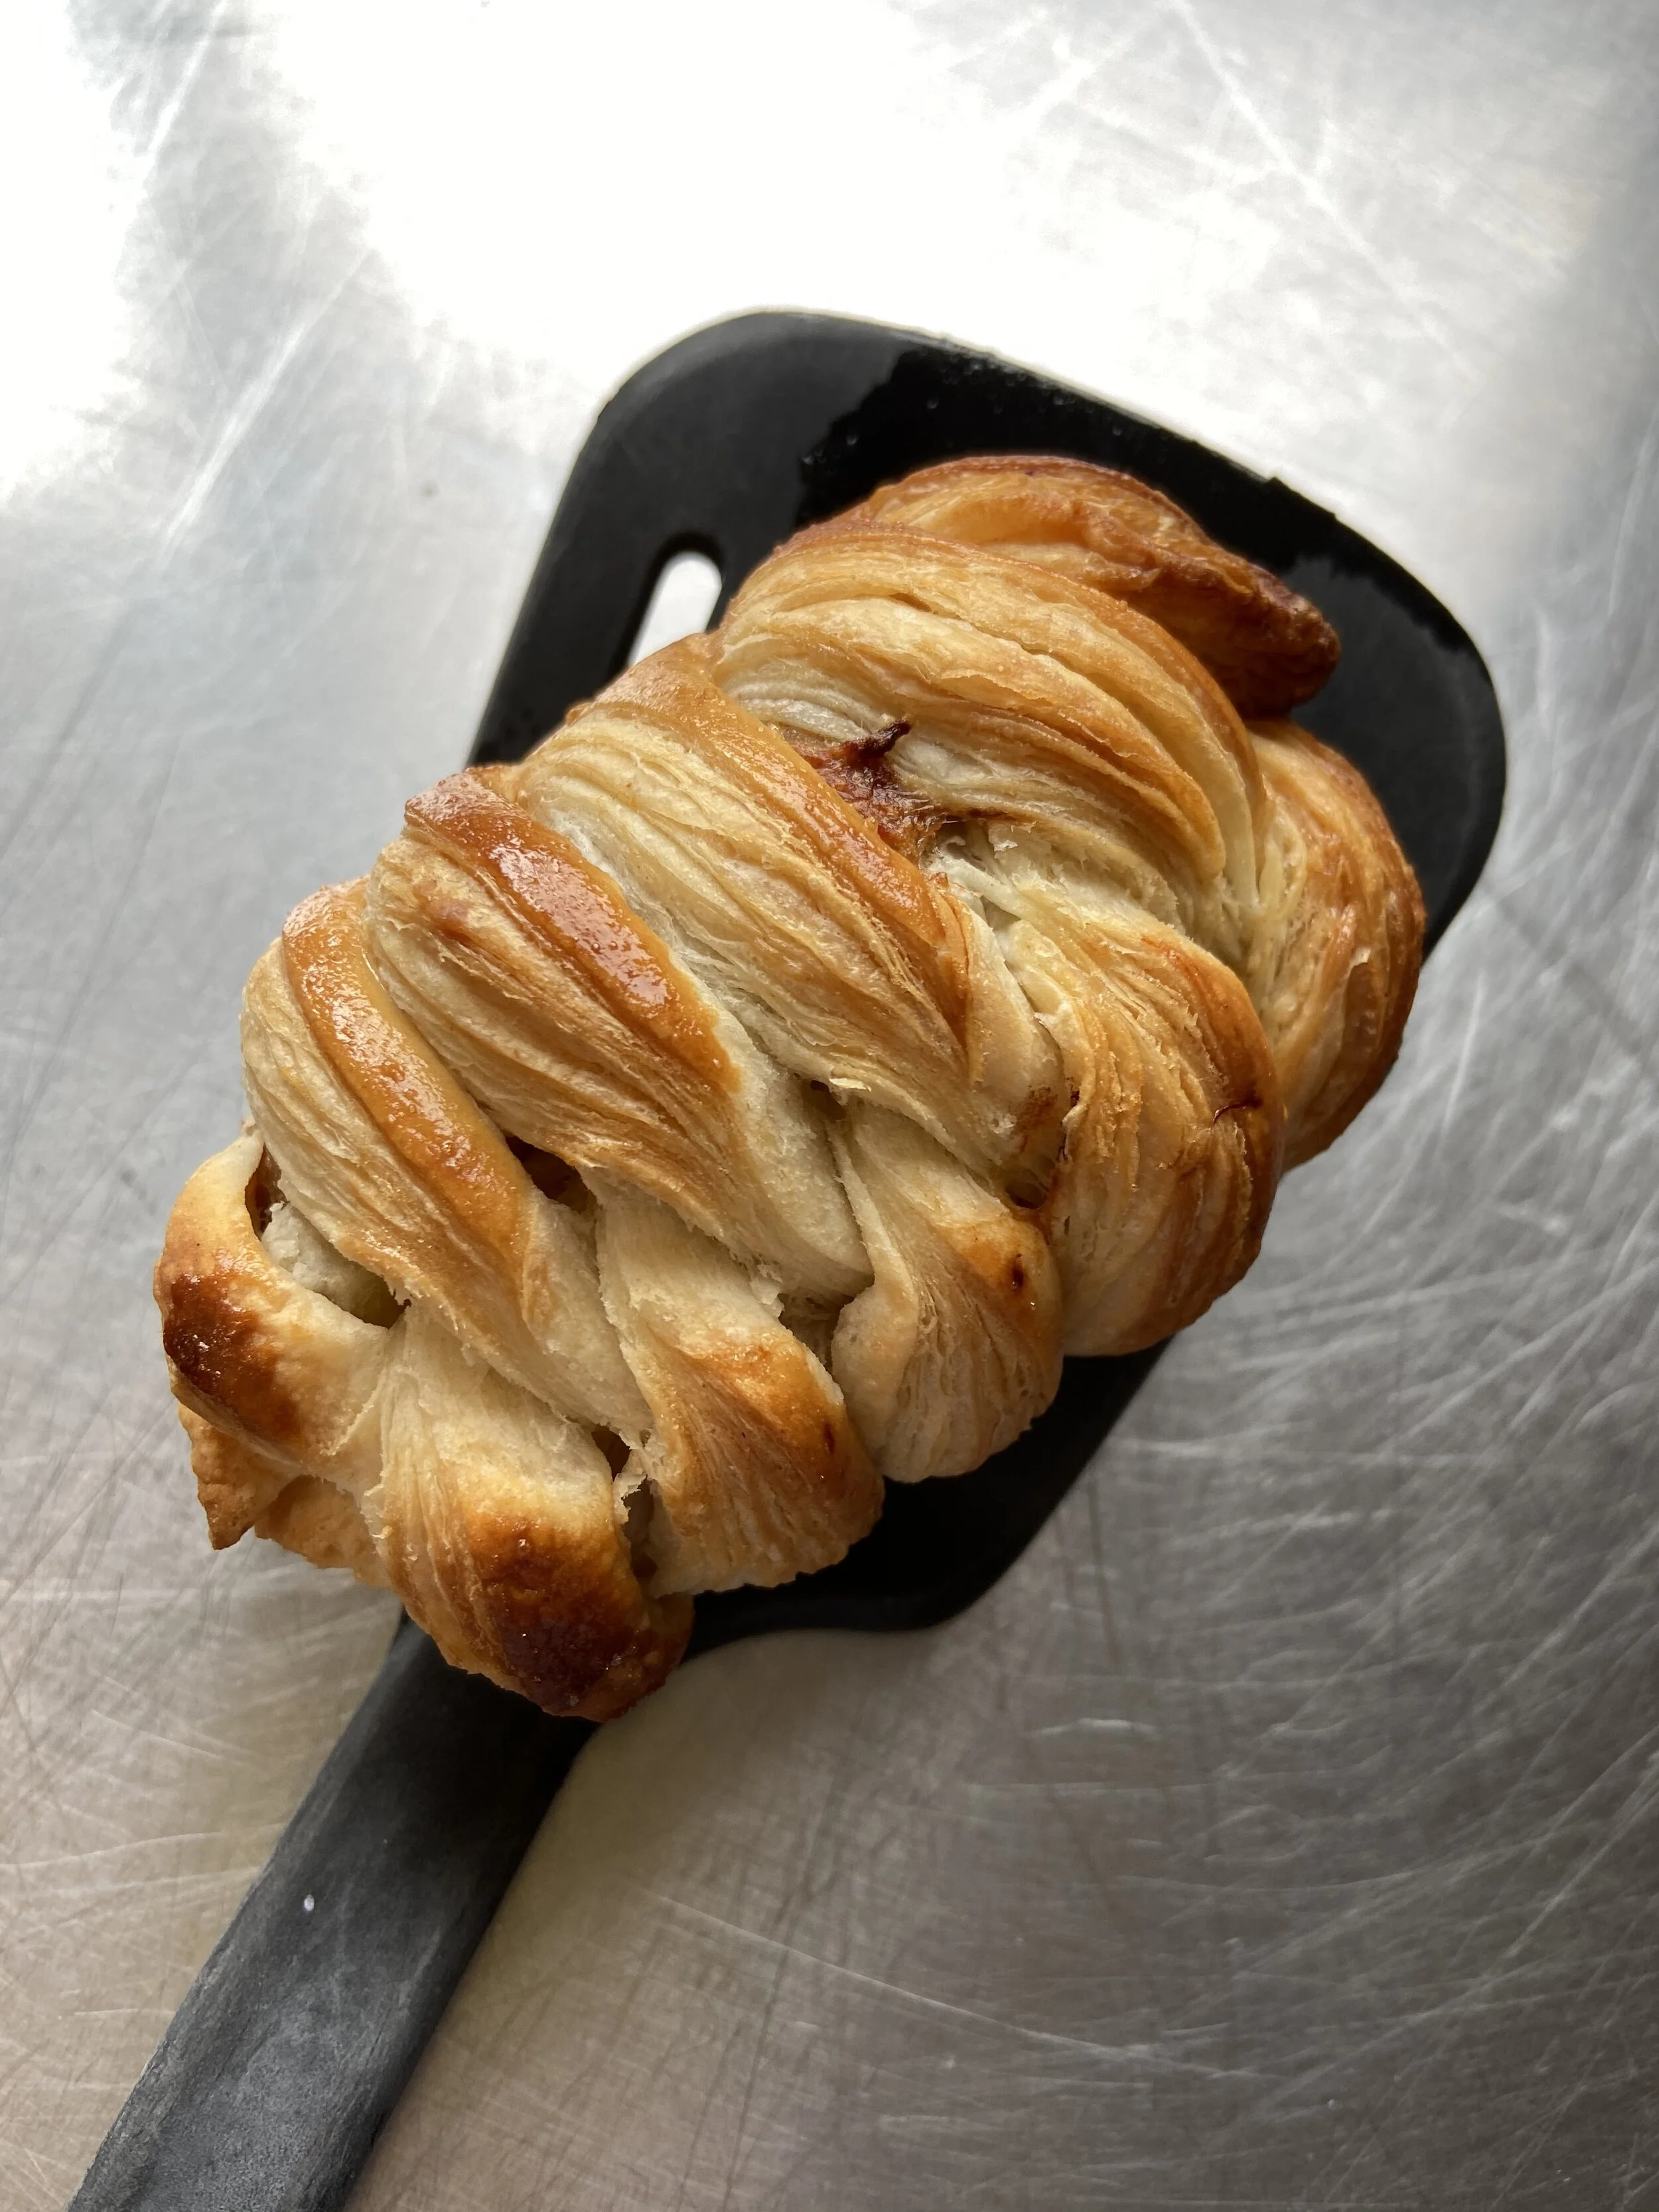
Look at those flaky layers of puff pastry in our sausage roll!
Puff Pastry
Yield: about 1 pound of puff pastry dough - good for 12 large sausage rolls, or 2 tart tatins!
Preheat your oven to 425*F once you are ready to bake your puff pastry
1 3/4 cup Flour
1 cup Butter, cold - cut into large cubes
1 teaspoon Salt
1/2 cup Water, cold
In a bowl mix together the flour, salt and cold butter, rubbing the butter into the flour but leaving large nickel sized chunks - we want to keep lots of big butter chunks so we can roll them into layers on our next steps!
Pour the cold water into the flour mixture and stir it together until it can be pressed into a ball. You might need to add a little more or less water depending on how your dough is working! I like to dump the dough out onto my counter and press it together into a rectangle shape, then saran wrap it and place in the fridge for 30 minutes.
Once your dough has rested, roll your dough out into a large rectangle, then fold it into 3rds like a brochure, so the bottom one third of the dough folded up, then the top one third folded down on top of it. This is called a “3 fold”
Roll out your folded dough and repeat the 3 fold again, then wrap in saran wrap and put in the fridge for 30 minutes.
Once chilled, you will repeat the 3 fold 2 more times, then wrap and put in the fridge for 30 minutes.
Now your puff pastry is ready to go! You can store it in the fridge or in the freezer. I cut my puff pastry in half, used one, and popped the other into the freezer for another time!
Sausage Rolls
Yield: 6 large ~3” long rolls
Preheat oven to 425*F
1/2 batch of Puff Pastry
2 Sausages (I used Spulumbos Chicken Apple Sausages but use your favourite!)
2 teaspoons Dijon Mustard
Egg wash (one egg with a pinch of salt and sugar wicked together)
Roll your puff dough out into a long rectangle about 18” long and 5” wide.
Using a sharp knife cut slits down both sides of your puff dough about 3/8” wide and about 1.5” long on each side leaving a 2” wide UNCUT section in the middle, this is where the sausage is going to go.
Smear a little mustard down the middle of your dough where you didn’t cut and then scoop your sausage down the middle from top to bottom, but not going on top of the cut strips on either side.
Starting at the top you will grab one of the cut strips and pull it across the sausage towards the other side, then grab the top strip from the alternate side and pull it across in the other direction so the strips are criss-crossing. Continue down the entire strip of sausage and pinch them together at the bottom.
Using a sharp knife cut the sausage roll into 3” long pieces, or whoever she you would like!
Place your sausage rolls onto a lined baking tray, then paint the tops with egg wash.
Bake in the oven for 25-35 minutes or until golden brown and the sausage is fully cooked through.
Eat!
Strawberry Cheesecake Babka!
Remember that cinnamon swirl bread you would get as a treat when you were little? Well imagine that, but a million times more delicious! You can fill your babka with all sorts of different fillings, if you want to make it with a cinnamon bun filling you can get that cinnamon swirl bread flavour, the most common flavour is chocolate, but today we are making STRAWBERRY CHEESECAKE! For that we are filling a rich brioche dough with a cheesecake layer, as well as strawberry jam.

So fluffy and buttery!
Strawberry Cheesecake Babka
Yield: 1 loaf (8”x4” loaf pan or an 8” round cake pan)
Once dough is on it’s final proof in the loaf pan, Preheat the oven to 350*F
Brioche Dough:
2 1/4 cup Flour
2 teaspoons Yeast
3 Tablespoons Sugar
1 teaspoon Salt
3 Eggs, room temperature
1/3 cup Milk, warm
2/3 cup Butter, soft
Cheesecake Filling:
1/2 cup Cream Cheese (4 oz.), soft
pinch Salt
2 Tablespoons Sugar
1 Tablespoon Sour cream
1/4-1/2 cup Strawberry jam (or whatever flavour you like!)
Glaze (optional):
1 Tablespoon Apricot Jam
2 teaspoons Water
In the bowl of your mixer stir together the brioche dry ingredients - flour, yeast, salt and sugar
Add the eggs and milk to your dry ingredients, then mix with a dough hook for about 6 minutes, or until the dough no longer sticks to the sides of the bowl, and is in a ball around the hook.
Now with the mixer running, slowly add the soft butter about 1 tablespoon at a time. toss in one small piece of butter, then let it knead into the dough before adding another piece. This will take about 10 minutes to do, to get the butter incorporated, ending with a sticky soft dough.
Plop the dough into a greased bowl and let it proof at room temperature for 1-2 hours or until doubled.
While the dough is proofing, stir together all your cheesecake filling ingredients except for the jam. Then set to the side at room temperature.
Once dough has relaxed pop it onto a floured counter and roll into a large rectangle about 10”x15”
Smear your cheesecake filling on top of the rectangle leaving about 1” of dough without filling on the top edge.
Next smear on your strawberry jam on top of the cheesecake layer.
Now roll your dough up like a cinnamon bun. Once you have rolled up the entire dough, pinch together the top edge.
Using a large sharp knife slice the log right down the middle so you end up with two long wormies of dough.
Now grab one log and lift it over the other log and then continue until you have a “rope” sort of braid looking log of dough. Try to keep the cut side of each log facing the top so we can see all the exposed layers from the top. Pinch together the ends.
Now place your dough into a greased loaf or cake pan. This is a little messy, but just do your best to get it all in there!
Cover with saran wrap and let your dough proof at room temperature for 1-2 hours or until doubled.
Preheat your oven to 350*F
Once you bread is proofed, remove the saran wrap and pop into the oven for 40-60 minutes, or until golden brown and a toothpick comes out clean when stabbed into it.
When your loaf comes out of the oven you can paint the top with a little bit of apricot jam thinned out with warm water. This isn’t necessary, but add a little shine!
Now enjoy!
Florentine Cookies!
Today is April fools day, but these crunchy caramelized cookies are no joke! They are dangerously thin and crispy! You can dip them in chocolate or sandwich two together with nutella if you are feeling extra decedent, but I just like to eat them straight up…by the dozen!
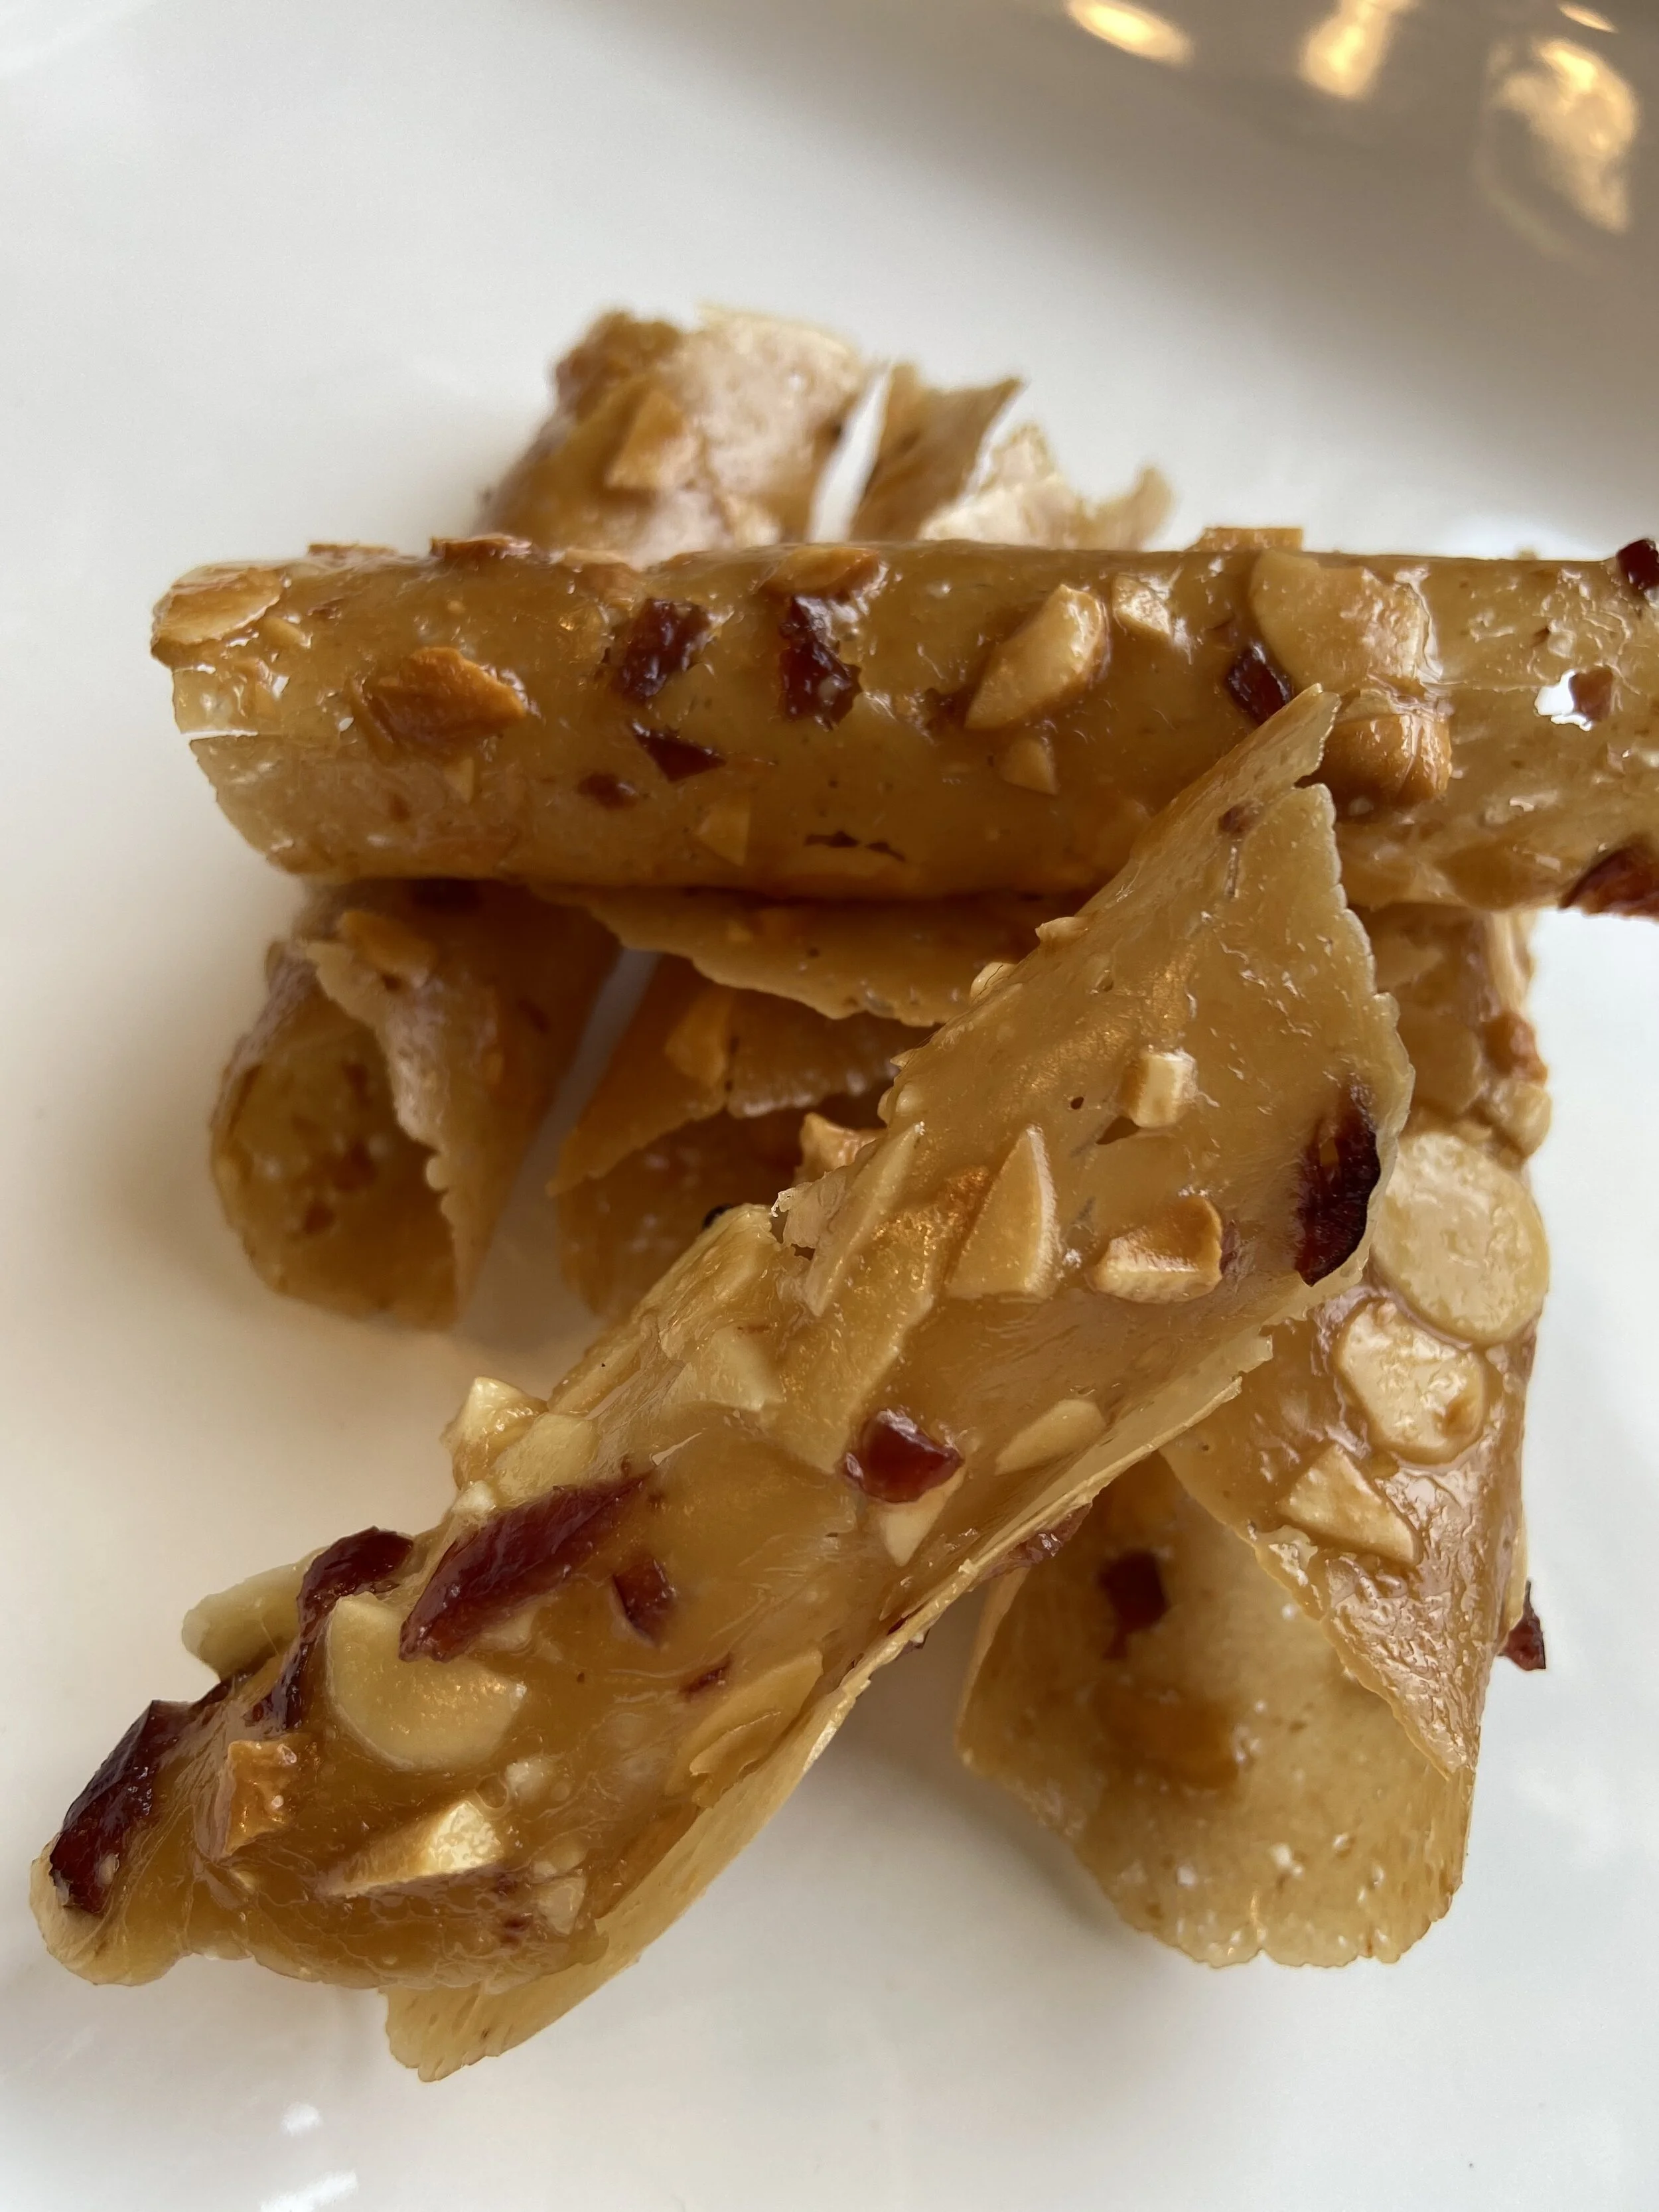
Crispy Florentine Cookies
Florentine Cookies
Yield 15-24 depending on your shaping skills
Preheat your oven to 350*F
1/4 cup Butter
1/3 cup Brown Sugar
1/2 cup Nuts, finely chopped (you can also add some dried fruit) - I used slice almonds, cashews and a little bit of dried cranberries
pinch of Salt
1 Tablespoon Corn Syrup
1/2 teaspoon Grand Marnier (optional)
In a pot heat together the butter, brown sugar, corn syrup and salt until its all melted and combined, takes about 1-2 minutes.
Stir in nuts and Grand Marnier.
Let cool until it thickens and is cold enough to handle - 5-10 minutes.
with a teaspoon place about 6 scoops of batter on a silat or parchment lined tray. Keep them at least 3” apart as these babies spread a lot! If you are planning to shape them, you might want to start with 2 or 3 on a tray until you get a feel for it.
Place your tray in the oven and bake for 5-10 minutes, the batter should bubble, spread and turn golden brown, then it’s ready. Mine took 7 minutes.
If you want them to be circles then these babies are ready to go straight out of the oven. If you want to shape them like I did, into little cannoli shaped tubes, you will keep touching the edges of your cookies when they come out of the oven, using a offset spatula or a knife, something thin that will be able to slip under the cookie, until the cookie hardens just enough to lift off the tray, then while warm, wrap it around the handle of a wooden spoon. Hold it there for a few seconds and it should cool enough to slip off and you have a fun tube shape!
Once you shaped all the cookies on your tray you will reload it with more batter and bake the next tray. If you want to shape them I would recommend only doing one tray at a time as you have to work very fast. Don’t worry if some break, it is going to happen, they are very breakable, but still super yummy!
Now you get to eat them or you can dip them in chocolate which is equally as yummy!
Spinach Dip STUFFED Pretzels!
It’s a soft pretzel…it’s a dip…it’s a SPINACH DIP STUFFED PRETZEL! I love dip! Like everything is better with dip! I could just live off of dip. Some people seem to think it’s inappropriate to just eat straight dip though, so what can one do but stuff it into a delicious soft pretzel! They’re SO good!!!

Pretzels EXPLODING with flavour!
Spinach Dip Stuffed Pretzels
Yield: 4 giant soft pretzels
Once you start shaping your pretzels, preheat your oven to 425*F
Dough:
3/4 cup Milk (or water), warmed
1 Tablespoon Honey
1 1/4 teaspoon Yeast
2 Tablespoons Butter, melted
1 teaspoon Salt
2 cups Flour
Spinach Dip Filling:
1/4 cup Cream Cheese, softened
1 Tablespoon Sour Cream
2 Tablespoons Cooked and drained Spinach (I use the frozen kind, thaw it, and squeeze out the water)
1-2 Tablespoons grated Parmesean
1/4 teaspoon Onion Powder
1/4 teaspoon Garlic Powder
pinch Salt
pinch Pepper
Water Bath:
2 Litres of Water
1/4 cup Baking Soda
Egg Wash:
1 egg
pinch salt
pinch sugar
Coarse Salt for sprinkling on top
In the bowl of your mixer stir together the warm milk and honey. Then sprinkle the yeast on top, and let it sit for about 10 minutes until nice a foamy looking.
Add the rest of the dough ingredients - flour, melted butter, and salt. Using the dough hook on your mixer, knead the dough for about 5-8 minutes, or until the dough is in a ball, not sticking to the sides of the mixer, and no longer sticky to the touch.
Place dough into a greased bowl, cover, and let sit for 1 hour at room temperature.
While the dough is resting, time to make the spinach dip! In a bowl stir together all the ingredients for the spinach dip, taste it, and adjust the seasoning to your taste!
Place the spinach dip into a piping bag, or if you don’t have one, a plastic ziplock bag will work. Then cut the corner/tip of the bag off so you will be able to squeeze out the spinach dip once your dough is ready. Leave at room temperature.
Once dough is rested get your water bath going, you will need a pot with about 2 Litres of water and 1/4 cup baking soda brought to a boil. You can also preheat your oven to 425*F at this time.
Now to roll the dough! Take your dough out of the bowl and cut into 4 equal pieces.
Roll each quarter into a long wormy on the counter, ideally about 18” long.
Now flatten out each wormy with a rolling pin so its about 1.5” wide.
Pipe a line of spinach dip in the middle of your flattened piece of dough from one end to the other.
Now fold the dough around the spinach dip and pinch the two sides together as tightly as possible. Try to make sure no spinach dip squishes out.
Now you should have a long wormy again, but this time it’s filled with spinach dip! Grab both ends, cross them, then place them onto the middle section of the wormy so it looks like a pretzel shape. That is a terrible description, but just look at the photo and make it that shape…or whatever shape your heart desires! Then press the overlapping dough parts together so they somewhat stick. Place onto a lined baking tray that has been lightly floured.
Next you will very gently simmer each pretzel in the baking soda water for about 20-30 seconds per side, then carefully remove and place back onto your baking tray. If your pretzel falls apart don’t worry, just put it back into shape on your baking tray once you remove it from the water.
Whisk together your egg wash - egg, salt, sugar. Then brush it onto your pretzels and sprinkle them with coarse salt.
Pop them into the oven for about 10-15 minutes until golden brown! Yay! Stuffed pretzels and no mall required!
Date Bars, some call them "Matrimonial Slice" but you know commitment issues...we're just DATING!
Sometimes I am a 100 year old women, why? BECAUSE I LOVE DATE BARS! They are buttery, soft, crunchy, cinnamon-y, and sweet! Plus, they are made of dried fruit and oats, so as far as I’m concerned they are a breakfast food. If you aren’t into the dates, you can also replace the date filling with the apple pie filling we made for our turnovers a few days ago, just double the apple filling recipe so you use 2 apples!

Date Bars for when your not allowed to go on dates to bars.
Date Bars
Yield: one 8”x8” pan or something of a similar size
Preheat your oven to 350*F
Date Filling:
2 1/2 cups roughly chopping Dried Dates (about one pound)
1 cup Water
1 Tablespoon Lemon Juice
1/2 teaspoon Baking Soda
1/4 teaspoon Salt
1 Tablespoon Butter
1 Tablespoon Grand Marnier (optional)
Streusel:
3/4 cup Butter, soft
1 cup Brown Sugar
1 1/4 cup Flour
1 1/4 cup Oats
1/2 teaspoon Salt
1/4 teaspoon Baking Powder
1 teaspoon Cinnamon
In a small pot over medium heat cook your dates, water, lemon juice, baking soda, salt and butter until it thickens and forms a puree type mixture. Remove from heat. (If your don’t want any larger date chunks you can puree this mixture in a food processor, but I like the texture so I just leave it as is!)
Add the Grand Marnier if using, then set to the side.
In a large bowl combine all the Streusel ingredients and rub them together with your hands until they are combined.
In a greased and lined 8”x8” pan pour about 2/3 of your streusel mixture and press into the bottom of the pan to form a crust.
Pour all of your date filling on top of the base crust and smooth it out evenly making sure to cover the entire base.
Now take the last 1/3 of streusel and crumble it on top of the date layer.
Bake in a preheated 350*F oven for about 25-35 minutes or until just starting to turn golden brown on the edges.
Let cool, then slice and eat! Or add to your tray of dainties if you are having a fancy team party like I wish I was having right now!