
Baking recipes
Scroll through our posts below to try all sorts of delicious baking recipes from our instagram baking videos. New baking videos are posted the first week of each month on Instagram and Facebook.
To easily find one of our recipes type below:
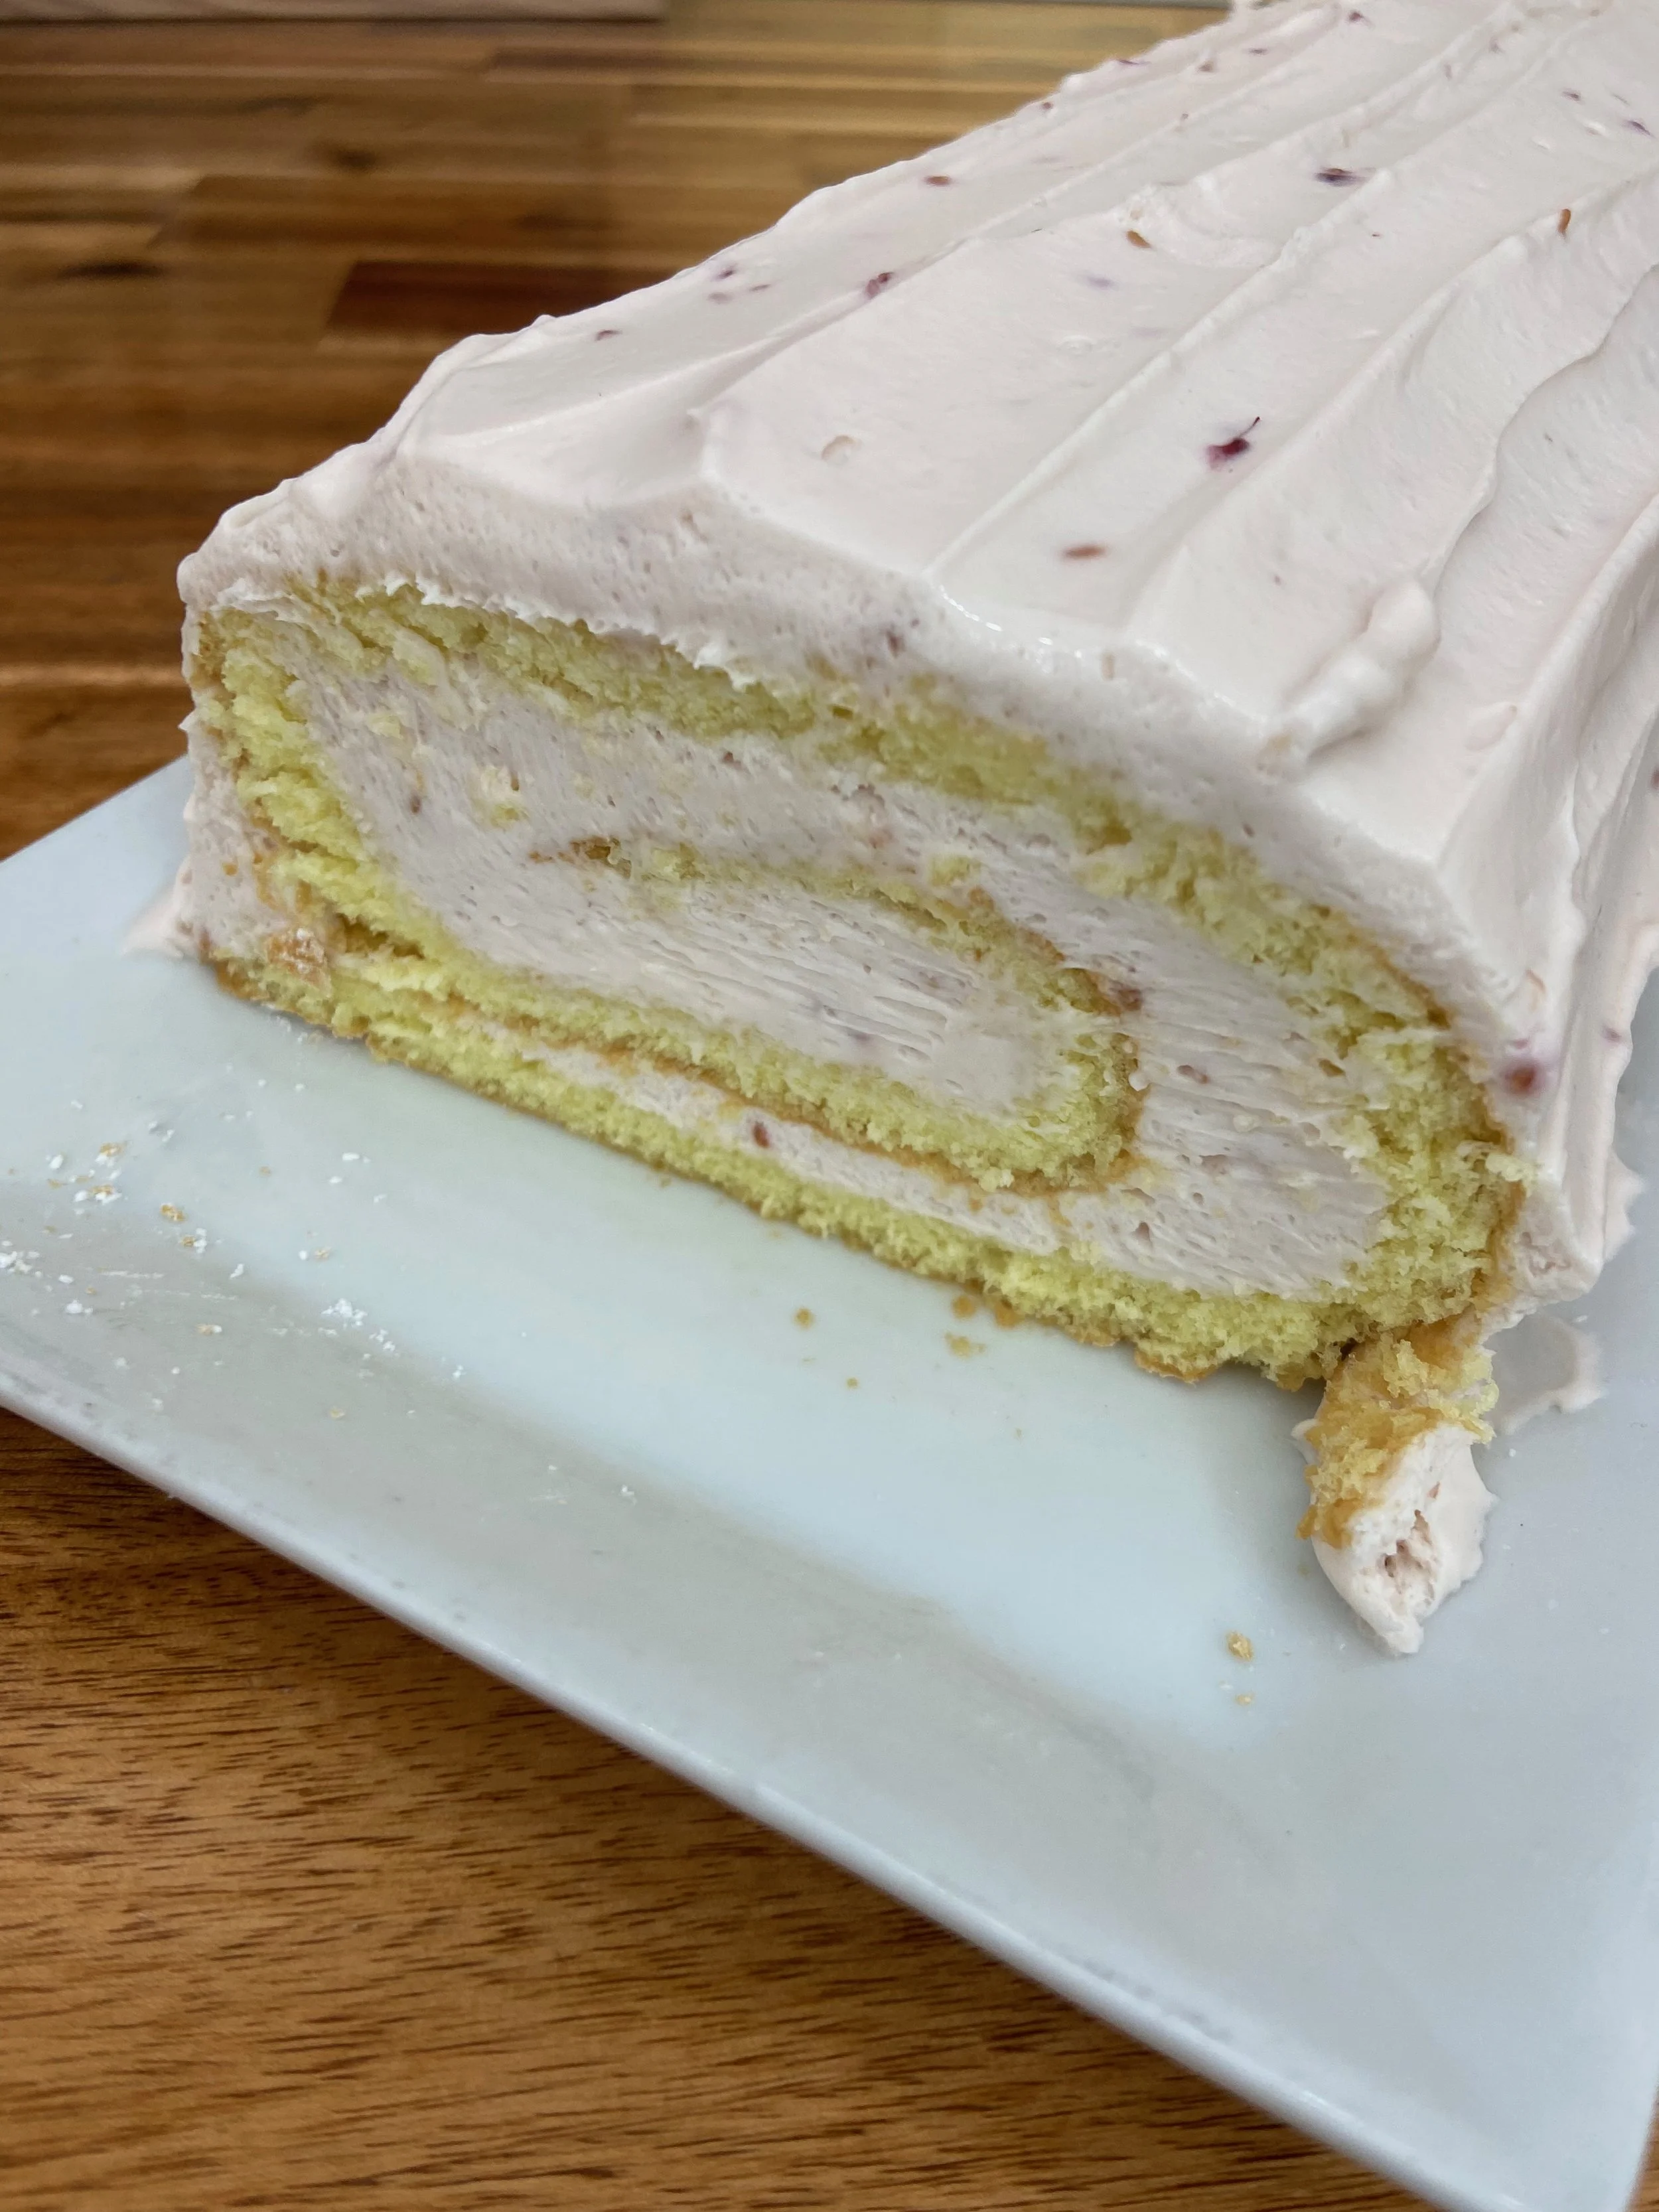
Lemon Raspberry Roll Cake!
YeeHAW! Stampede is back and so are my cooking demos at the kitchen theatre! This year we made a lemon raspberry roll cake with a light lemon sponge and smooth raspberry cream cheese filling. It’s delightful!
Ingredients:
Cake:
5 egg yolks
2 Tablespoons Oil
3 Tablespoons Milk
1 teaspoon vanilla extract
1 teaspoon lemon extract, or zest of 1 lemon
2 drops yellow dye (optional)
1 cup of sugar (divide into 2 parts)
4 egg whites
3/4 cup flour
2 Tablespoons Cornstarch
1 teaspoon Baking Powder
1/4 teaspoon salt
Filling:
454g Cream cheese (2 x 8oz logs)
1 cup sugar
pinch salt
3 Tablespoons Raspberry Jam
1 1/2 cups Whipping Cream
Cake:
Preheat oven to 350*F and grease and line a half sheet pan with parchment. Grease parchment as well.
With electric mixer, whisk yolks, oil, milk, vanilla, lemon extract, yellow dye and half of the sugar. Whip until light and fluffy.
In a separate bowl, whisk egg whites and remaining sugar until stiff peaks form.
Combine remaining dry ingredients in a bowl.
Sift dry ingredients into yolk mixture and gently fold in.
Fold approximately 1/3 of egg whites into the yolk mixture.
Fold in remaining egg whites gently.
Spread into the greased half sheet pan and bake for 15-20 minutes until golden brown and firm feeling.
When cake comes out of the oven, run a knife around the edges to loosen, and flip onto a clean tea towel that is sprinkled heavily with icing sugar.
Peel off parchment paper carefully.
Using tea towel roll the cake up into a log and let cool.
Filling
With a whisk on your mixer, mix together softened cream cheese, sugar, salt and raspberry jam.
Scrape down bowl and continue mixing until smooth.
Slowly pour in cream and combine.
Turn up speed and whip until thick and fluffy.
Unroll cake and spread a tick layer of the filling over the entire cake, leaving about 1” on the far end free of any filling.
Using the tea towel to help, roll the cake back up into a log.
Place onto your serving dish and then spread remaining filling all over the entire cake.
Place in the fridge to chill for at least 30 minutes and serve cold.
Tres Leches Cake!
This delicious vanilla cake gets soaked in three types of milk and then topped with whipped cream! The milk soak softens the cake so it’s a bit like a pudding and it’s SO delicious!
Tres Leches Cake
Yield: 9”x13” pan
Preheat your oven to 350*F
1/2 cup Butter, soft
1 cup Sugar
1 teaspoon Vanilla
1/4 teaspoon Cinnamon
1/2 teaspoon Salt
1 teaspoon Baking Powder
5 Eggs, separated
1 1/2 cups Flour
1 1/2 cups Milk
1 can Sweetened Condensed Milk
1 can Evaporated Milk
1 1/2 cups Whipping Cream
2 Tablespoons Sugar
1 teaspoon Rum (optional)
In the bowl of your mixer whip together your butter, sugar, salt, cinnamon, vanilla, baking power until light and fluffy.
Separate your eggs and add the egg yolks to the butter mixture and continue whipping until light and fluffy.
Add your flour and stir until combined.
In a separate bowl whip up your egg whites until medium firm peaks.
Fold the egg whites into the butter mixture in 2 additions. Folding gently so they don’t deflate too much!
Pour your batter into a greased 9”x13” pan, you don’t need to worry about lining the pan with parchment paper just a little baking spray is great!
Bake your cake in a preheated 350*F oven for about 25 minutes or until lightly golden and a toothpick comes out clean when poked into the middle.
While your cake is baking stir together your milk, sweetened condensed milk, and evaporated milk .
When your cake comes out of the oven, pos it ALL over with a fork so the milk has somewhere to soak into.
While the cake is still hot, pour ALL of the milk mixture on top of your cake as evenly as possible. It’s going to look like too much, but it’s going to soak in.
Let the cake cool at room temperature for about 30-60 minutes, then place into the fridge for at least an hour or ideally overnight.
Whip up your cream to soft peaks with the sugar and rum (if using).
Spread your cream on top of the cake and eat!
Blueberry Cake aka Blueberry Buckle!
This cake is family favourite! We would make it every summer whenever we had some fresh blueberries! It’s a soft buttery cake layered with blueberries and cinnamon streusel! the blueberries burst into the cake while it bakes making a delicious layer of blueberries and cinnamon in the middle! So good!

ALL the blueberries!
Blueberry Cake
Recipe courtesy of my mama Patty Lotecki
Yield: one 9”x13” pan
Preheat your oven to 350*F
Streusel:
1/4 cup Butter
1 cup Brown Sugar
1 Tablespoon Cinnamon
Blueberry Layer:
2 cups Blueberries
1/2 cup Sugar
Cake:
3/4 cup soft Butter
3/4 cup Sugar
1/4 teaspoon Salt
1 teaspoon Baking Soda
1 teaspoon Baking Powder
1 teaspoon Vanilla Extract
2 Eggs
1 cup buttermilk (or sour cream, or yogurt, or 1 cup milk plus 1 teaspoon vinegar)
2 cups Flour
In a bowl combine your streusel ingredients (butter, brown sugar and cinnamon) by rubbing them together with your hands until combined. Set aside.
In a bowl combine your blueberry layer ingredients - blueberries and sugar. Toss to combine. Set aside.
In the bowl of a mixer place your butter, sugar, salt, baking soda, baking powder and vanilla. Whip until light and fluffy.
Add eggs one at a time, mixing between each egg until they are combined. Then give your bowl a scrape down and whip for a few more minutes or until light and fluffy.
Slowly add about 1/3 of your flour to the butter mixture, once it’s almost fully combined add half of the buttermilk, then continue alternating the buttermilk and flour until it’s all used up. I usually do 3 portions of flour and two of buttermilk. Then scrape your bowl down and mix for about 20 seconds until the batter is nice and combined.
In a greased 9”x13” pan put about 2/3 of your cake batter and smear so it covers the entire base of the pan.
Next, layer all of your blueberry mixture, spreading it evenly on top of the cake batter.
Then layer all of your streusel topping on top of the blueberry layer as evenly as possible.
Now dollop spoonfuls of the remaining batter randomly on top of the streusel layer so you can still see the streusel peeking through.
Bake in a preheated 350*F oven until golden brown and comes out clean when stabbed with a toothpick.
Let it cool then devour!
Pavlova!
Pavlova is the fluffiest of cakes! It’s a GIANT meringue with a marshmallowy centre that you fill with whipped cream and top with fresh fruit! It’s our favourite dessert for any bakery staff party! Named after a ballerina’s fluffy tutu this cake is as light as air!

it’s a mountain of deliciousness!
Pavlova
Yield: 1 approximately 8” round pavlova
Preheat oven to 300F, then reduce to 250*F when you place the pavlova into the oven.
Pavlova:
5 Egg Whites, room temperature
pinch Salt
1 teaspoon Vanilla extract (optional)
1 cup Sugar
1 teaspoon Vinegar
1 Tablespoon Cornstarch
Filling:
1/2 cup Whipped cream
1-2 Tablespoons Sugar
1 cup Fresh Fruit
1 Tablespoon Sugar
In the bowl of your mixer place your egg whites and the pinch of salt.
Using the whisk attachment, whip the egg whites until they start to turn white and foamy.
While the machine is running on a low speed, slowly pour in the sugar until it is fully incorporated, then increase the mixer speed to medium high speed and whip until super thick and fluffy, at least 10 minutes. The meringue should not feel grainy when you rub it between your fingers.
Add the vinegar and cornstarch to the mixer and mix on a medium speed for 20-30 seconds until combined.
Using a bowl or plate, trace an approximately 8” diameter circle onto a piece of parchment paper, then flip oven the parchment so the outline is on the bottom of the paper, and place the parchment onto your baking tray. You can use a little baking spray on the pan to stick down your parchment so it won’t slide.
Load your meringue mixture onto your drawn circle on the parchment. Then gently spread it into the circle shape. You can use the back of a spoon or a spatula to create decorative lines on the side of your pavlova, or just leave it with a rustic look.
Place pavlova into a preheated 300F oven, then as soon as the pavlova is in, REDUCE the heat to 250*F and bake for 1.25-1.5 hours. The pavlova should be crispy feeling on the outside.
Turn off the oven, but leave your pavlova in the oven to cool - about 2 hours (or just leave overnight.)
Once your pavlova has cooled, whip your cream to soft peak and sweeten to taste with sugar (1-2 Tablespoons if usually good for me), place the whipped cream on top of the pavlova.
Chop up your fresh fruits and toss with a little sugar to taste - if your fruit is sweet enough don’t worry about adding any sugar. Place fruit on top of the whipped cream.
Serve right away! So delicious!
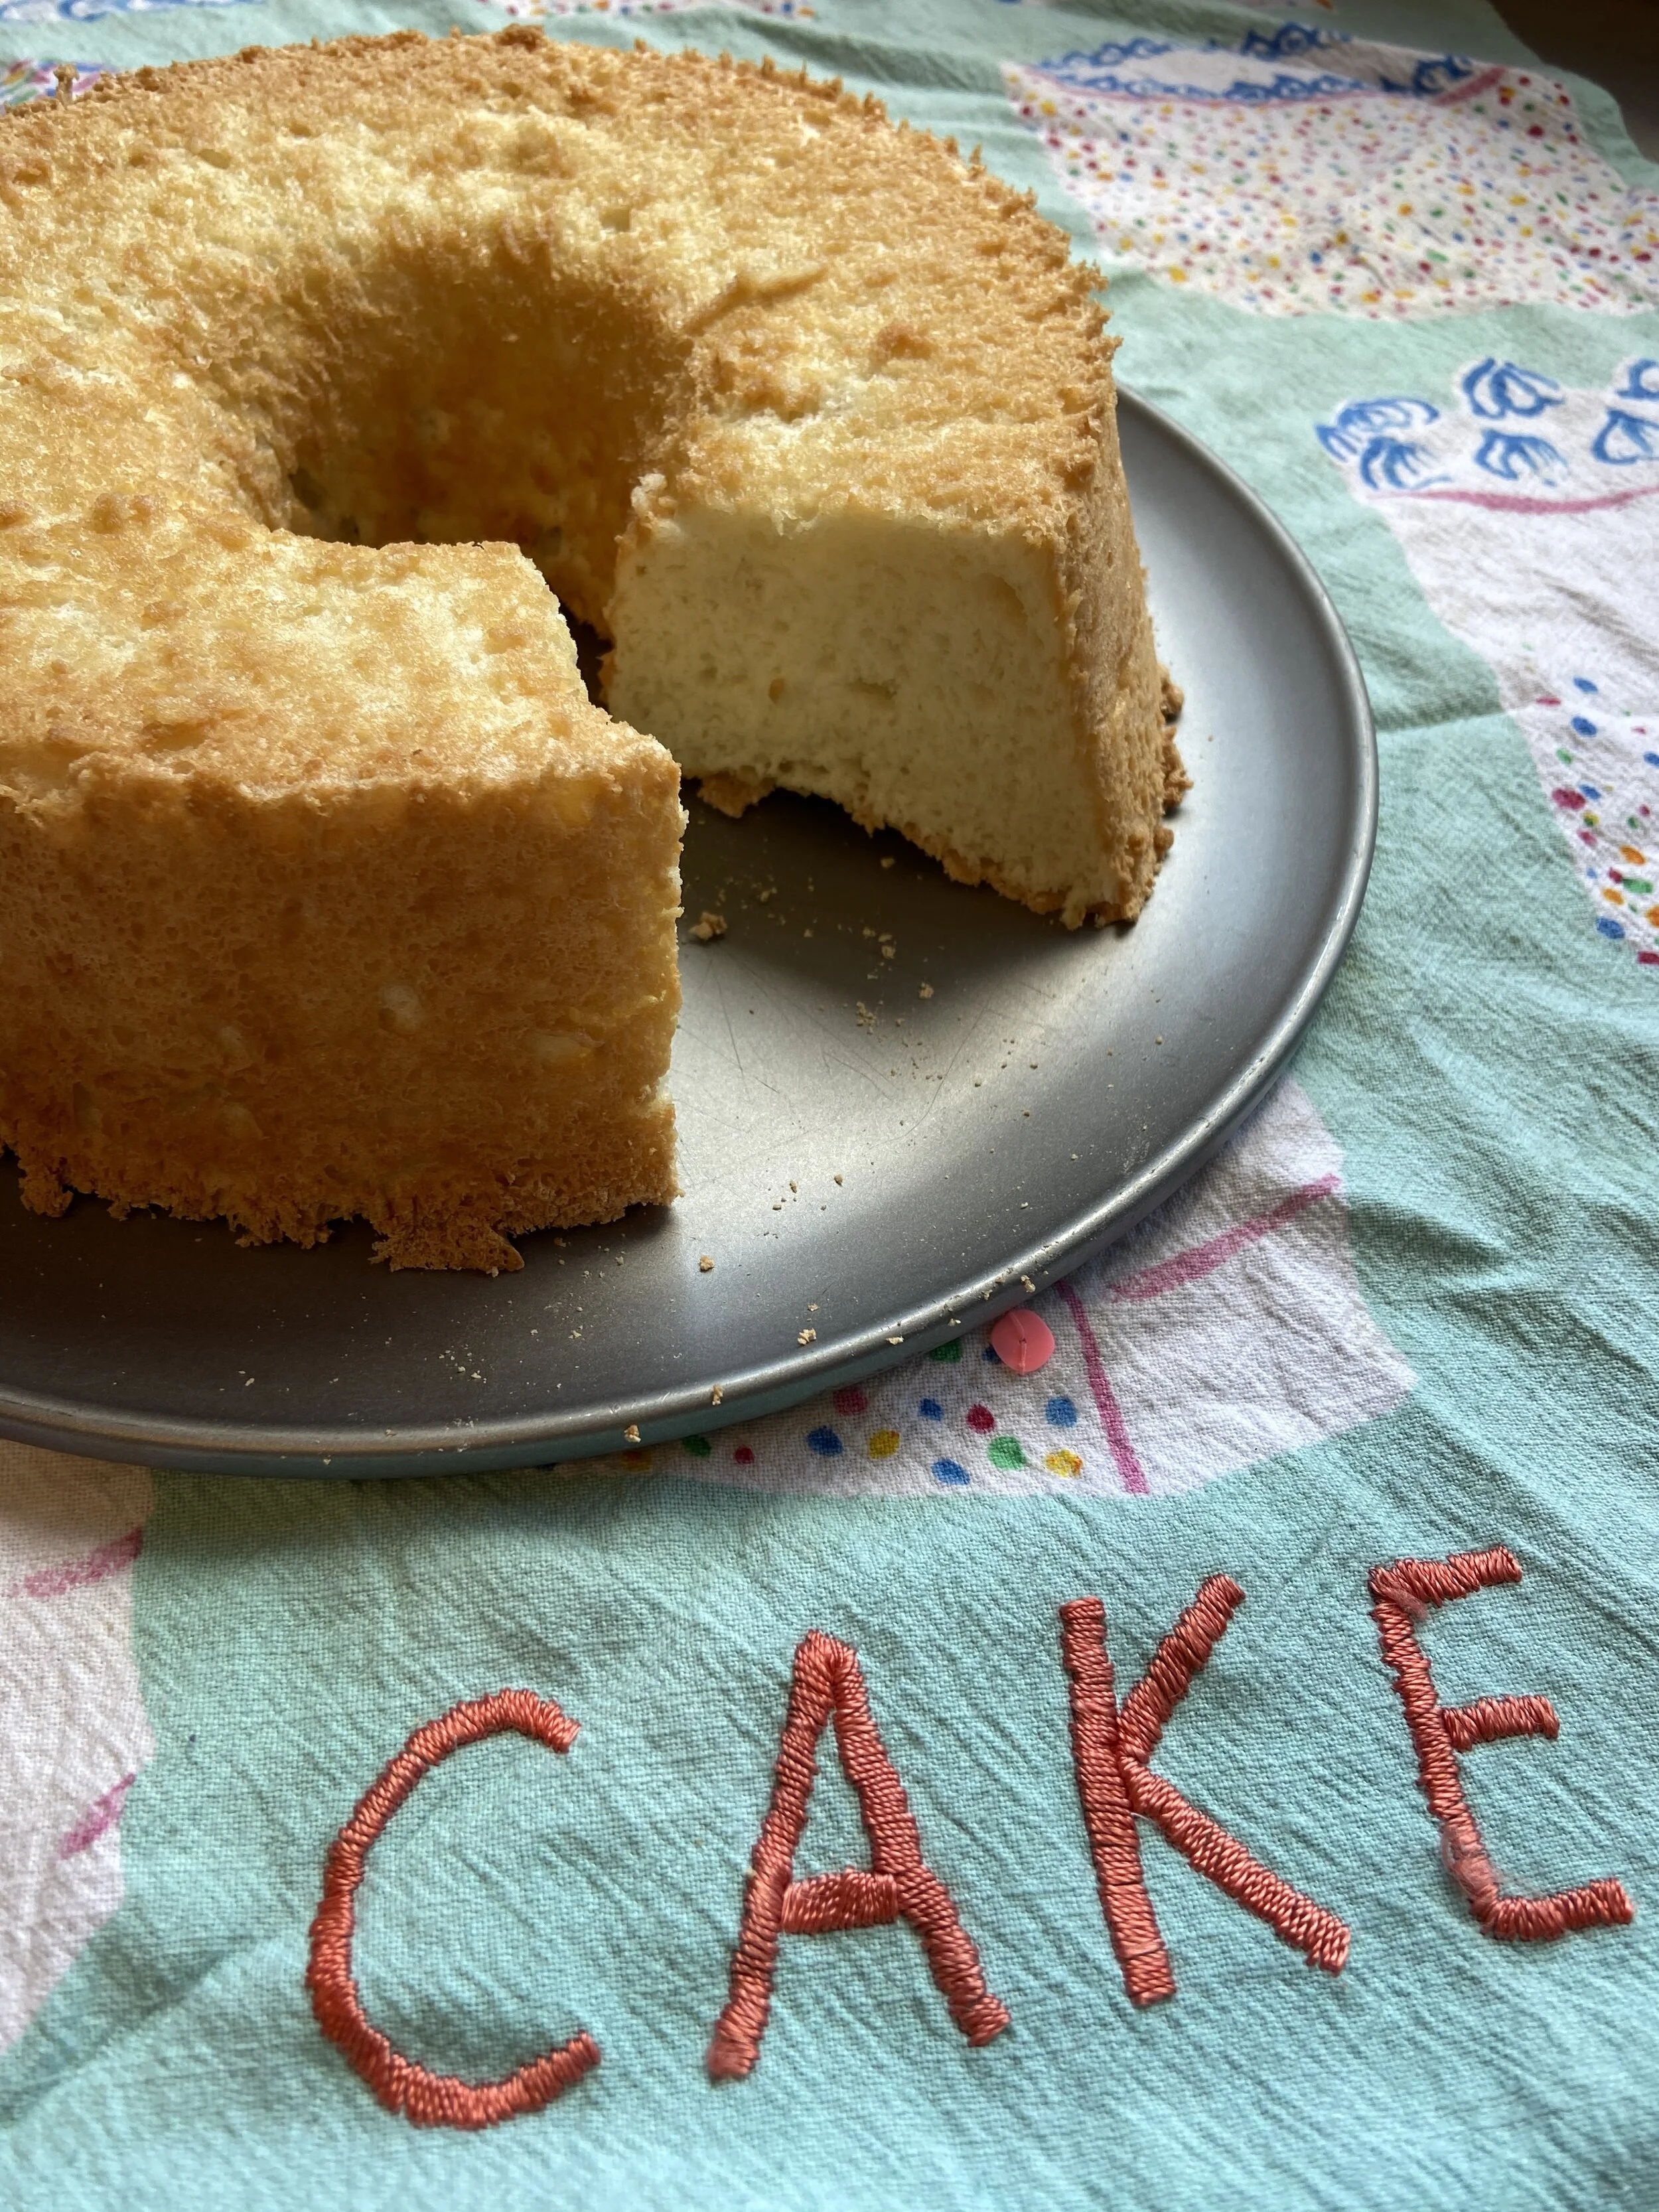
Angel Food Cake! Popular with Angels AND Devils!
Angel food cake, what a name! I just imagine the Philadelphia Cream Cheese Angel snacking on it while taking a break from her cream cheese bagels. It’s a cake as light , fluffy and white as a cloud! This baby is made without any fat, which means it can be a bit tricky, but I have faith in you! First you make a meringue, then carefully fold in flour and sugar, then once baked you flip it upside down so it doesn’t collapse on itself while it cools! Fun!
Angel Food Cake!
Angel Food Cake
Yield: 1 x 10” Angel Food Cake Tube Pan (ideally with a removable bottom, but use what you got!)
Preheat your oven to 350*F
1 1/2 cups of Egg Whites, room temperature (I had a carton of pasteurized egg whites to use up, but you can also use fresh egg whites, which would be about 12 egg whites)
1 cup Sugar
1/4 teaspoon Salt
1 teaspoon lemon juice (or vinegar) or if you have it 1/2 teaspoon Cream of Tartar
3/4 cup plus 2 Tablespoons All Purpose Flour
2 Tablespoons Cornstarch
1 1/4 cup Icing Sugar
1 teaspoon Lemon Extract (you can use any flavour here, traditionally it’s almond extract, but vanilla or orange are yummy too!)
Using a sieve, sift together your flour, cornstarch and icing sugar 3 times! Yes, seems excessive but we want those dry ingredients to be light and fluffy! Then set this to the side.
In the bowl of a mixer place your egg whites (make sure the bowl and whisk attachment are super clean and there isn’t any oily residue or else your whites aren’t going to whip). Whip the egg whites with the whisk attachment on medium high speed until they are white, fluffy and starting to look thick.
Now add your lemon juice (or cream of tartar) and salt, and while the machine is whisking on a medium speed very slowly add your 1 cup of regular sugar, don’t dump it in all at once or else it will deflate your egg whites. Basically you want to add a spoonful or two and then once you can’t see it on top of the whites, add another few spoonfuls until it’s all gone.
Once all the sugar is in the whites turn it up to high speed and whisk until you get stiff peaks. You should be able to hold the bowl upside down and the mixture won’t fall out. This is a meringue! Meringue is one of my favourite words.
Remove the bowl from the mixer and add your lemon (or other flavour) extract, and now we are going to add in the flour/icing sugar mixture to the whites by carefully folding it in, in 3-4 additions.
Dump about 1/3 of your flour mixture on top of the meringue and using a rubber spatula,scoop the meringue from the base of the bowl on top of the flour mixture, then continue doing this until it is mostly mixed in, some flour bits will still be showing. Then continue this with the rest of the flour mixture until it has all been incorporated.
At this point your mixture should still be thick and fluffy looking.
Now scoop the batter into your angel food cake tube pan. DO NOT GREASE YOUR PAN! We want a nice, dry, greaseless pan because the batter is going to cling to the sides while it bakes making it nice and light!
Using a butter knife run it through the batter in the pan a few times to knock out any large air bubbles.
Pop your cake into the oven for about 40 minutes or until golden brown and dry looking on top. It should spring back if you touch it with your fingers.
Right when it comes out of the oven FLIP it upside down to cool! Most angel food cake pans have little feet, or a hole in the middle so you can rest it on something and not touch the top edge of the cake.
Once it is cooled, run a knife around the edges, then using the removable bottom from your pan your should be able to push it out and your lovely angel food cake is all ready to be eaten!
I love to eat my angel food cake with whipped cream and berries, but honestly it’s delicious just on it’s own, or if your feeling wild, take a slice, butter both sides, and fry it! Yes, it’s SO good!
Cinnamon Streusel Banana Bread because we all have ugly bananas in our freezer!
I love bananas! Not just as a fruit, but I think they are SO cute! I literally have a banana change purse, banana leaf wallpaper and my phone screen is bananas, they are happy, yellow and adorable! One might say I’m BANANAS for bananas! Anyways, last week was pi day, which meant making mucho banana cream pies but now I am left with lots of bananas that didn’t get used up, so what better use than banana bread! If you don’t have a pile of blackening bananas on your counter like me, you probably have a few in the freezer, where all bananas go to die, so lets use them up!

Cinnamon Streusel Banana Bread - a gift from the baking gods!
Cinnamon Streusel Banana Bread
Yield: 1 loaf pan 9”x4” or whatever pan you want to use!
Preheat your oven to 350*F
4 Bananas (or 3 if they are big boys!) - ideally blackening ones or ones from the freezer as they are full of flavour!
3/4 cup Sugar
1/2 cup Brown Sugar
1/2 cup Vegetable Oil - I used canola but anything light on flavour should be good
2 Eggs
1/2 cup Buttermilk (or sour cream or yogurt or 1/2 cup milk plus 1/2 teaspoon vinegar)
1 teaspoon Vanilla Extract (optional)
1 teaspoon Baking Soda
1 teaspoon Salt
1 teaspoon Cinnamon
2 cups Flour
Streusel Topping:
1/4 cup Butter, softened
1 cup Brown Sugar
1 Tablespoon Cinnamon
1/4 cup Oats
in a large bowl smash your bananas until they are liquidy, I use a fork, but you can also use a potato masher if that’s easier for ya!
To the bananas add both the regular and brown sugar, you can also add the cinnamon, salt, and baking soda at this point. Stir to combine.
Now pour in your liquid ingredients, buttermilk, oil, eggs and vanilla. Stir to combine.
Now add all your flour and stir together. Don’t overmix the batter here, it’s ok if there are a few lumpy bits.
In a separate bowl place all the ingredients for your streusel topping - butter, brown sugar, cinnamon, and oats.
Using your hands smoosh together the streusel ingredients until the butter has been incorporated into the sugar.
In a greased and lined loaf pan place about 1/3 of the batter and spread to cover the base of the pan, now grab a handful of the streusel topping and spread it over top, then repeat this two more times until you use up all the batter and streusel topping, making sure to have a nice layer of streusel topping to place on top of the loaf.
Bake in a preheated 350F oven for about 45-60 minutes, or until a toothpick stabbed into it comes out clean. If your banana bread seems to be browning too quickly, turn the heat down to 325*F. If you don’t use a loaf pan be sure to adjust your baking time, the thinner your batter is, the less time it’s going to take.
Let cool then you are ready to slice and eat! Yay!!!!
Pineapple Upside Down Cake for when the world is upside down!
Yesterday I watched a terribly amazing movie about the BEST surfer from Arizona who goes to Hawaii to surf the North Shore, only he has no idea what he is doing because he is a surfer from ARIZONA! This pretty much sums up my skiing experience - “Hey Deidre have you skied before?” “Oh yes, plenty of times” in MANITOBA! Where we literally skied down a man made hill because we have no mountains. Lets just say I rolled down the mountain for a day and decided never to ski again. Anyways, Hawaii, the land of pineapples is where I wish I was right now, but since I can’t be there lets eat some pineapple!

Pineapple Upside Down Cake
Pineapple Upside Down Cake
Yield: 10” skillet serves 1-8 depending on how willing you are to share
Preheat that oven to 350*F
1/4 cup Butter
1/2 cup Brown Sugar
1 can of pineapple (ideally those rings of pineapple, but I don’t have that so I’m using the chunks of pineapple, use what you got, we’re in quarantine!)
3/4 cup Butter, softened
3/4 cup Sugar
2 Eggs
1 cup Buttermilk or Sour Cream or Yogurt or 1 cup of milk with 1 teaspoon of vinegar
1 teaspoon of Vanilla or Rum if you got it!
2 cups Flour
1 teaspoon Baking Powder
1 teaspoon Baking Soda
1/4 teaspoon Salt
In a large skillet or 8”-9'“ cake pan melt the 1/4 cup butter, if you have a skillet you can do this right on the burner, otherwise just pop your butter in the microwave and pour it into the bottom of your pan.
Spread the brown sugar on top of the melted butter, making sure to evening distribute it.
Drain your pineapple (we don’t need the juice for this recipe, but it sure makes a great cocktail!) then fan it on top of your brown sugar. If you have larger chunks like me, you can slice them into thinner pieces and read those on the brown sugar so they look prettier…or not, up to you! Then set this pan to the side!
Now for the batter! Ideally with an electric mixer (stand or hand mixer, both work great) beat together your butter, vanilla/rum if you got it, and sugar. You can do this by hand, you are just going to have a work out!
Once the butter/sugar looks nice and fluffy add your eggs.
You can now toss in the baking power, baking soda and salt.
Next, alternate in the flour and buttermilk (or alternative as listed in the ingredients). I usually do 3 additions of flour and 2 of the buttermilk.
Now smear your batter on top of the pineapple in your pan, try to not smooth around the pineapples too much since they are going to be the pretty top of your cake after.
Bake in a preheated 350*F oven until golden and a toothpick comes out clean
Once baked, let your pan sit for about 5 minutes, then place a plate over the top of the cake and very carefully flip it over. WATCH FOR HOT SYRUP! Then eat while warm and dream of Hawaii!