
Baking recipes
Scroll through our posts below to try all sorts of delicious baking recipes from our instagram baking videos. New baking videos are posted the first week of each month on Instagram and Facebook.
To easily find one of our recipes type below:
Hey! Nice (Cinnamon) Buns!
Cinnamon buns…can you think of a GREATER bun?! The answer is no! Sweet, soft and oh so gooey! They are the perfect breakfast, lunch or dinner! This recipe has a delicious layer of “goo” aka caramel on top (some might call it a sticky bun!), but if you are more of a cinnamon bun with icing type of person, omit the goo and top with your favourite icing instead.

Yield: 12 buns (or you can make 8 ginormous buns)
Ideally use a 9”x13” pan but you can probably use 2 pie pans if you don’t have one
Dough:
3 cups All purpose flour
1/4 cup milk powder
1 1/2 teaspoons salt
2 teaspoons or 1 packet Instant Yeast
2 Tablespoons Sugar
1 1/4 cup milk, warm to the touch but not boiling
1 egg
1/4 cup butter, melted
In the bowl of an electric mixer, place the milk, egg and melted butter.
In another bowl toss together the flour, milk powder, salt, yeast and sugar just to combine.
Pour the dry ingredients on top of the liquid ingredients in the mixer bowl and then mix using the dough hook attachment for 5-10 minutes, or until the dough forms a smooth ball. The dough will still be a little sticky.
Place the dough into a greased bowl and cover. Let rest at room temperature for about 1 hour or until doubled.
Goo:
1/3 cup butter
1/2 cup Brown Sugar
1/2 cup Corn syrup, honey OR maple syrup
1/4 cup heavy cream (if you don’t have cream, omit this and increase your butter to 1/2 cup)
pinch of salt
Combine all the ingredients: butter, brown sugar, syrup, cream and salt in a small pot.
Bring to a boil while stirring, basically we are melting the butter and sugar together, so you don’t need to cook it very much. You can also do this in the microwave if you prefer.
Pour the goo into a greased 9”x13” pan and set it to the side until your dough is ready.
Filling/Assembly:
1/3 cup - 1/2 cup Butter, very soft basically you want it to be the texture of mayonnaise, so almost melted
3/4 cup - 1 cup Brown sugar
1-2 Tablespoons Cinnamon
1/2 cup Add-in (optional): toasted pecans, toasted walnuts, raisins, chocolate chips, OR dried fruits
Once your dough has doubled in size place it onto a lightly floured surface and shape it into a rough rectangle shape. Then roll out into a large rectangle using a rolling pin or wine bottle, whatever you’ve got on hand! Since we are making 12 buns, make sure your rectangle is at least 12” wide, but if it gets a bit longer that is no problem. Mine probably was about 15”x9” in the end.
Smear your super soft butter all over your rectangle but leave a strip about 1” wide across the top edge without any butter. This strip is going to be the end edge of our roll which we will use to stick the dough to itself and seal the log.
On top of the butter sprinkle a nice even layer of brown sugar all over, depending on the size of your rectangle you might need a little more sugar, or a little less, but as long as it’s nicely covered you are set, the measurements for the filling are more by feel, so if you have leftover don’t worry!
Next, sprinkle the cinnamon all over the sugar to your liking. If you are putting any add-ins into your cinnamon buns, you can sprinkle them all over the cinnamon sugar layer now as well.
Now time to roll! Starting at the edge closest to you, move from one side to the other, rolling the dough on top of itself, tucking in the dough into the layer of cinnamon sugar, until you reach the top edge that doesn’t have any butter on it. Your dough should look like a big wormie and be lying on top of the un-buttered strip of dough.
For ease, I like to roll my wormie over so the edge of the dough is on top, then you want to seal the dough together by pinching it all the way from one side to the other so it won’t unravel when we cut it.
Now using your sharpest knife cut the wormie into 12 even-ish pieces. The easiest way for me to do this is to cut the wormie in half, then you will have 2 pieces. Now, take each of those pieces and cut them in half, so now you should have 4 even-ish pieces. Then cut each of those 4 pieces into thirds. Viola! 12 even-ish pieces!
Now grab your pan that has the goo at the bottom (or if you don’t want goo, just make sure your pan is very well greased, or lined with greased parchment). Place your buns cut side down in the goo into the pan, in a 4 across and 3 down pattern.
Cover the pan and let sit at room temperature until doubled and starting to reach the top edge of the pan, about 1 hour. If you want to serve these for breakfast, make your buns the day before, then cover them and place into the fridge overnight. In the morning, take your buns out about 2 hours before baking so they can come up to room temperature and then continue to proof so they are doubled and reaching the top edge of the pan.
While your buns are rising, pre-heat your oven to 350*F.
When your buns have doubled, pop the pan onto a cookie tray (this is purely to catch caramel drips from falling into your oven which would be the worst to clean…speaking from personal experience) and then place the pan with cookie tray into the middle of the oven and bake for 20-30 minutes or until golden brown and sounding hollow when you tap on the dough.
Let the pan sit for about 5 minutes at room temperature so it’s not boiling and then using oven mitts and being EXTREMELY careful, place a baking tray or a large platter (something that is larger than your cinnamon bun pan so it can catch the caramel) on top of the cinnamon buns, and flip them over and remove the baking pan. All your buns and delicious caramel should pour out onto the baking tray/platter, but if there are a few stragglers, just grab a spatula and scrape them out.
Now time to devour these delicious babies! Best served warm!
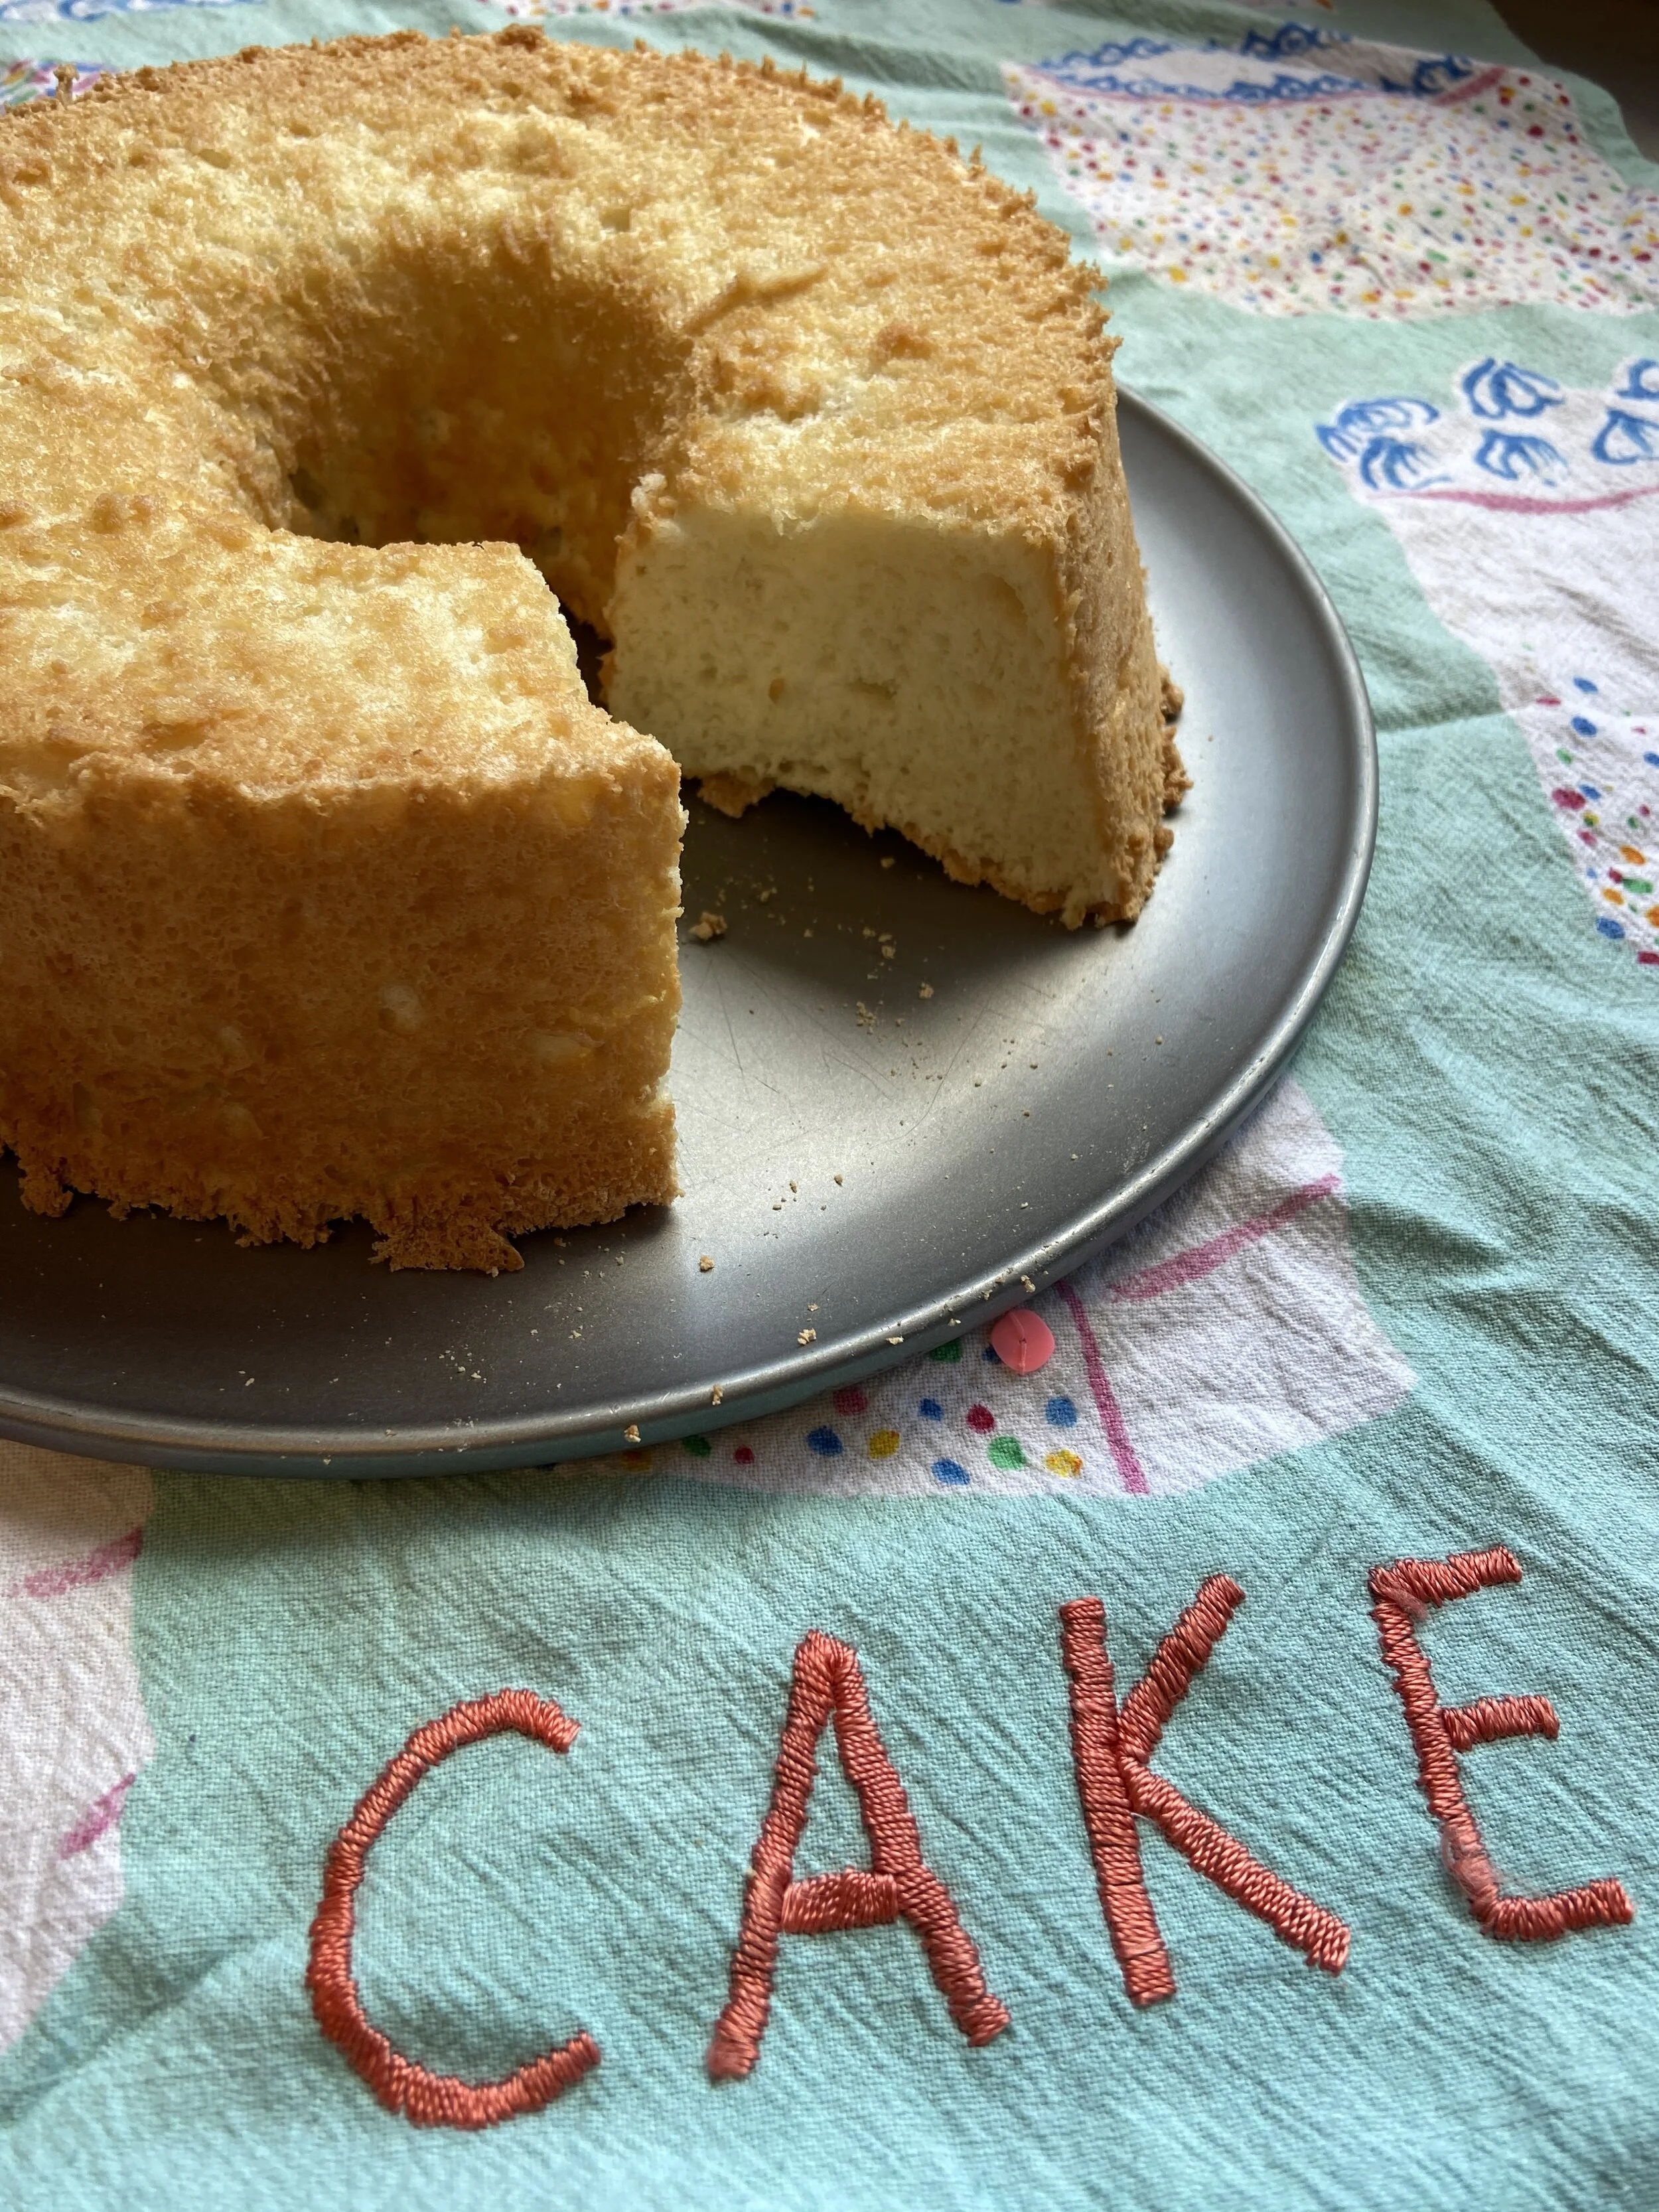
Angel Food Cake! Popular with Angels AND Devils!
Angel food cake, what a name! I just imagine the Philadelphia Cream Cheese Angel snacking on it while taking a break from her cream cheese bagels. It’s a cake as light , fluffy and white as a cloud! This baby is made without any fat, which means it can be a bit tricky, but I have faith in you! First you make a meringue, then carefully fold in flour and sugar, then once baked you flip it upside down so it doesn’t collapse on itself while it cools! Fun!
Angel Food Cake!
Angel Food Cake
Yield: 1 x 10” Angel Food Cake Tube Pan (ideally with a removable bottom, but use what you got!)
Preheat your oven to 350*F
1 1/2 cups of Egg Whites, room temperature (I had a carton of pasteurized egg whites to use up, but you can also use fresh egg whites, which would be about 12 egg whites)
1 cup Sugar
1/4 teaspoon Salt
1 teaspoon lemon juice (or vinegar) or if you have it 1/2 teaspoon Cream of Tartar
3/4 cup plus 2 Tablespoons All Purpose Flour
2 Tablespoons Cornstarch
1 1/4 cup Icing Sugar
1 teaspoon Lemon Extract (you can use any flavour here, traditionally it’s almond extract, but vanilla or orange are yummy too!)
Using a sieve, sift together your flour, cornstarch and icing sugar 3 times! Yes, seems excessive but we want those dry ingredients to be light and fluffy! Then set this to the side.
In the bowl of a mixer place your egg whites (make sure the bowl and whisk attachment are super clean and there isn’t any oily residue or else your whites aren’t going to whip). Whip the egg whites with the whisk attachment on medium high speed until they are white, fluffy and starting to look thick.
Now add your lemon juice (or cream of tartar) and salt, and while the machine is whisking on a medium speed very slowly add your 1 cup of regular sugar, don’t dump it in all at once or else it will deflate your egg whites. Basically you want to add a spoonful or two and then once you can’t see it on top of the whites, add another few spoonfuls until it’s all gone.
Once all the sugar is in the whites turn it up to high speed and whisk until you get stiff peaks. You should be able to hold the bowl upside down and the mixture won’t fall out. This is a meringue! Meringue is one of my favourite words.
Remove the bowl from the mixer and add your lemon (or other flavour) extract, and now we are going to add in the flour/icing sugar mixture to the whites by carefully folding it in, in 3-4 additions.
Dump about 1/3 of your flour mixture on top of the meringue and using a rubber spatula,scoop the meringue from the base of the bowl on top of the flour mixture, then continue doing this until it is mostly mixed in, some flour bits will still be showing. Then continue this with the rest of the flour mixture until it has all been incorporated.
At this point your mixture should still be thick and fluffy looking.
Now scoop the batter into your angel food cake tube pan. DO NOT GREASE YOUR PAN! We want a nice, dry, greaseless pan because the batter is going to cling to the sides while it bakes making it nice and light!
Using a butter knife run it through the batter in the pan a few times to knock out any large air bubbles.
Pop your cake into the oven for about 40 minutes or until golden brown and dry looking on top. It should spring back if you touch it with your fingers.
Right when it comes out of the oven FLIP it upside down to cool! Most angel food cake pans have little feet, or a hole in the middle so you can rest it on something and not touch the top edge of the cake.
Once it is cooled, run a knife around the edges, then using the removable bottom from your pan your should be able to push it out and your lovely angel food cake is all ready to be eaten!
I love to eat my angel food cake with whipped cream and berries, but honestly it’s delicious just on it’s own, or if your feeling wild, take a slice, butter both sides, and fry it! Yes, it’s SO good!
Focaccia! *Imagine an Italian Nona saying that*
I have about 20 Italian vacations planned in my Pinterest. Unfortunately I never have time to go to Italy…and now that I have time, I am not supposed to leave my house…how rude! So to fake my dream vacation we are making focaccia and watching movies in Italy in hopes that if I drink enough vino I might almost think I am there…almost! This crispy bread takes a few hours to make but you don’t need to do that much work, basically just move it from one bowl to another every few hours, nothing too crazy! I mean we have time on our hands now, but we don’t want to be labouring away for 6 hours, I have netflix shows to watch!

Focaccia Bread!
Focaccia Bread
Yield: 1 skillet sized pan, or a 9” cake pan, or whatever you’ve got!
Once you get to the final rise you will need to Preheat your oven to 450*F
1 cup Warm Water (needs to be warm to awaken our yeast)
1 teaspoon honey, sugar, or maple syrup
1 teaspoon yeast, I used instant yeast, but use what you got, we’re in quarantine!
2 Tablespoons Olive Oil
1 1/2 teaspoons salt
1 teaspoon dried herbs (optional)
2 1/2 cups Flour
Topping:
2 Tablespoons Olive Oil
1/2 teaspoon Coarse Salt (if not just a sprinkle of regular salt should do the trick!)
Toppings such as: parmesan cheese, chopped garlic, sundried tomatoes, pepperoni, herbs, sliced onion, olives, pesto, really anything you want!
In the bowl of your mixer pour your warm water and honey, stir to combine.
Sprinkle your yeast on top of the warm water, then let it sit at room temperature for about 10 minutes or until foamy.
Now add your olive oil, salt, dried herbs and flour and combine using the dough hook on the mixer.
Using the mixer with dough hook continue to mix the dough for 10-15 minutes, or until the dough pulls away from the sides of the bowl and sticks together around the hook in a ball. If you need to, you can finish kneading this by hand, but I didn’t because it came together in the bowl.
Place the dough ball into a greased bowl and cover it with a lid, saran wrap, or a tea towel and let sit at room temperature until doubled in size, mine took 1.5 hours.
Now grease your pan (I used a cast iron skillet) using about 1-2 Tablespoons of olive oil, this is going to seem like a lot, but the olive oil is there to kind of fry the edges of your bread and make them crispy in the oven!
Place your dough ball into the greased pan and using your fingers spread it out to fill the pan.
Now cover your pan with a tea towel and let sit at room temperature for about 1 hour, until the dough rises up about 1/2"-1” (doubled). If you don’t want to eat this today, you can also pop your focaccia into the fridge instead of letting it rise and bake it off tomorrow or later in the day, just make sure you let it sit at room temperature until it’s risen after taking it out of the fridge.
Preheat your oven to 450*F while the dough is resting in it’s pan.
Using your fingers dimple the dough ALL over so it has lots of imprints, then drizzle it with olive oil, a sprinkle of salt, and any of the toppings you want. This isn’t a pizza, so you want to be able to see some of the dough peeking through, but a nice smattering of garlic or sundried tomatoes or olives is delicious! You can also bake this just with the olive oil and salt.
Pop the pan into your hot oven and bake for 18-20 minutes, or until golden brown!
Now pour yourself some vino, turn on “Under the Tuscan Sun” and eat your focaccia while pretending your on vacation. Heaven!