
Baking recipes
Scroll through our posts below to try all sorts of delicious baking recipes from our instagram baking videos. New baking videos are posted the first week of each month on Instagram and Facebook.
To easily find one of our recipes type below:
Cream Puffs with a Lemon Cheesecake Filling!
Cream puffs are made with ‘Choux Paste” which is a dough that is used for ALL sorts of things - eclairs, churros, cruellers, profiteroles, gorgieres and more! It’s a dough you cook on the stove, then add eggs to before piping and baking. I filled my cream puffs with a lemon cheesecake filling, but you can fill them with lightly sweetened whipped cream or a scoop of ice cream for a simple and delicious dessert!
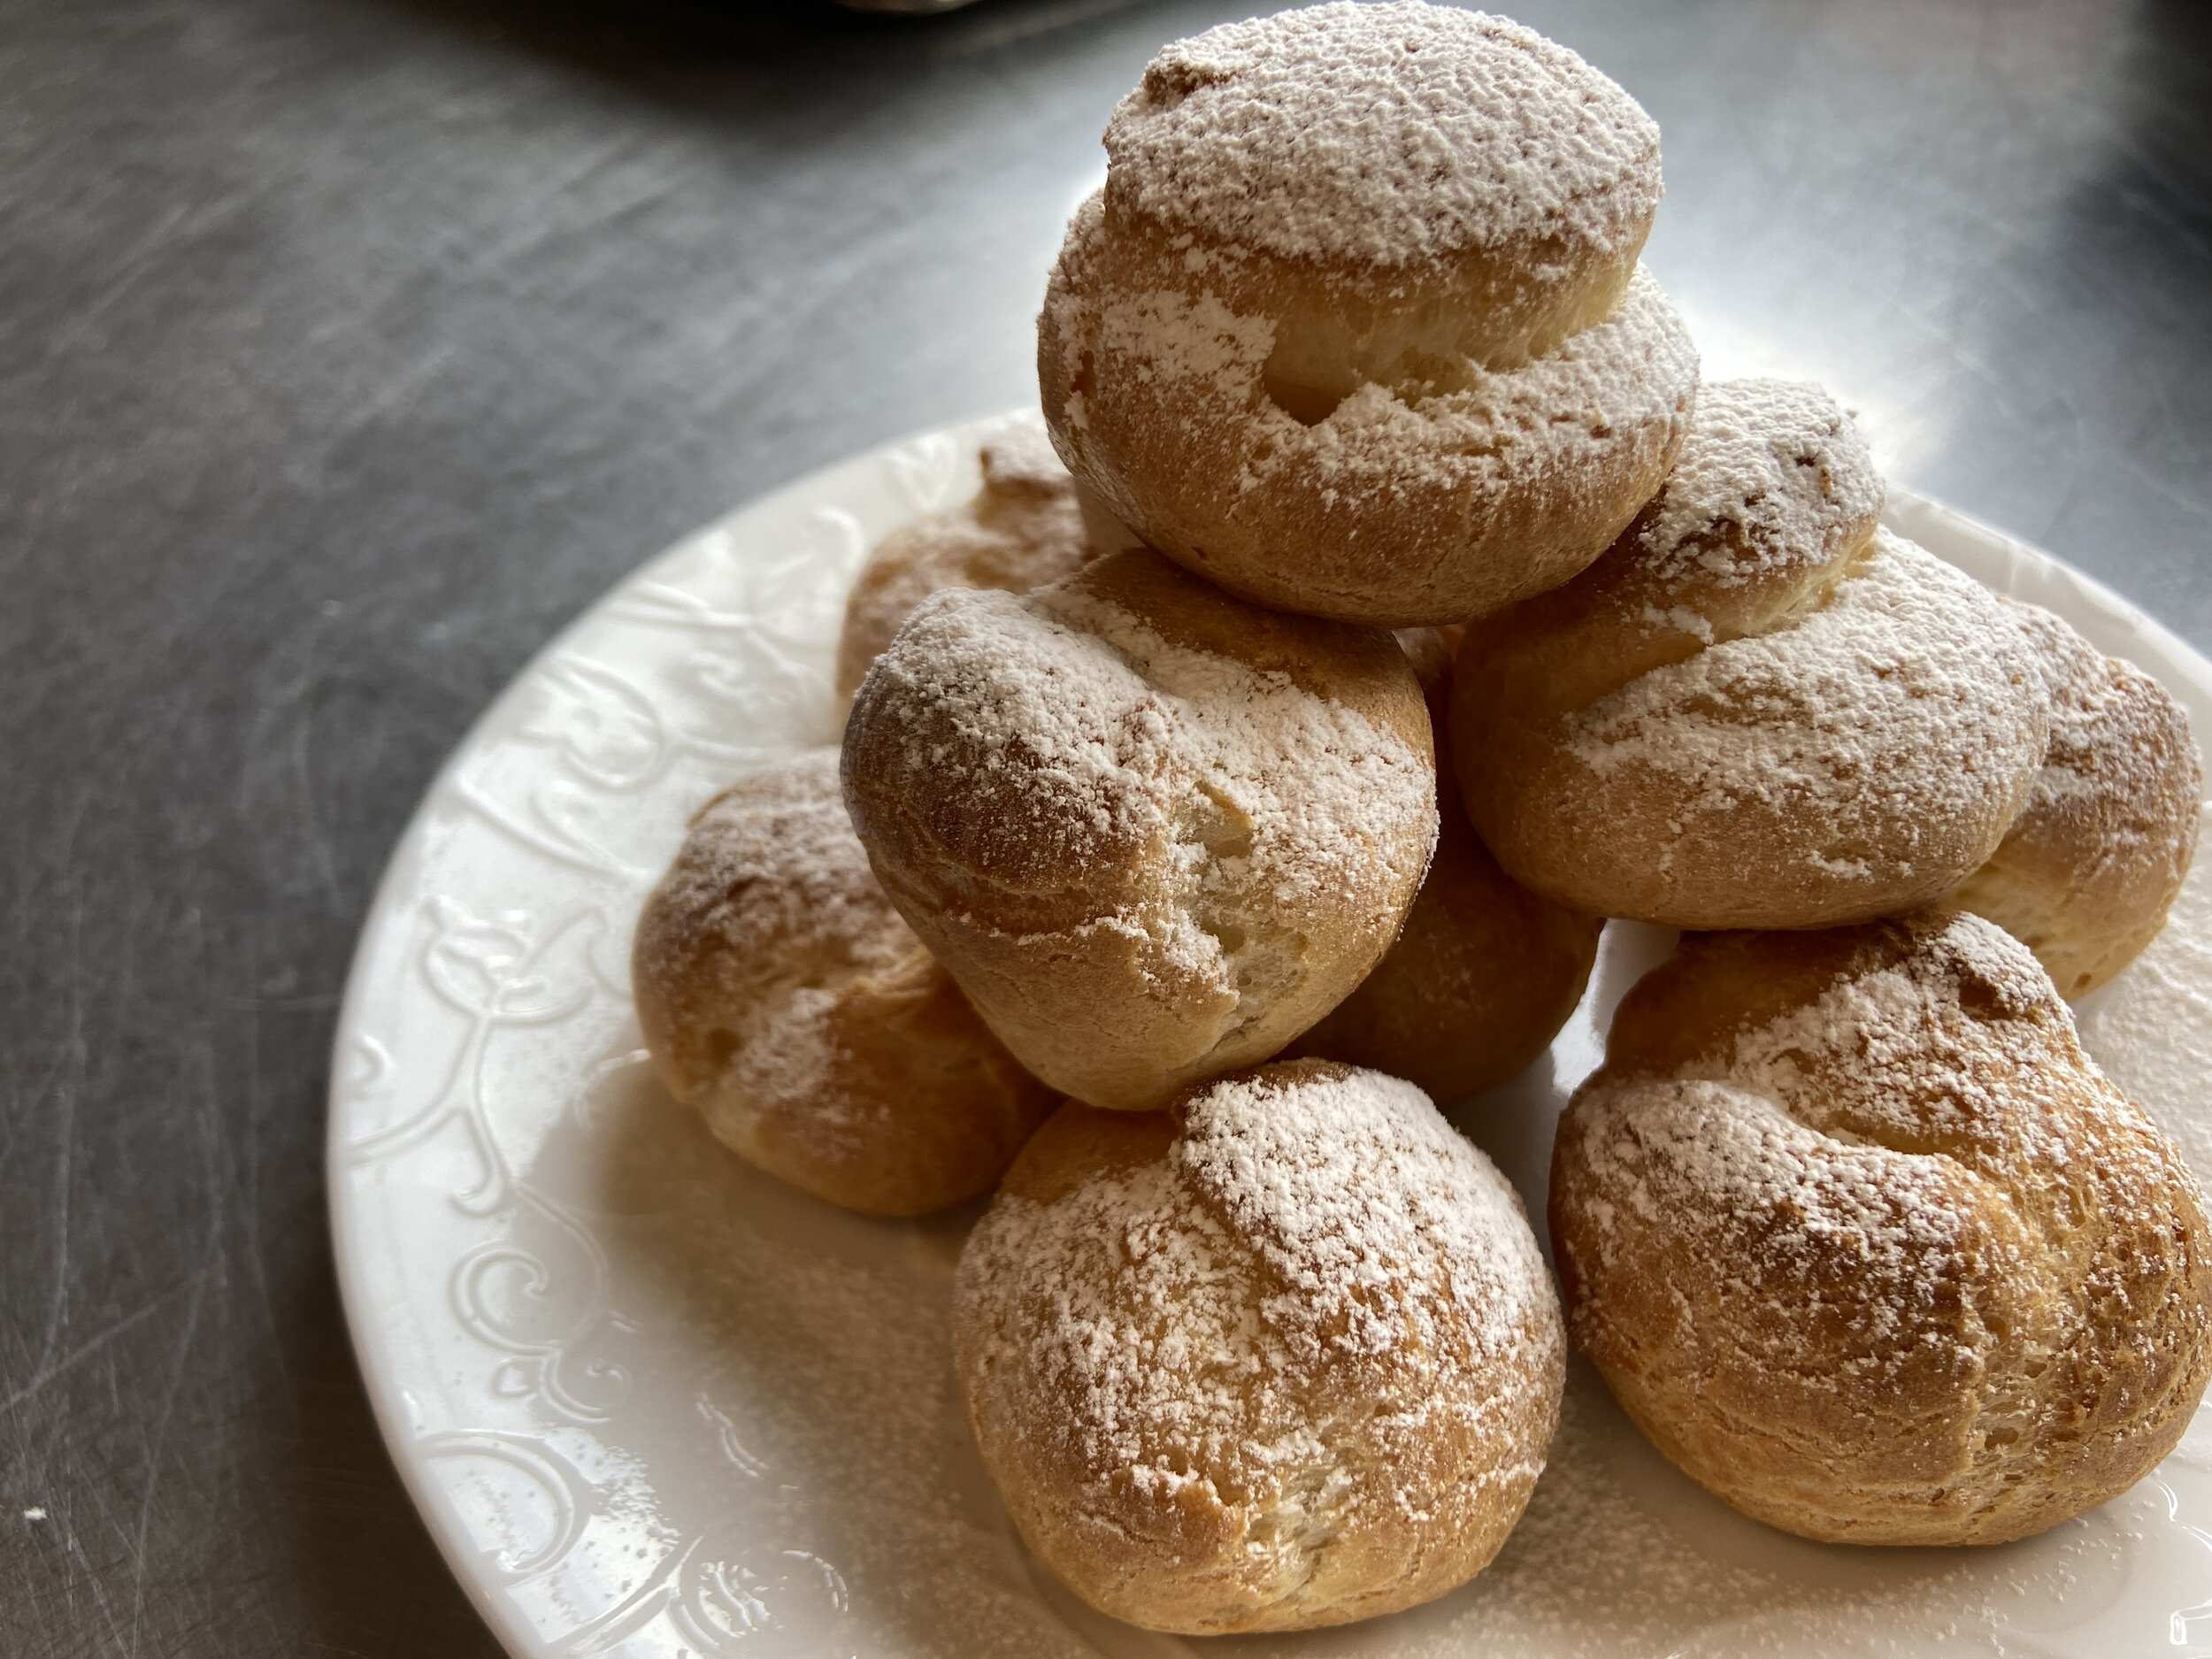
A mountain of Cream Puffs!
Cream Puffs with Lemon Cheesecake Filling
Yield: 24-30 cream puffs
Preheat your oven to 400*F
Choux Paste aka Cream Puff Dough:
1/2 cup Milk
1/4 cup Water
1/3 cup Butter
1/4 teaspoon Salt
1/2 teaspoon Sugar
3/4 cup Flour
~3 Eggs
icing sugar for dusting on top
Lemon Cheesecake Filling:
1 cup (8oz.) Cream Cheese, softened
1/4 cup Icing Sugar
1/4 teaspoon Salt
zest of 1 lemon
In a small pot, bring your milk, water, butter, salt and sugar to a boil.
Once the milk mixture is boiling, add your flour and stir over a medium heat until the mixture become a dough ball and leaves a film on the base of your pot. Transfer to a bowl and cool for a minute or two.
Add your eggs one at a time, stirring to combine after each egg. Depending on how much moisture is in your dough, and how large your eggs are, you might not need all three. You want your finished dough to be soft and when you run your finger though it, it should slowly fill in the gap, but still leave a visible line where your finger had been.
Place your dough into a piping bag and pipe about 1.5” diameter rounds onto a parchment lined baking tray.
If there are little “kisses” poking up from where you stopped piping, wet your finger and lightly press them down so the tops of your cream puffs are flat.
Bake in a preheated 400*F oven for 20-30 minutes, or until golden brown. Try not to open the oven at all (no peeking!) for the first 20 minutes, the cream puffs are creating steam that will help them bake, and we don’t want that to escape!
To make the lemon cheesecake filling, whip together the cream cheese, icing sugar, salt and lemon zest until light and fluffy. If you plan on piping it into your cream puffs, you can place it into a piping bag or a ziplock bag with the corner cut off.
Once your cream puffs are baked, let them cool and fill with your choice of filling! You can use a knife to poke a hole in the base of your cream puff, large enough to fit the tip of a piping bag full of filling, then squeeze it into your cream puff, or you can cut the top of your cream puff off with a serrated knife, scoop some filling into it and then place the top back on once filled, both look cute!
Sprinkle the tops with icing sugar and devour!
Herb and Garlic Pull Apart Bread!
This loaf of bread is made up of many squares of dough layered with herb and garlic butter! The layering results in a flaky loaf you can just pull apart with your fingers! So tasty and easy to eat!

Layers of buttery goodness!
Herb and Garlic Pull Apart Bread
Yield: 1 loaf sized 9”x5”
Dough:
1.5 cups Milk, warm
1/4 cup Butter, melted
3 cups Flour
1.5 teaspoons Salt
1.5 teaspoons Instant Yeast
3 Tablespoons Sugar
1/2 teaspoon Pepper
Herb and Garlic Butter:
1/3 cup Butter, soft
2 cloves Garlic, chopped
1/2 cup chopped herbs - I used green onion, cilantro and parsley, but use what you got!
pinch of Salt
pinch of pepper
In the bowl of your mixer combine all the dry ingredients for your dough - flour, salt, instant yeast, sugar and pepper. Toss to combine, then add your warm milk and melted butter.
Mix with the dough hook about 10 minutes or until the dough is no longer sticking to the sides of your bowl and is in a nice firm ball around the dough hook.
Place the dough into a grease bowl with a lid and let sit at room temperature for about 1 hour or until doubled.
While the dough is resting, stir together the herb butter- soft butter, garlic, herbs, salt and pepper.
Once your dough is ready, roll it into a large rectangle about 12'“x16” on a lightly floured surface.
Now spread your garlic butter on top of the dough covering the entire thing.
Using a pizza cutter, cut the dough into 12 pieces 3 columns x 4 rows, don’t worry if some aren’t exactly square.
Now grab one of the 12 squares and fold it in half so the butter layer is in the inside like a herb butter taco, you will do this with each square of dough.
Place all the folded pieces of dough into a greased loaf pan, placing the folded edge on the bottom of the pan so you can see the buttery centre from the top of your loaf. I find it easiest to place my loaf pan on it’s side so I can stack all the pieces of dough on top of each other without them falling over, then I can place the pan back on it’s bottom and rearrange the pieces if needed.
Once all your dough is in the pan, cover with a piece of saran wrap and let sit at room temperature until it has expanded and filled the pan, about 1 hour.
Bake in a preheated 350*F oven for about 30-45 minutes, or until golden brown and hollow sounding when tapped.
Cool and eat!
Pavlova!
Pavlova is the fluffiest of cakes! It’s a GIANT meringue with a marshmallowy centre that you fill with whipped cream and top with fresh fruit! It’s our favourite dessert for any bakery staff party! Named after a ballerina’s fluffy tutu this cake is as light as air!

it’s a mountain of deliciousness!
Pavlova
Yield: 1 approximately 8” round pavlova
Preheat oven to 300F, then reduce to 250*F when you place the pavlova into the oven.
Pavlova:
5 Egg Whites, room temperature
pinch Salt
1 teaspoon Vanilla extract (optional)
1 cup Sugar
1 teaspoon Vinegar
1 Tablespoon Cornstarch
Filling:
1/2 cup Whipped cream
1-2 Tablespoons Sugar
1 cup Fresh Fruit
1 Tablespoon Sugar
In the bowl of your mixer place your egg whites and the pinch of salt.
Using the whisk attachment, whip the egg whites until they start to turn white and foamy.
While the machine is running on a low speed, slowly pour in the sugar until it is fully incorporated, then increase the mixer speed to medium high speed and whip until super thick and fluffy, at least 10 minutes. The meringue should not feel grainy when you rub it between your fingers.
Add the vinegar and cornstarch to the mixer and mix on a medium speed for 20-30 seconds until combined.
Using a bowl or plate, trace an approximately 8” diameter circle onto a piece of parchment paper, then flip oven the parchment so the outline is on the bottom of the paper, and place the parchment onto your baking tray. You can use a little baking spray on the pan to stick down your parchment so it won’t slide.
Load your meringue mixture onto your drawn circle on the parchment. Then gently spread it into the circle shape. You can use the back of a spoon or a spatula to create decorative lines on the side of your pavlova, or just leave it with a rustic look.
Place pavlova into a preheated 300F oven, then as soon as the pavlova is in, REDUCE the heat to 250*F and bake for 1.25-1.5 hours. The pavlova should be crispy feeling on the outside.
Turn off the oven, but leave your pavlova in the oven to cool - about 2 hours (or just leave overnight.)
Once your pavlova has cooled, whip your cream to soft peak and sweeten to taste with sugar (1-2 Tablespoons if usually good for me), place the whipped cream on top of the pavlova.
Chop up your fresh fruits and toss with a little sugar to taste - if your fruit is sweet enough don’t worry about adding any sugar. Place fruit on top of the whipped cream.
Serve right away! So delicious!
Lemon Cranberry Scones!
Did you see Julie Van Rosendaal and I did a live instagram! What!!! She’s only my idol, no big deal! Just kidding SUPER BIG DEAL! How exciting!!! Anyways Julie made biscuits and I made these lemon cranberry scones!
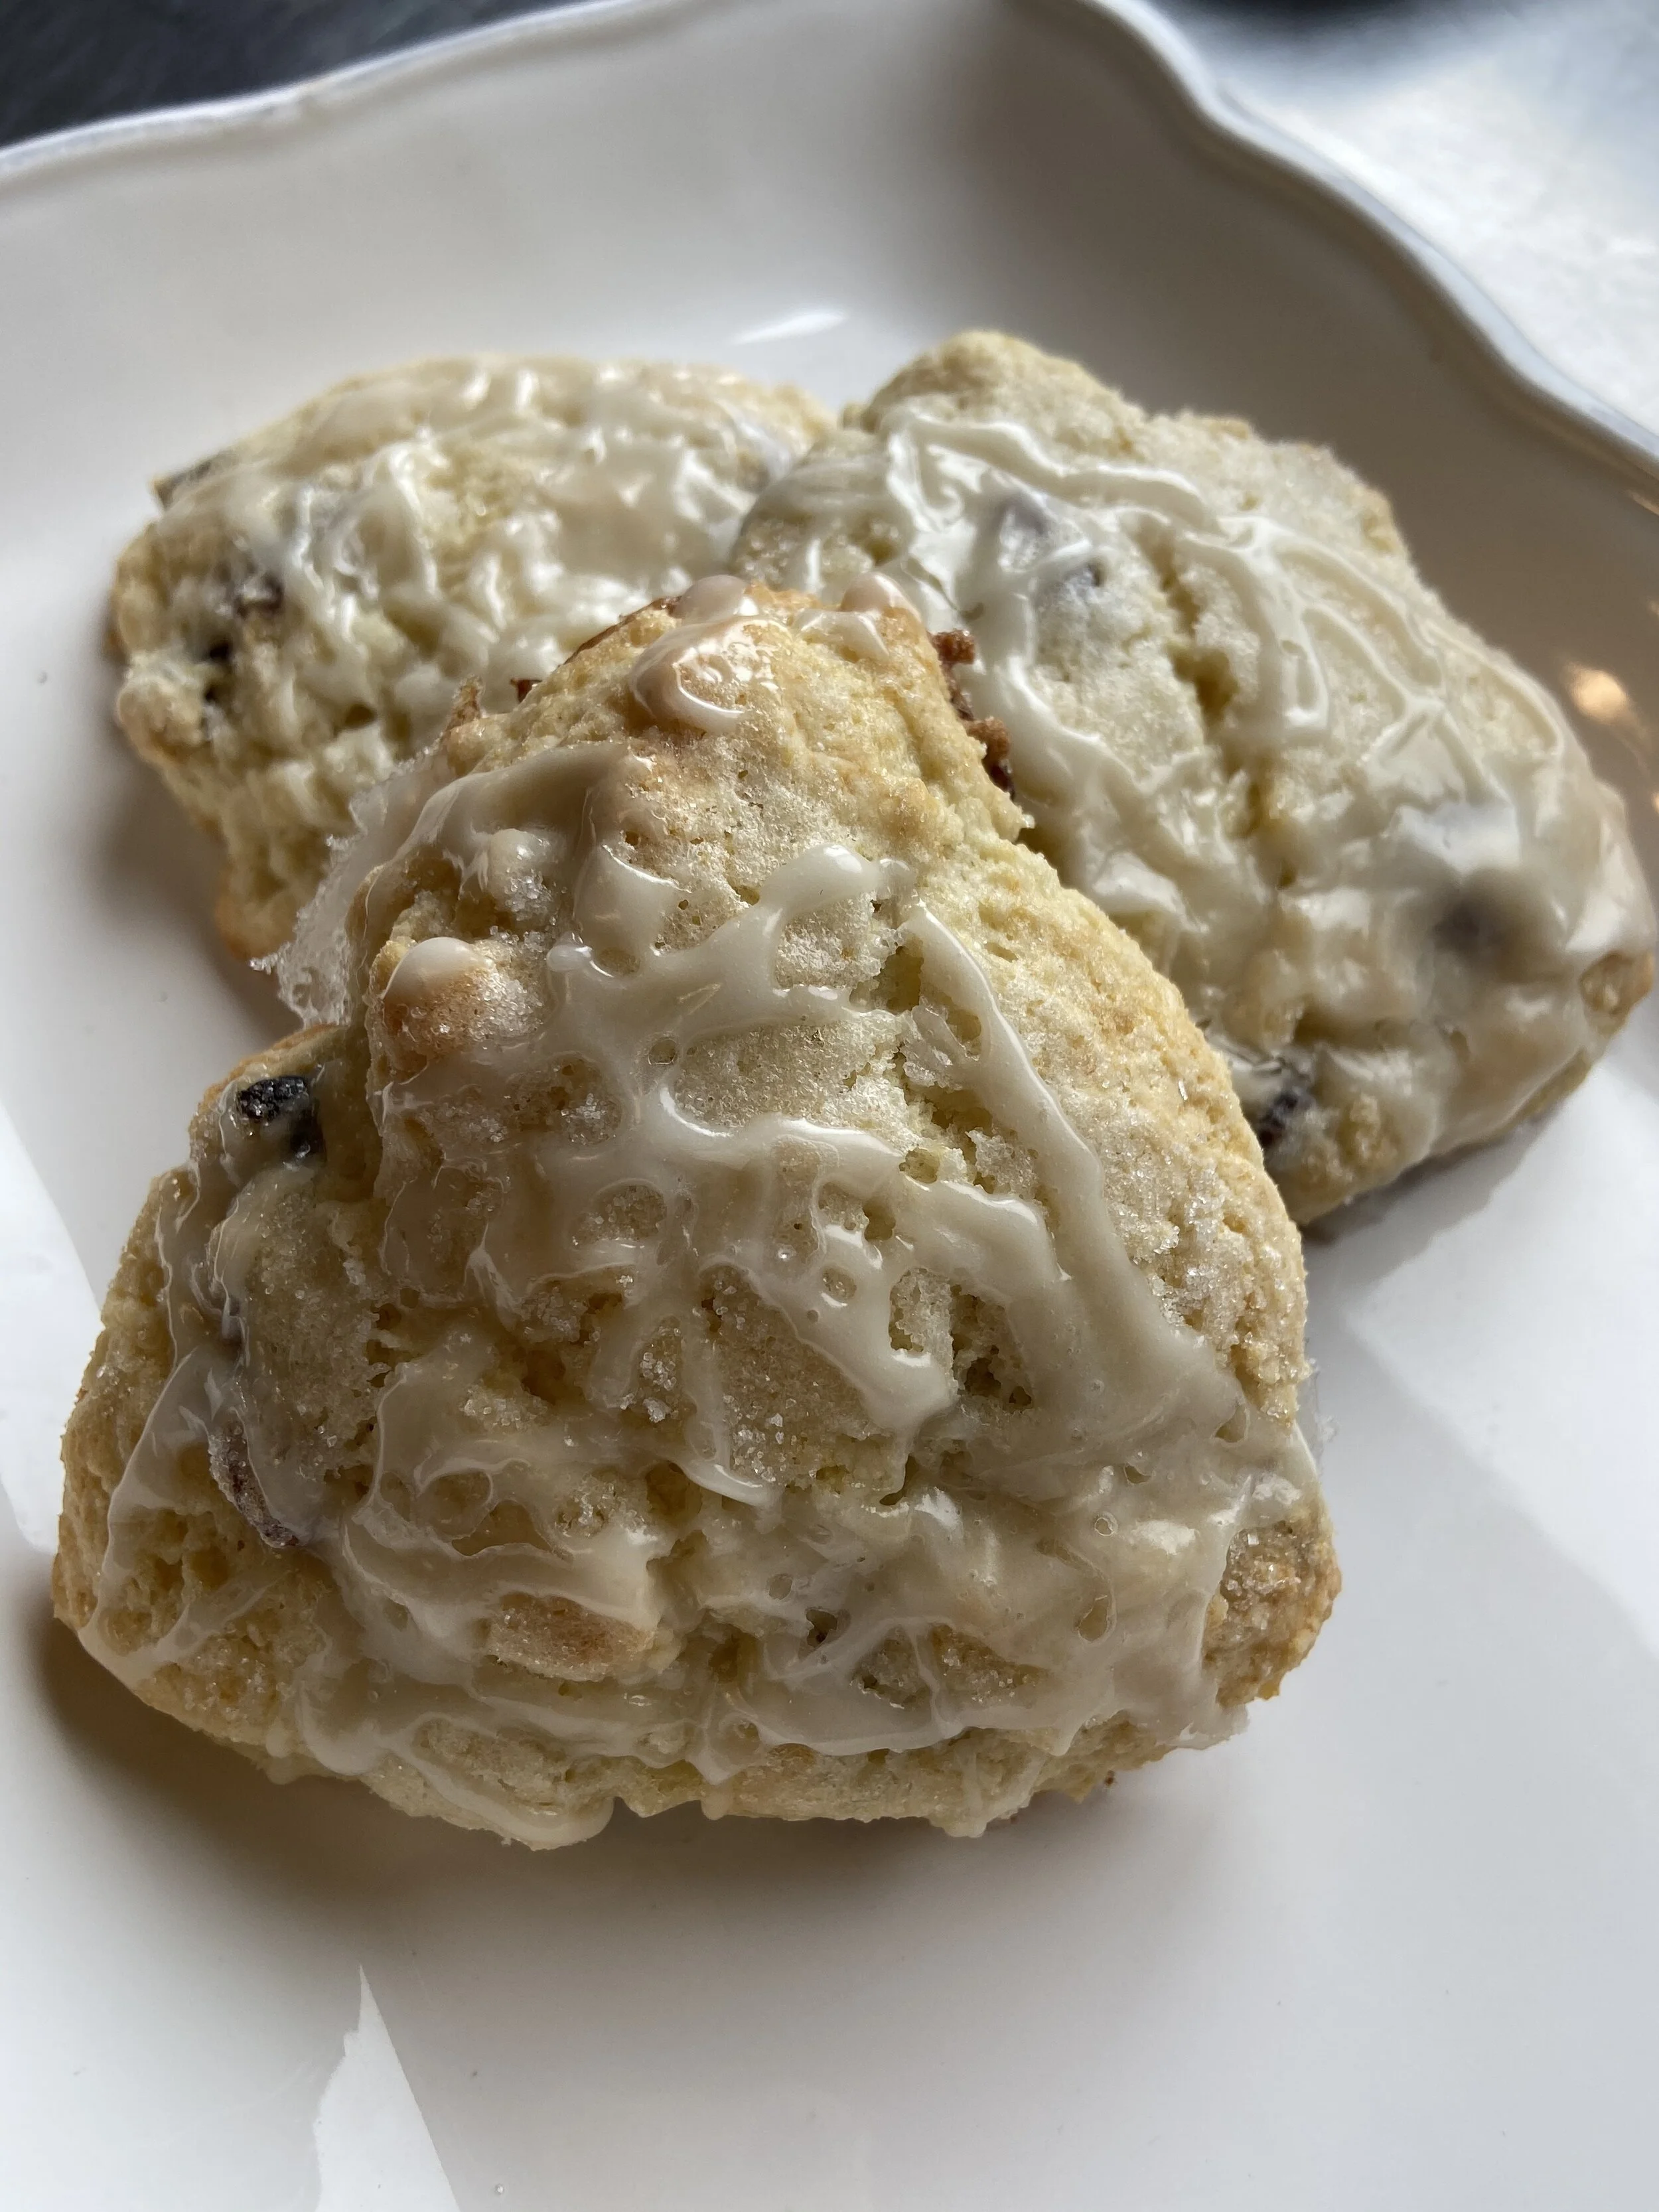
Lemony and delicious!
Lemon Cranberry Scones
Yield: 6 scones
Preheat your oven to 350*F
1/2 teaspoon Salt
1 1/2 cups Flour
1/4 cup Sugar
1/4 teaspoon Baking Soda
1 1/4 teaspoon Baking Powder
1/2 cup Butter, cold, cubed
1/2 cup Buttermilk
1 Egg
1/2 teaspoon lemon extract (or the zest of 1 lemon)
1/4 cup Dried Cranberries
Glaze:
1 Tablespoon Lemon Juice
Enough Icing Sugar to thicken to a drizzling consistency ~1/4-1/2 cup
In a large bowl stir together your dry ingredients - salt, flour, sugar, baking soda, baking powder.
Using your fingers pinch and rub in the butter until the mixture looks sandy but still has some pea sized chunks of butter.
Now pour in your liquid ingredients - buttermilk, egg, lemon extract, and you can also add in the cranberries at this time too. Stir just until combined.
On a floured surface shape your dough into a rough circle about 1” thick, then using a knife cut the circle like a pie, into 6 pieces.
Place onto a lined baking tray and brush the tops with a little buttermilk and sprinkle with sugar.
Bake for about 15-20 minutes or until lightly browned.
While baking, mix together your glaze, lemon juice and icing sugar, just add enough icing sugar until you get a thin paste.
Once your scones come out of the oven, drizzle the glaze on them while hot.
Now eat! Yay!!
Apple Turnovers aka Hand Pies aka DELICIOUS!
What’s better than a pie? A personal pie that fits into your hand! These little pies can be made into any shape, I went for a pop tart-esque shape, but you can make them into triangles or circles or whatever you like! As for fillings, that is completely up to you! I whipped up an apple pie filling, but you can use any canned pie filling, or jam, or even a cheesecake filling! So many options!

Apple Turnovers - the pop tart of your dreams!
Apple Turnovers
Yield: 4 pop tart sized turnovers, or more if you make them smaller
Preheat the oven to 350*F
Pastry:
1 1/2 cups Flour
1 Tablespoon Brown Sugar
1/2 teaspoon Salt
1/4 cup Cream Cheese, cold and cubed
1/4 cup Butter, cold and cubed
1/4 cup Cold Water
Apple Pie Filling:
1 Apple, peeled and chopped
1/2 teaspoon Cinnamon
1 teaspoon Butter
pinch of Salt
1/2 teaspoon grated Ginger (optional)
1/4 cup Water
2 Tablespoons Brown Sugar
2 teaspoons Flour
Egg Wash:
1 Egg
pinch of Sugar
pinch of Salt
In a bowl combine your flour, brown sugar, and salt. Stir to combine.
Now add the cream cheese and blend it into the flour mix by pinching and rubbing it in. It should look dry and sandy.
Once your cream cheese is worked in, add your cold butter and using the same pinching and rubbing technique work in the butter, but make sure to stop while there are still some larger pea sized chunks of butter. These are going to make things flaky!
Next we’ll add the cold water and stir until the dough comes together, it will still have some dry bits and look a bit shaggy, but when you press it together it should stay together. Then press your dough into a rectangle shape, wrap it in saran and pop it into the fridge for at least 30 minutes to chill and relax.
Now for our filling! If you want to skip this step you can definitely replace this with canned pie filling or jam. In a pot place your apples, ginger, 1 teaspoon of butter, cinnamon, salt and water, cook over medium heat until your apples soften and start to release their juices.
Stir together the 2 Tablespoons of brown sugar and 2 teaspoons of flour, then dump into the apple mixture and cook until it thickens (about 1 minute). Put this to the side to cool while our dough rests.
Whisk together your egg with a pinch of salt and sugar until combined for your egg wash.
Once your dough is chilled roll it into a large rectangle on a floured surface, about 1/8-1/4” thick. Using a pizza cutter, slice the dough into evenly shaped rectangles about the size of a deck of cards. You should have 8 rectangles altogether, if you need to, re-roll the scraps to get a few more pieces go for it!
Now take one rectangle of dough and scoop about 2 tablespoons of your pie filling into the middle. Brush around the edges with your egg wash, then place another rectangle of dough on top and press together the edges, then using a fork press all around the edges to seal in the pie filling. Slice 3 slits into the top of the dough so the filling has a vent. Place onto a parchment lined baking tray and continue with the the rest of your dough until they are all filled.
Brush the tops of your turnovers with the egg wash and sprinkle them with sugar for a crispy top!
Bake for 20-25 minutes or until golden brown!
Time to eat! Yay!