
Baking recipes
Scroll through our posts below to try all sorts of delicious baking recipes from our instagram baking videos. New baking videos are posted the first week of each month on Instagram and Facebook.
To easily find one of our recipes type below:
Cheese-y Mushroom "Danishes"
These danishes are made with puff pastry instead of the traditional yeast raised Danish dough. For this recipe I used half of the batch from the puff pastry dough I made for Sausage Rolls, you can check out that recipe if you would like to make your own puff pastry or you can just use the puff pastry from the freezer section of your grocery store! These little danishes are buttery and full of flavour! You can fill your danish with anything (sweet or savoury!) and they make an awesome and impressive appetizer! I am filling mine with some caramelized onions, mushrooms, ham and swiss cheese!
Cheese-y Mushroom “Danishes”
Yield: 9 large sized danishes
Preheat your oven to 400*F
1 sheet of puff pastry (if buying premade) or 1/2 batch of my puff pastry dough (see Sausage Rolls recipe)
~1 Tablespoon Dijon Mustard
~1 cup grated Swiss Cheese (or your favourite cheese!)
2 slices of Ham Deli Slices (or your favourite thinly sliced meat), cut into quarters
Egg Wash - 1 egg whisked up with a pink of salt and sugar
Mushroom Filling:
1 Tablespoon Butter
1/2 an Onion, diced
1-1 1/2 cups of Mushrooms, chopped
1/2 teaspoon Dried Thyme
1/2 teaspoon Dried Rosemary
1/4 teaspoon Salt
1/4 teaspoon Pepper
1-2 Tablespoons Wine (white or red), or both or water - anything you have on hand!
1/2 teaspoon Worcestershire Sauce (optional)
In a frying pan melt your butter, then add your onions, thyme, rosemary, salt and pepper. Cook over medium heat until onions start to brown and caramelize.
Add your mushrooms and continue cooking until the mushrooms start to brown and release their juices.
Deglaze your pan by pouring a tablespoon or two of wine into the pan and scraping the bottom to release any of those bits that have stuck on. Add your Worcestershire sauce.
Cook for a minute or so while stirring until most of the liquid has bee absorbed. Pour into a bowl to cool and Taste and season to your liking!
Roll out your puff pastry into a large square about 1/8” thick.
Using a pizza cutter or knife, trim the edges and then cut into 9 portions, I did 3 rows horizontally and 3 rows vertically.
Going diagonally from on corner to the other, smear a thin layer of dijon mustard down the middle.
I sliced my deli ham into quarters, then placed one quarter on top of the dijon mustard.
On top of the ham but keeping to the centre area of your square, scoop about 1 tablespoon of the mushroom mixture.
Then place a large pinch of shredded cheese on top of the mushrooms.
Now you can bake the danish just like this, or make it into a shape!
To shape, grab the corner with the least toppings and fold it over so it’s reaching across the cheese and filling. Lightly egg wash, then grab the opposite corner and fold it on top of the first one, so they are “hugging” your filling. Egg wash the other side.
Sprinkle the tops of your danishes with coarse salt or pepper (optional)
Bake in a preheated 400*F oven for about 25 minutes or until golden brown!
Eat!
Crepes Suzette! It's FLAMBE time!
This dessert was popular in the days of white gloved waiters, but no white gloves necessary! First you make crepes which are already delicious, then you make an orange caramel sauce which you FLAMBE! So fun and exciting! Both the crepes and orange caramel sauce are delicious for other uses, like crepes filled with nutella and bananas, or ice cream with orange caramel sauce on top! Yum!

These crepes are saucy!
Crepes Suzette
Yield: 6-8 large crepes (I used a 10” skillet)
Crepes:
1/2 cup Milk
2 Eggs
1 Tablespoon Butter, melted
2 teaspoon Sugar
1/4 teaspoon Salt
1/2 cup Flour
Orange Caramel Sauce:
1/2 cup Sugar
1/4 cup Butter
Juice of 1 Orange (about 1/4-1/2 cup)
2 ounces (1/4 cup) Grand Marnier (optional)
To make crepes, whisk together all the crepe ingredients until smooth and combined. If it is lumpy just pour it through a strainer. Let this sit in the fridge at least 30 minutes or overnight.
To cook the crepes, heat a non-stick skillet to medium high heat (or a crepe pan if you have one of those!). Grease the pan with a little butter or oil then pour a few tablespoons of batter into the pan and swirl the pan around to coat the base. You don’t want your crepes to be thick, so depending on the size of your pan probably 2-4 tablespoons.
Continue heating the crepe until it looks matte on top and not liquidy, then it’s all cooked! Peel it off the pan and place onto a clean baking tray. Then continue until all your batter is used up, placing each crepe onto the baking tray, the crepes can overlap a bit and they shouldn’t stick together.
Now for the sauce! Make sure you have ALL the sauce ingredients ready to go, you can’t walk away from this once you start.
Heat up a large pan over medium-high heat. Place a few teaspoons of sugar onto it and stir until it is melted, then add a few more teaspoons of sugar and continue stirring until it’s melted, then continue until all your sugar is used. This is called a dry caramel. Once all your sugar is melted, continue cooking until it is a nice golden brown colour.
Turn off the heat and carefully add your butter, stirring it gently until it is all melted and combined. Watch out this is going to be super hot and bubbly!
Now slowly pour in your orange juice, and stir to combine. Even though this is off the heat it is still going to bubble up and steam so be careful! If the sugar clumps up don’t worry!
Now put your caramel sauce onto a medium-low heat and cook until all the sugar clumps have melted and the sauce looks nice and smooth.
Now turn off the heat and pour in your grand mariner (if using), DO NOT POUR FROM THE BOTTLE! This can carry a flame back into your bottle and explode which would not be good! Just use a measuring cup or small container. Carefully using a BBQ lighter ignite your sauce, it might take a second and then it will be on fire! Carefully shake your pan until the fire burns itself out. If you get scared or the fire gets out of control, keep a lid nearby to cover the pan, this will put out the fire if you need. IF YOU HAVE A GAS STOVE your burner will ignite the pan, you might have to tilt it towards the flame, but it will catch on fire that way. If you are not comfortable with this, turn off your gas stove, move your sauce off the heat and ignite with the BBQ lighter as I had. Now your delicious sauce is all ready to go!
To serve, fold each crepe in half and then fold that in half, so it looks like a triangle shape. Then you can place the crepes directly into the sauce, or you can place the crepes onto a plate and pour the sauce on top! Yum!
Blueberry Cake aka Blueberry Buckle!
This cake is family favourite! We would make it every summer whenever we had some fresh blueberries! It’s a soft buttery cake layered with blueberries and cinnamon streusel! the blueberries burst into the cake while it bakes making a delicious layer of blueberries and cinnamon in the middle! So good!

ALL the blueberries!
Blueberry Cake
Recipe courtesy of my mama Patty Lotecki
Yield: one 9”x13” pan
Preheat your oven to 350*F
Streusel:
1/4 cup Butter
1 cup Brown Sugar
1 Tablespoon Cinnamon
Blueberry Layer:
2 cups Blueberries
1/2 cup Sugar
Cake:
3/4 cup soft Butter
3/4 cup Sugar
1/4 teaspoon Salt
1 teaspoon Baking Soda
1 teaspoon Baking Powder
1 teaspoon Vanilla Extract
2 Eggs
1 cup buttermilk (or sour cream, or yogurt, or 1 cup milk plus 1 teaspoon vinegar)
2 cups Flour
In a bowl combine your streusel ingredients (butter, brown sugar and cinnamon) by rubbing them together with your hands until combined. Set aside.
In a bowl combine your blueberry layer ingredients - blueberries and sugar. Toss to combine. Set aside.
In the bowl of a mixer place your butter, sugar, salt, baking soda, baking powder and vanilla. Whip until light and fluffy.
Add eggs one at a time, mixing between each egg until they are combined. Then give your bowl a scrape down and whip for a few more minutes or until light and fluffy.
Slowly add about 1/3 of your flour to the butter mixture, once it’s almost fully combined add half of the buttermilk, then continue alternating the buttermilk and flour until it’s all used up. I usually do 3 portions of flour and two of buttermilk. Then scrape your bowl down and mix for about 20 seconds until the batter is nice and combined.
In a greased 9”x13” pan put about 2/3 of your cake batter and smear so it covers the entire base of the pan.
Next, layer all of your blueberry mixture, spreading it evenly on top of the cake batter.
Then layer all of your streusel topping on top of the blueberry layer as evenly as possible.
Now dollop spoonfuls of the remaining batter randomly on top of the streusel layer so you can still see the streusel peeking through.
Bake in a preheated 350*F oven until golden brown and comes out clean when stabbed with a toothpick.
Let it cool then devour!
Mud ball Cookies aka Easter Nests!
Mud ball cookies, sounds like your eating mud, but they’re actually a delicious chocolate coconut oatmeal cookie! This recipe is from my mom! We made them ALL the time growing up, and they are still a favourite today. They are a great cookie because they are quick to make and don’t involve any baking! Today we shaped them into nests with little mini eggs in the centre, but you can just scoop them and eat them without any chocolate eggs on top. These are also egg free and wheat free, which is great for anyone with allergies!

The most delicious bird’s nest you will ever eat!
Mud Ball Cookies
Recipe courtesy of Patty Lotecki - mama extraordinare
Yield: about 12 nests, or 24 smaller cookies
No oven required for these cookies!
1/4 cup Butter
1/4 cup Milk
3/4 cup Sugar
1 1/2 cups Oats (quick or rolled, both work great)
1/4 cup Cocoa Powder
1/2 cup Coconut (sweetened or unsweetened)
pinch Salt
1 teaspoon Vanilla extract (optional)
Mini Eggs for garnish (optional)
In a pot heat bring your butter, milk and sugar to a boil, then boil for 1 minute while stirring.
In a bowl combine all your dry ingredients - oats, cocoa, coconut, and salt. Stir to combine, breaking up any cocoa balls.
Once your butter mixture has boiled, pour it into the dry ingredients and add your vanilla extract. Stir until everything is well combined.
Grab a baking tray lined with parchment, and scoop your batter into little mounds on the tray. I used an ice cream scoop, but two spoons work great too! Then press the centre of each mound down slightly so it looks more like a nest shape.
Place a few mini eggs in the centre of each mound like eggs would be placed in a nest.
Let them cool at room temperature for about 2-4 hours, or until set and you can remove them from the parchment paper.
Eat! You can also store these in a sealed container…if you don’t eat them all!
Tiramisu! It's like we're at a fancy Italian Restaurant... when actually we can't leave the house!
Tiramisu! It just sounds delicious! This Italian dessert has layers of coffee soaked ladyfingers (which we made yesterday!), sandwiched with sweet fluffy mascarpone cheese filling, then topped with a sprinkle of cocoa powder! No Italian restaurant required!
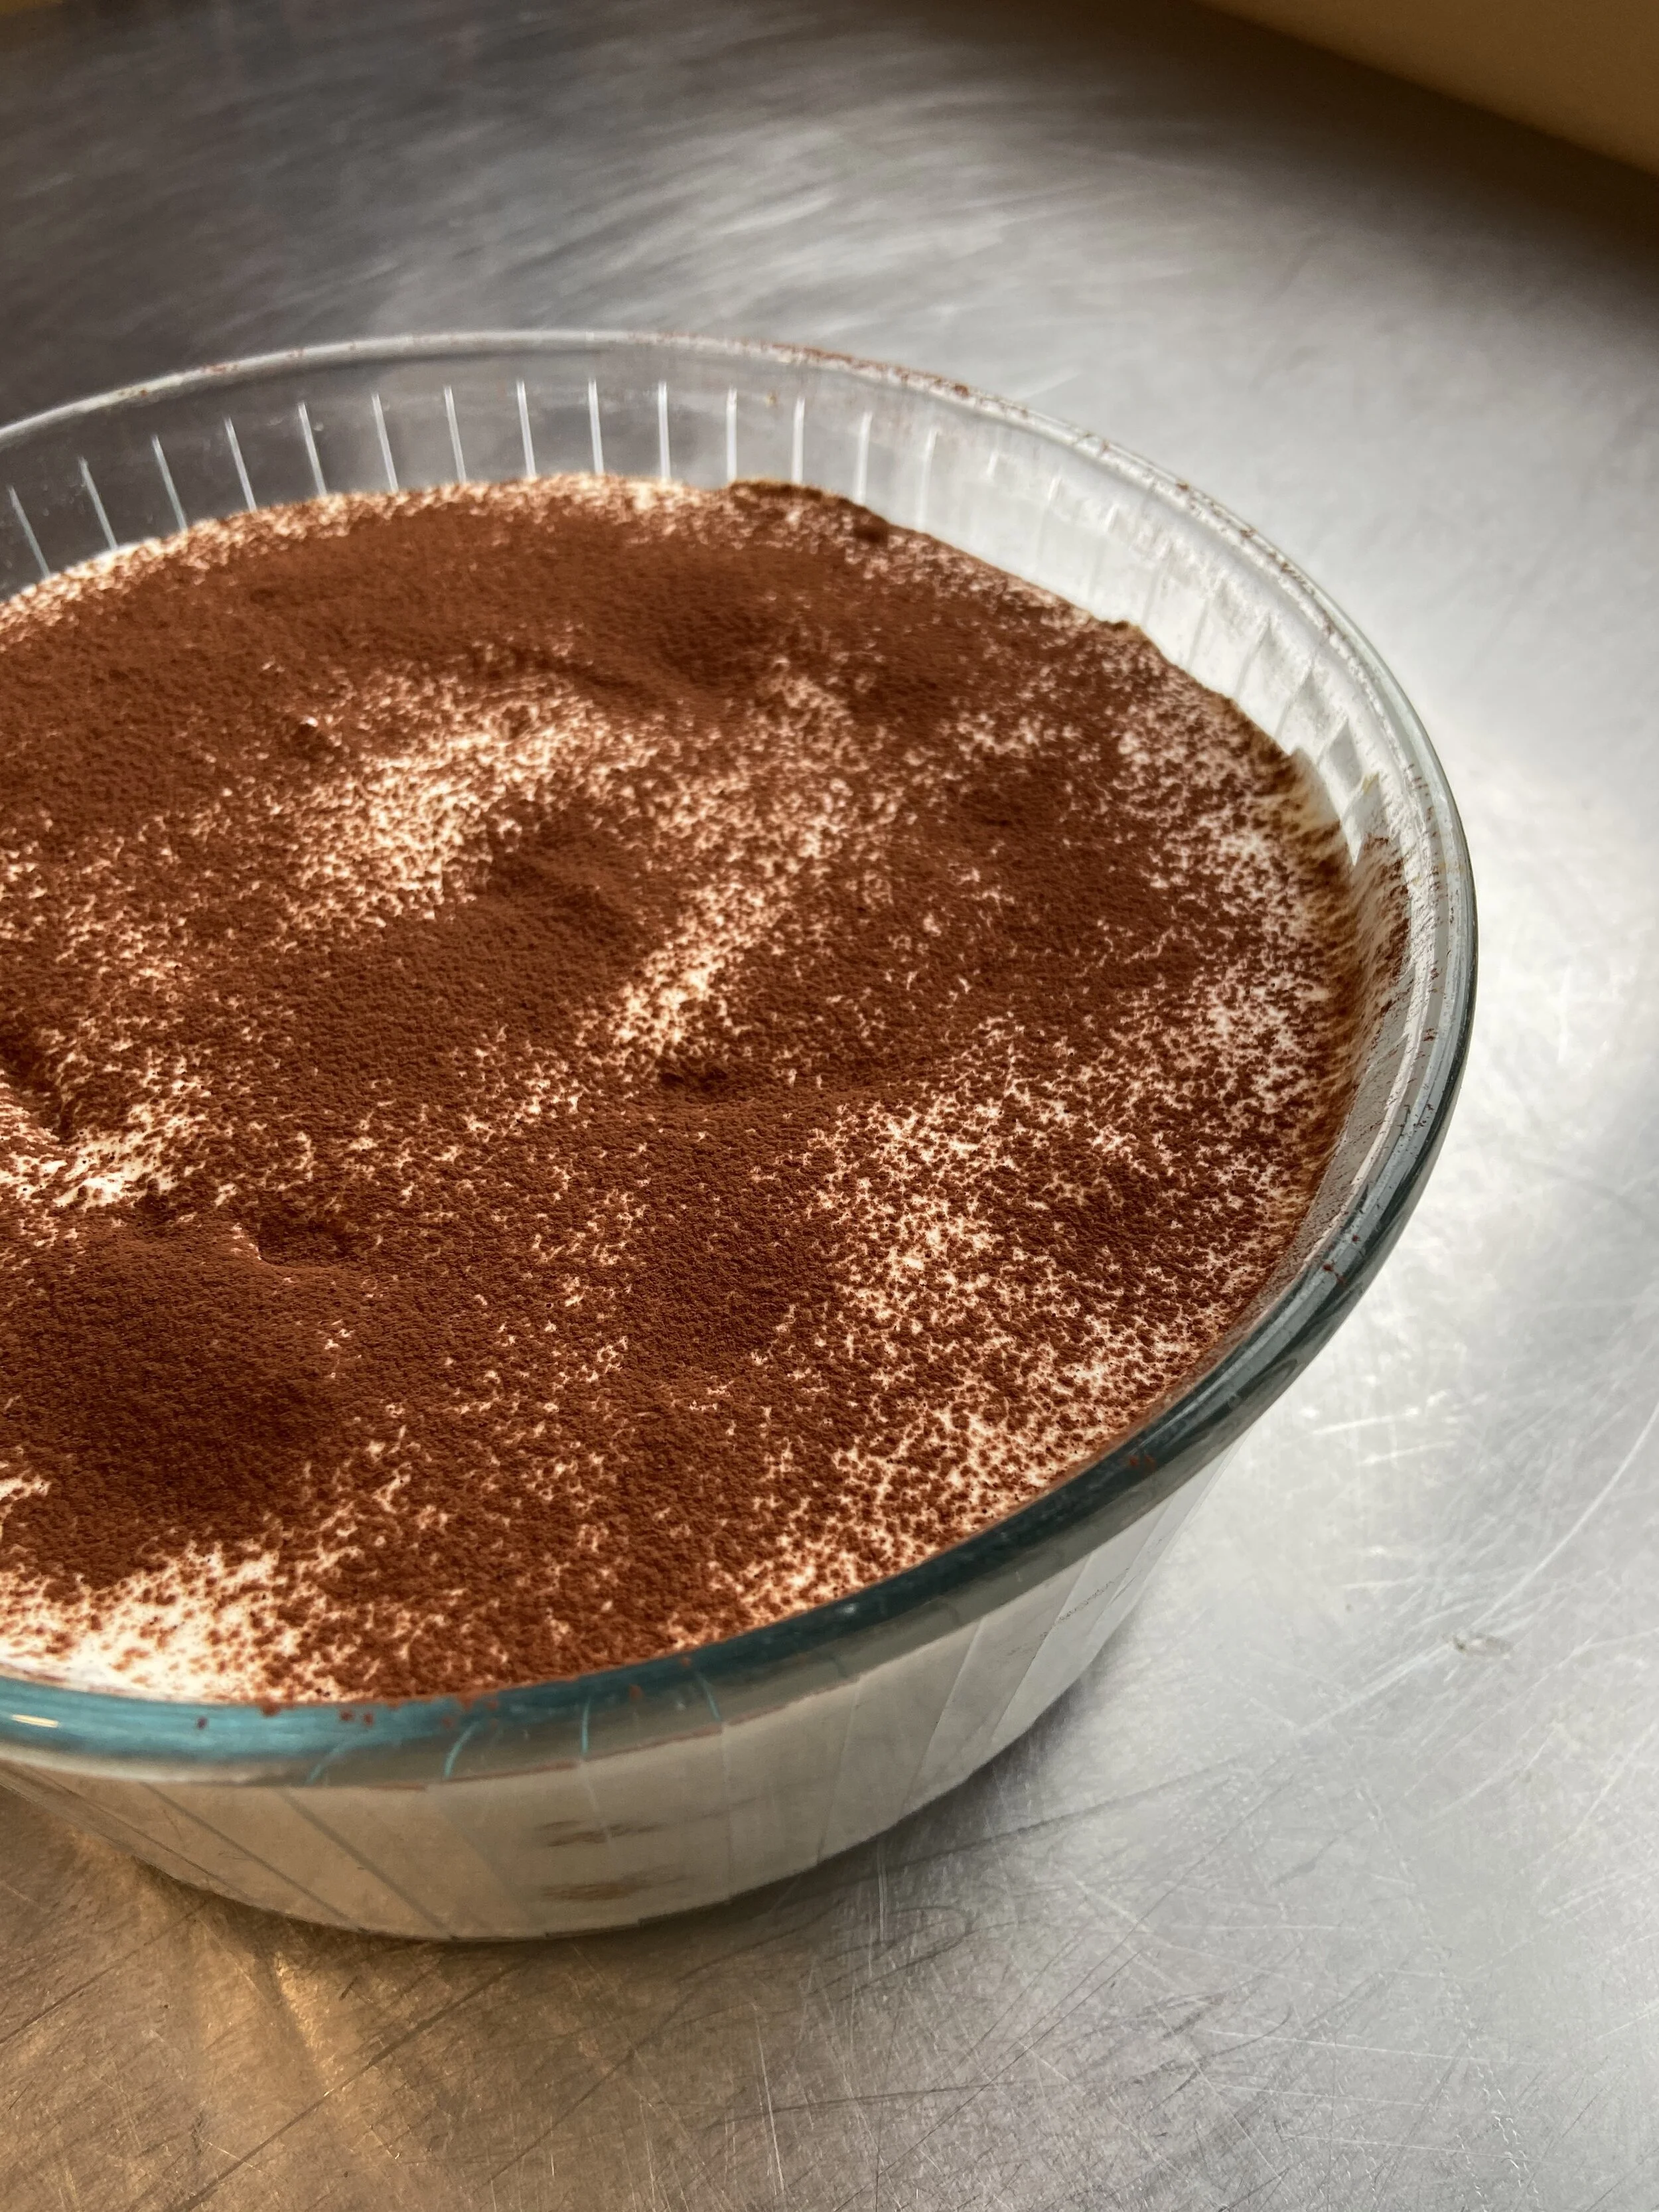
This photo does not capture the deliciousness of this Tiramisu!
Tiramisu
Yield: 1 large serving dish, I believe my glass dish is about 2 litres, but use whatever pan you’ve got, the taller the container, the more layers you will get. You could also make this in a 9”x13” pan
Mascarpone Filling:
1 1/4 cup Whipping cream
4 Egg Yolks
1/2 cup Sugar
2 Tablespoons Frangelico - Traditionally this is made with Marsala wine, but I don’t have any, so use whatever liqueur you got!
pinch of Salt
1 1/4 cup Mascarpone Cheese, softened at room temperature
Ladyfinger Soaking Syrup :
2 cups of coffee
1/4 cup sugar
2 Tablespoons Frangelico (optional)
Approximately 24 ladyfingers (or one batch of the recipe we made yesterday)
Cocoa Powder - for dusting
In a shallow baking dish stir together your ladyfinger soaking syrup ingredients - coffee, sugar, Frangelico. Set this to the side.
In the bowl of your mixer (or by hand) whip the cream to soft peaks. Then leave in fridge until we are ready for it.
Get a pot with water simmering on the stove, we are going to do a water bath! Just an inch or two of water in the bottom of a large pot will be perfect.
Grab a metal bowl the will fit on top of your pot of water and in it place the egg yolks, sugar, Frangelico, and salt. Then stir them together and place it on top of the simmering water pot on the stove. The bowl should not be touching the water, we are just trying to steam the bottom of our bowl and cook the eggs so they are safe to eat.
Constantly stir your egg mixture while it is sitting on the waterbath until the eggs feel warm/hot and when you rub it between your fingers you cannot feel any grains of sugar. Then pour this mixture into the bowl of your mixer and whip on high until cool - it should be super fluffy and marshmallowy looking.
In a large bowl place your softened mascarpone cheese.
With a spatula fold in all of your egg mixture, being as gentle as you can so you don’t knock out too much air.
Now fold in about 1/3 of your whipped cream, again, being gentle!
Then fold in the rest of your cream. Now your filling is complete!
To layer your tiramisu you will start with a layer of ladyfingers. Grab one ladyfinger, dunk it into your coffee syrup on both sides and then place it into the bottom of your serving dish. Continue until you have fully covered the bottom of the pan (mine fit 8 cookies).
Now pour a layer of your mascarpone filling - my container would fit 3 layers of ladyfinger cookies, so I planned to do 3 layers of mascarpone filling, so I poured about 1/3 of the filling on top. but count up your ladyfingers in the base layer and see how many cookies you have for your baking dish and divide the filling evenly.
Continue to layer the soaked ladyfinger cookies, then the mascarpone filling until you use them all up.
Then lightly dust the top of your tiramisu with cocoa powder!
This baby is all finished now, it just needs to sit in the fridge for about 8 hours or overnight to let everything soak into each other.
Yum!
Cornbread - Cake you can eat for dinner!
Anyone else dreaming of the Stampede'? The weirdest 10 days of Calgary’s summer where everything becomes cowboy themed and it’s socially acceptable to wear a cowboy hat in any circumstance. Glorious! Well with cowboy themed things come chili and what goes with chili? CORNBREAD! Yee HAW! Cornbread is a super easy quick bread that you can stir together and pop into the oven while your chili is cooking, or equally as delicious made into muffins in the morning! So many options!

The corniest of breads!
Cornbread
Yield: one 8”x8” pan or a cast iron skillet
Preheat your oven to 350*F
1/2 cup Butter, melted
2/3 cup Sugar
2 Eggs
1 cup Sour Cream (can replace with 1 cup buttermilk, yogurt, or 1 cup of milk with 1 teaspoon vinegar or lemon juice)
1/2 teaspoon Baking Soda
1/2 teaspoon Salt
1 cup Flour
1 cup Cornmeal (I like Yellow cornmeal for the colour, but white will work too!)
Fun flavourings: I used 2 Tablespoons chopped cooked bacon, 1 Tablespoon chopped pickled jalapeños, and 1/2 cup grated cheddar cheese. Other delicious things you can add are whole corn kernels, caramelized onions, roasted red peppers. Or for a sweet variety, blueberries and lemon zest!
In a large bowl mix together your melted butter, sugar and eggs.
Add the sour cream, baking soda and salt. Stir to combine.
Stir in your flour and cornmeal.
Stir in any flavourings you want to add like cheese or bacon! Now pour into a greased 8”x8” baking dish.
Bake for 30-40 minutes or until its lightly golden, springs back to the touch and a toothpick inserted into it comes out clean.
Now enjoy! YAHOO!